Filters

September 2020 Canon Sony Nikon Fuji LEICA Zeiss Hasselblad all reviews
Introduction

I buy only from these approved sources. I can't vouch for ads below. |


The selection of the proper filter is actually far more important than any choice of lens or camera.
I'm big on filters. The filter has a large and real effect on your image. Lens brand or sharpness does not.
Yes, you need filters even with your digital camera and Photoshop. Polarizers and grad filters need to be used before the lens and are not well, if at all, simulatable electronically. Digital cameras are excused from most of the color conversion filters, since you dial these in as white balance settings. I still use a mild warming filter (81A) on all my digital cameras since I prefer the look I get, even with the WB adjusted warm.
The more you learn about photography the more you'll also learn that artificial filters and manipulation are required to make a natural looking image. Ansel Adams realized that human perception and the photographic processes are quite different. Therefore one needs to use a lot of filtration, manipulation and burning and dodging to compensate for the human eye and brain's image processing to create an image on paper that looks natural. (You can read this in his books.) This is why most snapshots don't look like the original scene. Artificial processes and image manipulation are needed to make a photograph look natural.
Armchair photographers like to play a stupid game that prohibits anything creative and requires they just play forensic photographers blindly Xeroxing nature without filters. I only judge people on the final image, not the process. Sadly these folks get images that are both dull and unnatural.
I'm not trying to reproduce nature. I encourage people to be creative. I personally use any sort of artificial anything I can to create the look I want. I'm expressing my imagination, not trying to duplicate reality.
That said, the best images come when nature is at her best, and at those times she needs no enhancement. The good images I show on this website are mostly made without filters. I usually use filters when the light is not perfect to pump it up. Photos made during epic light are much better than those made under lesser light with filters attempting to compensate.
When the light is bad I try to salvage things with filters. These are the photos that usually make it to the trash. Yes, they are much better than the unfiltered photos made under those conditions, but no, they are not the more spectacular images I actually show people.
Michael Fatali has nothing to worry about. Filters and Photoshop still can't replace being in the right place at the right time.
Many ask if I use filters to get the great colors you see in my galleries. Usually I don't. I use filters to try to make good light out of bad light, and the results are better than without filters, but not as good as having good light to begin with.
I also make a point of seeking out wild colors, using Fuji Velvia slide film to capture the wildness, and then make sure that I'm in the right place at the right time. It sounds simple, but few people do it.
If you shoot print film you just can't get these vivid colors on paper. Heck, try hitting the PRINT button on your browser (illegal for my copyrighted site) and note how vivid colors on your screen fade on paper.
Filters for Digital Cameras
You still need grad neutral density and polarizers, same as with film explained in paragraphs below. These effects cannot be duplicated electronically. nik multimedia's color efx pro is the best way to simulate these looks if you forgot to use the filter when you made the shot.
You may skip the color conversion filters like 80A, FLD and 85C, since you get these by adjusting the camera's white balance. This is an advantage of digital, since you don't lose the stop or two of light that these filters absorb. Since you are often in dim light when using these filters this is a huge help!
You also can replace mild, fine tuning warming and cooling filters like my favorite 81A by fine tuning the white balance adjustment. Personally I still use an 81A filter all the time on my digital camera lenses so I can swap these to my film cameras without having to twiddle with filters. Otherwise just adjust the fine tunes of your WB presets to get this. Not all cameras can adjust the presets, and now you see why this is so important.
Black-and-White with Digital Cameras
Shoot your B/W images in color and then use Photoshop's channel mixer to convert to B/W. This allows you to choose the exact effect of using a colored filter in front of the lens after you've made the shot. This has many advantages:
1.) You can get any and all possible filter results with only one image.
2.) You can see what you're doing when choosing filter effects much better than while you're out shooting.
3.) You also have a color image for free!
4.) This is the serious one: you can use layers in Photoshop to apply different filters to different parts of the image. The only way to have gotten that with film was to either a.) use a filter taped together like a mosaic in front of the lens (not practical when you realize you also have to mosaic ND filters with them to compensate the different colors) or b.) composite print from several different negatives, again not exactly convenient.
5.) There is no advantage to using a colored filter over the lens of a digital camera when shooting because:
a.) The final images will still be colored. You still have to load them into Photoshop to make then black and white instead of black and red.
b.) It's easier to compose due to the brighter finder.
c.) There's no quality advantage: all digital cameras use color sensors anyway. Actually all color sensors are B/W sensors with RGB filters permanently painted on top of alternating pixels. Kodak made a very special B/W DSLR some years back without the RGB filter atop the sensor, and thus it did give the advantage of higher resolution and speed and you did have to use a color filter in front of the lens. Otherwise there are no B/W digital cameras common today.
6.) The Canon 20D allows you to select color filter effects in camera, which is very handy if you only want B/W. It electronically applies the equivalent of a colored filter over the lens and converts to B/W in-camera. If you intend to spend time editing later you're still better off shooting in color and converting later due to #5 above. The 20D feature retains advantages # 2 and 5 and negates advantages # 1, 3, 4 above.
Filters for Color Film
For color film I use an 81A (Nikon A2 or B+W KR2) filter almost all the time. It warms up the colors just a little bit and gives the look I love.
If the light is very cool or I want a much warmer effect I use a very warm 85C (B+W KR9 or European A9). This filter is almost as strong as the 85A (Nikon A12 or B+W KR12) daylight-to-tungsten conversion filter. I use the 85C a lot to give very warm images. I used it here to get a much warmer effect.
I use a Tiffen 812 if I'm under a tree or otherwise want to trim out a little green (same as adding magenta), in addition to warming a little more than the 81A.
I carry a polarizer, but rarely use it. Polarizers were popular back when people still shot Kodak color film because they could help try to get the colors to saturate on the Kodak films. Now that most people shoot vivid Fuji Velvia the polarizer isn't needed just to get the colors to look the way they should. In fact, a polarizer can turn the sky a yucky black with modern Fuji film. Polarizers are often overkill on color landscapes with modern film.
There are at least two kinds of polarizers. The conventional kind is now called a linear polarizer. It works great with all rangefinder cameras, view cameras and most manual focus cameras. You don't need to know, but they are called "linear" because the light waves coming out the back of them vibrate in one plane in a linear fashion.
Most autofocus cameras use polarization tricks as part of the autofocus system. Therefore if you use a regular linear polarizer you may mess up your focusing and metering. Because of this a new kind of polarizing filter was developed, called a circular polarizer, that eliminates these problems. No, these names have nothing to do with the shape of the filter! Circular polarizers use a trick (a quarter wave retardation plate if you must know) that makes the light waves coming out of the back of the filter spin around in a way called "circular polarization." This means that the light coming out the back of a circular polarizer does not appear polarized to the camera, and therefore it won't confuse anything. Yes, the effect of the two filters is the same on your pictures. The circular polarizer costs more and may be used anyplace you'd use a linear polarizer. You can test your filter by looking through another POL filter (or POL sunglasses) through the back of the filter in question. Rotate the filter in question. If it gets darker and lighter as rotated then it's not circularly polarized. It should always look the same. Turn the filter in question around and look through the front of it as you rotate. It will now go dark and light, confirming that you're running the test correctly.
"Warm" polarizers are simply polarizers with a built-in 81A warming filter. This is because many of us would use both filters at the same time, and when you stack them sometimes you would cut off the edges of the picture from looking through the stack of filters. Also many polarizing filters, even the most exotic and expensive B+Ws, often alter the color balance towards cooler blue, and thus the warming ones often wind up being neutral. I always hand-pick my polarizers for neutrality. I found the cheap off-the-rack linear Tiffens here and the very expensive Nikons here are the best. I found the B+Ws not good. Also the Hoya circular polarizer I have is quite good. Poke around that website to find the sizes you need.
I carry a Tiffen 0.6 graduated neutral density ("Two Stop ND Grad") in a regular circular screw-in mount. "0.6" is the scientific term (D/log10) for "two stops." You can get it here. (Again, poke around that site to find the size you need.) I have no idea why we call them "graduated" filters, as if they have been granted an academic degree, instead of "gradiated" or "gradiented," which would imply that there is a gradient involved as indeed there is. These are clear glass with one half colored a dark gray and a smooth transitional gradient between the two areas. I only use these only in cases of extreme brightness difference between the sky and ground. This also is a filter that destroys your image if used when it shouldn't be. Photo author Tim Fitzharris and sometimes Galen Rowell use a little too much of these filters for my taste because they turn the sky and mountain tops unnaturally dark. I prefer using a weaker grad filter. I find the square filter systems like the Cokin and Singh-ray too bothersome. Avoid the square systems for rangefinder cameras: they cover up parts of the viewfinder and rangefinder windows, and even worse, one cannot view through the lens anyway to take advantage of the additional flexibility of the square systems on a rangefinder camera. The reason for the one-stop filter factor in the tables below for the two-stop grad for use with rangefinder cameras is because the average factor through the whole filter is one stop (no stops at the top and two at the bottom).
I also carry a purple FL-W or FL-D florescent conversion filter. Not only does this try to correct the nasty green cast of florescent lights, but more often I use it to turn an otherwise gray sunset an exciting violet. The photos on my site are of the good sunsets and I didn't use this filter for them. A magenta color conversion filter (CC05M through CC50M) filter also can add a nice magenta to after sunset photos.
Last and least I carry a deep blue 80A filter sometimes to try to remove excessive orange cast from photos made under ordinary household tungsten light on my beloved Velvia. It works poorly: I get a nasty slight green cast. This is God punishing me for photographing with a vivid film like Velvia under ordinary home lighting as opposed to color balanced studio quartz lights. I usually just take off my standard A2 filter and shoot nude under home lighting.
With a digital camera you can do all the warming and cooling and fluorescent conversion with the white balance controls. Therefore the only filters I use with my digital camera are a polarizer and a graduated ND.
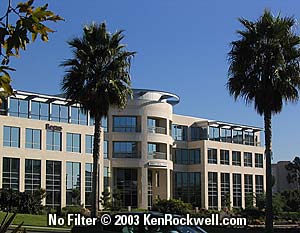
The Blue-Yellow Polarizer
Wow! I've always been curious and finally got one of these in December 2003. I got this one here for a whole $34. It's a Cokin P size I hold over whatever camera I'm using. It looks like a huge winner for improving yucky light. Knowing me I may start using it for everything. It changes things that are polarized, like the sky and reflections off stone, either to blue or yellow. Used correctly it can make the sky bluer and the ground warmer, which is exactly the artistic effect and lighting for which I pine. Just remember to rotate it until you get the look you want. Here are examples taken at mid day in boring light:
 |
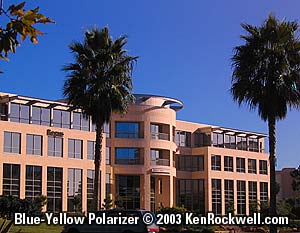 |
Pretty neat, eh? I snapped these with my digital camera. The effect is the same with film. Note the typically boring mid-day image on the left and great improvement on the right. The sky gets bluer and then building gets warmer.
The effect is fun, but it's easy to overdo. Be careful.
Hoya also makes a filter with a similar name but totally different effect in screw in 49 mm here, 52 mm here, 55 mm here and 58 mm here. As far as I can see these Hoyas are silly multiple layer filters which allow you to change the entire image from blue to yellow. These are completely different from the Cokin and don't have any different effect from place to place in the image as the Cokin does. I'd skip these Hoyas.
Filters for Black-and-White Film & LEICA MONOCHROM
Polarizers and graduated filters are used the same way for b/w.
Don't bother with warming, cooling and color conversion filters, since there are no colors on your prints!
You do need to use colored filters when taking a b/w photo outdoors so that different colors in the scene come out as different levels of light and dark on your prints. Otherwise your prints will come out pretty gray and the skies will all be a washed out cloudless white.
The standard filter you are required to use on all outdoor photos is a yellow, also called a K2, Yellow 12 or Y48. It is mandatory because most b/w films see way too much blue and ultraviolet, and render these colors much brighter than they appear to our eyes. Without a filter the blue of the sky looks as bright as the white clouds! A yellow filter makes b/w photos look just about natural.
For a stronger effect use an orange (O56) filter, or a red (R60 or 25A) filter. Red will darken a sky even more! For a really scary dark sky use a red and a polarizer at the same time.
I often use a deep green (#58) filter. It lightens trees a little and brings out contrasts inside orange sandstone rocks in the American Southwest. It also makes the sky look natural.
Indoors feel free to skip the filter, especially if you're in dim light.
As Ansel Adams points out in his books, unless you are photographing very brightly colored things like fruit or flowers, there is not much difference in the effect from one filter to another. Yes, he used over a dozen different ones for b/w, but no, there wasn't that much difference from one to another. There is a huge difference between using even a mild yellow filter and using no filter at all because all the filters (except blue which I never use) remove all the ultraviolet light to which b/w film is very sensitive and which is invisible to our eyes.
Since I print electronically today I don't even shoot B/W film for B/W prints. I shoot color film and convert in Photoshop using the Channel Mixer for the same reasons explained under Shooting B/W with Digital Cameras.
How to use Filters, Especially Polarizers and ND Grads, on Rangefinder Cameras
It's easy to use any kind of filter on rangefinder cameras.
For ordinary colored filters like the 81A, 85C or b/w filters one just sets the camera's exposure compensation dial and shoot away. (A few old rangefinder cameras like the 1970's Canonette QL-17 and Nikon L-35 AF and many modern Leicas, actually meter through the filter and require no compensation. This is rare.)
These factors come with the filter when you buy it and are all over the Internet. Here they are again:
| Color Filter | Stops |
| 81A (A2, KR2), 812, 81B, 81C | 1/3 |
| 85C | 2/3 |
| 80A | 2 |
| FL-D, FL-W | 1 |
| Color & B/W Filter | Stops |
| Polarizer | 1-2/3 |
| (different brands of polarizers will vary from 1 to 2 stops, test yours) | |
| 2-stop Graduated ND (Grad ND 0.6) | 1 |
| B/W Filter | Stops |
| Yellow (K2, Yellow 12, Y48) | 1 |
| Orange (O56) | 2 |
| Light Green (X0) | 1 |
| Medium Green (11, X1) | 2 |
| Dark Green (58) | 3 |
| Red (25A, R60) | 3 |
For filters that have different effects depending on rotation (polarizers and graduated filters) it's also easy. Take the filter off the camera, hold it up to your eye and rotate until you get the effect you want. Note the position of the filter (look for the position of the writing on the outside or an index dot), put it back over the lens and rotate it to the same position.
For graduated filters you may want to hold them over the camera's viewfinder to get a better idea of the effect. Avoid doing this with conventional linear polarizers since many rangefinder viewfinders may go black depending on the angle of rotation. If you really need to look through your viewfinder to gauge the effect then use a circular polarizer (differences explained here above.)
Remember when setting the exposure (auto or manual) with the grad filters that the +1 setting corrects the overall exposure, but of course the part of the image looking through the clear section will be one stop lighter than your meter says (without the filter) and the section exposed through the dark part will be one stop darker then your meter says when set to +1 compensation and not metering through the filter. That's the reason you use a grad: to lessen exposure of an overly bright area and lighten a very dark area.
Avoid polarizers on wide-angle lenses
You'll get weird effects with a polarizer on any ultra-wide lens. Linear and circular polarizers give the same weird results on skies.
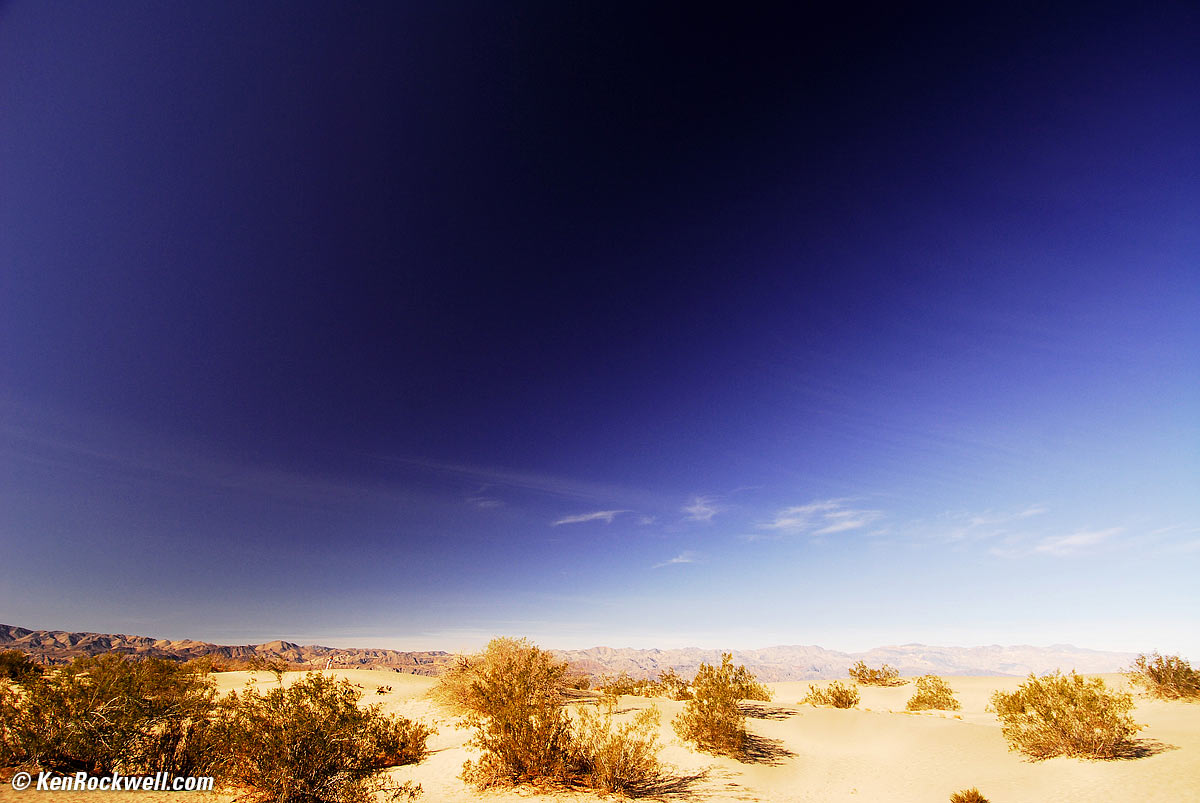
Stovepipe Dunes, Death Valley, 21 January 2006. Nikon D200, Nikon 12-24mm f/4 DX with polarizing filter at 12mm (18mm full-frame equivalent) at f/5.6 at 1/125 at Auto ISO 100. bigger.
The weird results on ultra-wide lenses are because the polarization of the sky varies from one end of the sky to the other. Polarization of the sky is maximum at 90 degrees from the sun, and none at the sun and 180 degrees from it. This is no issue with a tele lens, however with a super wide you are sweeping such a broad expanse that the polarizing effect will vary greatly across the sky. You often get a dark area in the sky, which usually looks nasty. I rarely use polarizers with ultra wide lenses.
If your polarizer is thick (as many are due to the rotating mount) you may be getting mechanical vignetting in the corners, too.
What sizes should you use?
Don't even think about using more than one filter size. It will drive you insane.
Honestly, if you are serious about photography you will eventually wind up buying the bigger filters, so if you start there you won't have to throw away all the smaller ones.
I suggest using step-up rings and bringing all your smaller lenses up to the largest common size. For Nikon and Canon that would be 77mm.
For instance, instead of using 62mm filters on your 20mm f/2.8 AF or 72mm filters on your 28mm f/1.4D AF, just step them up to 77mm and never look back. Do you really want to buy and carry an additional dozen smaller filters instead of just a couple of step up rings?
This saves a lot of fiddling when you are out shooting and trying to swap filters around.
I suggest B+W brand German step up rings because they cost about the same as the crappy Japanese aluminum ones. They don't get stuck and have nice knurling to make them easy to grasp. They cost me about $12 - 20 each here. Big deal.
If you use these stepping rings you probably won't be able to use a standard hood. I never use hoods so I don't worry. Lens coatings have made hoods obsolete for decades, except as prophylaxis (protection). Your hand provides much better shielding against the sun.
But don't filters rob sharpness?
No. This was an old-wives tale from the 1950s.
Proper filters cause no loss in sharpness.
The additional exposure required due to the loss of light can increase motion induced blurring due to longer exposure times, or accentuate a poor lens' loss of sharpness at larger apertures, or simply cause smaller depth of field at the larger aperture. This is probably what led to the old wives' tales still spouted today by junior high school photo teachers about filters lowering sharpness.
It is easy to test your filters if you are worried about a defective filter desharpening you image. Just look through it with any binocular or small telescope. The image ought to be sharp. If there is any defect in the flatness of the filter it will be obvious through the magnification of your binocular (one-eyed) or telescope. Hold the filter half over the front of the binocular; you should see a single, not double, image. If there is a problem it will be obvious through the scope.
I have seen perfectly good plastic Cokin filters, and also bad expensive glass Hoya and B&W polarizing filters. This binocular test makes clear exactly what you have and eliminates all uncertainty.
How do I determine which filter to use?
This is the most important and difficult part!
The choice of filter outdoors is different for every scene.
You have to see what the scene is, know what you want on film, and the difference between them defines the filter you need. This is the art of interpretation and is central to good photography.
If you are shooting negative color film you can forget about using colored filters as I love. Most efforts you make will be "corrected" when printed, losing all your efforts. That's why people serious about controlling color shoot slides, or have to resort to doing their own printing. All the color photos on this site are from transparencies or slides.
Many people love a polarizer to darken daytime skies into dramatic colors. This usually comes through even on print film.
For black and white you need a yellow filter outdoors. Film is much more sensitive to blue light than our eyes are, so without the yellow filter your skies all get washed out. The yellow filter is the standard required filter, taking it off results in an effect.
At night I usually skip filters. If you are shooting color indoors you will need an FL-D or FL-W (purple) filter to make florescent lights look normal instead of green, and an 80A filter if you want to make tungsten lights less orange.
Which brands are best?
I prefer B+W, Nikon and Hoya. This is because of the thin mounts of the Nikon and the great quality of Hoya at cheap prices. B+W is fantastic, and you pay accordingly.
Canon, Leitz, Pentax and most camera makers also supply filters. Camera brand filters are usually excellent, however are not available in many colors and are expensive.
A stranger told me that Nikon filters are made by Hoya. Look at a Hoya filter. They are very, very similar.
B+W makes great filters in a stupefying varieity of mounts. Sadly, they're all marked only on the inside of the ring, so you can't read their markings unless you unscrew them from your stack.
Hoya makes so many kinds of glass and coating variations I've lost track. I have a page explaining Hoya Filter Variations.
Nikon and Hoya use a circlip to hold in the glass which is much thinner than the screw-in retaining ring used by Tiffen. The circlip also reduces stress on the glass that can deform it. If you worry about the quality of glass, just remember that Hoya is the biggest glass maker on earth and supplies glass I'm told even to Leica. Although often the least expensive I find the Hoya filters first in quality.
I also haven't seen Nikon claim for about 10 years that they make all the glass in their lenses anymore. That's irrelevant. If you were a lens designer you wouldn't want to be crippled by only being able to use only the glass types that your company just happened to make.
Just be careful when you drop the Hoya and Nikon filters on concrete: they can pop out of the mount more easily than the others. When I drop mine on concrete I have been able to pop them back together.
Nikon and Hoya filters are all coated. This is important. Hoya makes many of their filters available in multicoated versions, also at a reasonable price. I love these when I can get them.
Avoid Tiffen. We use them here in Hollywood for movie making because they just happen to make the oddball sizes and colors we need. Other than that, the Tiffens today seem primitive. Tiffen can't even coat their filters because they aren't even solid glass as Hoya and Nikon are. Tiffen filters are two pieces of clear glass glued to a colored plastic center sheet. Because of this they are best for combat and dangerous duty where you will be taking hits. When hit the Tiffens deform and stay in one piece just like the safety glass of a car windshield. Solid glass filters shatter into hundreds of dangerous glass shards instead.
I use Tiffen only when I can't get the color I want from another manufacturer, as with the 812 and grad ND filters. I think Hoya has introduced a copy of the 812 under a different name. The Tiffen polarizers are also very good and more neutral than other brands I've tried.
I avoid the B+W brand graduated filters. They were plastic and expensive when I looked at them. I prefer the all-glass Tiffens for this. The Tiffens are remarkable because their neutral grads really are neutral, unlike the plastic Cokins, Hoyas and B+Ws.
I have not tried Bob Singh's Singh-Ray grads that many people love. The advantage to Singh-Ray is that they make many odd types and unique types of grads, however unless you really need something weirrd I've always loved my Tiffens.
Cokin filters are wonderful. They are inexpensive and allow you to get a huge range of filters for little cost that will work on all your lenses. If you want to play with all sorts of colored grads, this is the way to go. Playing with all sorts of different colored Cokin grads can easily give you breathtaking results that you can not get without these filters. Therefore, presuming you like these sorts of images, with $30 worth of tobacco and blue Cokin grads you can get better travel images than any camera without the grads.
Multicoated is better than single coated, which is better than uncoated, but the results are not usually visible at all.
The only time you may see a difference is if you have a bright light or the sun shining directly into the lens. In some of these cases you may get less ghosts and reflections from the filters with the better coatings. Otherwise there is no visible difference.
99.9% of the time there is no difference.
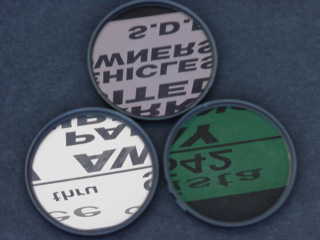
How to see what kind of coating you have: look at the reflection directly from the front of a filter against the dark. The white reflection is from an uncoated filter, the magenta reflection is single coated, and the dark green reflection is from a multi-coated filter.
Unlike coated or multicoated filters, you can clean uncoated filters in a sink with any kind of soap and water. You can do this in a filling station rest room, but not if the filters are coated.
I prefer Hoya HMC filters whenever I can get them, although the multicoated filters really show even the smallest amount of crud on them. Remember that the reason the crud stands out on a multicoated filter so much more than on an uncoated filter is because the reflections from the uncoated filter hide the crud. A dirty multicoated is still better than an uncoated filter, even though as the crud gets deeper the difference goes away.
I use 100% Methyl Alcohol, Reagent ACS grade, to clean my lenses and filters. A 500 ml bottle cost me $8 in 1991 from a laboratory supply house.
See the Glossary for more about coatings and how to see for yourself what sort of filters you have.
Most filters are uncoated. Tiffen and Cokin filters are uncoated. Hoya, B+W, Heliopan and most camera brand filters, including Nikon, are single coated. Multicoated filters are a luxury and you will see a marking bragging about it, for instance, Hoya "HMC."
Why do Nikon's polarizers cost three times what others do?
In this rare instance you actually do get a much better product for your money:
1.) They are much bigger. They are made much bigger than the thread diameter to ensure no vignetting. In other words, the 77mm polarizer is maybe 90mm around. This way wide lenses can easily see around the mounting rings because those rings are made very big along with the filter's glass. This is the main reason, and a very good one, why you pay so much.
2.) They are more efficient than regular pol filters. That means that they transmit more light, so you can get an extra half stop or so over other brands. Most polarizers have about 2 stops of light loss; the Nikon I have only needs 1-1/3 stops. (Of course your TTL meter automatically sets this). This also will help the Matrix meter perform better, requiring less compensation in bright light. (See the Matrix section for more details.)
3.) They are coated. Few POL filters are because one cannot heat the completed laminated filter assembly hot enough to deposit the coating, so one has to coat all the parts before assembly; a royal pain. That's why most (even B&W and other boutique brands) are uncoated unless you pay an ultra premium. You can see this for yourself: look straight at the reflection in the front of the filter. If it's plain white it's uncoated glass. On Nikon if the reflection's blue it's single coat, if it's a deep green it's multicoated. Simple.
4.) Look at the mechanics: the Nikon filter has a special keyed mount that only allows it to rotate about 190 degrees. This way one can mount and unmount it by grabbing the outside of the whole thing and rotating it as an assembly. Other POL filters require messing around with a tiny little knurled ridge, making it impossible to remove with gloves on. Once attached, the crafty 190 degree rotating mount lets you rotate your filter without a problem, and when you're done, just unscrew it. Every other POL I've tried from Tiffen, Hoya, B&W, Heliopan, etc. is the traditional rotating mount without any keying.
5.) They are neutral in color. I had a bitch of a time finding a POL filter that didn't alter the color slightly; even the B&W and other boutique filters had mild but nasty cyan casts. Oddly, the cheap Tiffen I bought in a drug store was more neutral than some fancy ones. As far as I know, all polarizing material for these filters is still made by 3M (as acquired from the Polaroid Corporation) and used by all filter makers by laminating. 3M makes many different kinds and grades of this material; you can find the specs here. Actually if I was smarter I would have ordered "warm" POL filters from the other makers which should have fixed the cyan casts.
Tiffen Ultra Contrast Filters
Tiffen won an Oscar (or maybe it was an Emmy) for these filters. They figured out a way to make this filter so that it did not add a foggy look or reduce resolution while adding flare. They demonstrated this using a waveform monitor display for an image of two flat dark and bright areas. Fog filters would have let the bright area leak into the dark area, looking like fog. This looks like a slope on the waveform monitor. Tiffen's ultra-con filter instead simply lightens the dark area instead of looking like the light area is leaking into it. The waveform monitor was flat for each area showing the lack of fog. I realize waveform monitors aren't known outside of professional video.
Used properly it saves the need to make a double exposure for pre-exposure for contrast reduction and control. See Ansel Adams' book "The Negative" chapter on the zone system for this technique.
Used properly the Ultra Contrast (flare adding) filter will throw just enough light into shadows too dark to capture and give them contrast that otherwise would be a black blob. Again, ignore what you read on the internet and read from Ansel Adams.
This filter is much easier to use than making a double exposure through the special flashing device Ansel used. If you have a Mamiya 6 or 7 you need these filters if you normally use pre-exposure since the Mamiyas can't make double exposures.
If you really do your homework and like to push film then these flare filters actually can increase film speed!
Sizes
Germans sometimes like to say E52 when everyone else says 52mm. The E is short for Einschraubfilter, which is German for "screw-in filter."
Less common today, if you see something like A42, it means a slip-on filter. A is short for Aufsteckfilter, or slip-on filter.
Thread Pitches
Sometimes the same diameter filter has come in different thread pitches.
For instance, 43mm and 48mm filters in the 1950s had 0.5mm thread pitches, but today usually have 0.75mm thread pitches.
If you use the wrong thread pitch, a filter or adapter ring will start to screw in, but get stuck. If you force it, you'll destroy both the filter and the lens.
Filters up to and including 40.5mm usually use 0.5mm pitch threads today.
Filters from 46mm through 82mm usually use 0.75mm pitch threads.
Filters from 86mm through 122mm usually use 1.0mm pitch threads.
Usually means not always, so you can get burned. If you're using older lenses, filters or adapter rings, be sure to check that the threads match. Older Nikon rangefinder lenses tended to use finer threads than is standard today.
Mireds
Europeans and Nikon use names like A2 or A12 to refer to the American designations of 81A or 85A. Just as often, B+W and Heliopan use R3 or KR3 where others use A3. Here's a list converting the screwy American designations to simple Amber and Blue units. The first number, like A6, is a common designation, and the parenthetical numbers are the exact conversions. Don't sweat this; filters aren't made this precisely.
Clear flashbulbs are 3800K.
Warming
American |
European |
Exposure Compensation |
81 |
A1 (A0.9) |
1/3 stop |
81A |
A2 (A1.8) |
1/3 stop |
81B |
A3 (A2.7) |
1/3 stop |
81C |
A3 (A3.5) |
1/3 stop |
81D |
A4 (A4.2) |
1/2 stop |
81EF |
A6 (A5.3) |
1/2 stop 81EF is greener, KR6 is redder. |
85C |
A8 (A8.1) |
2/3 stop |
85 and 85A |
A12 (A11.3) |
2/3 stop (Nikon A12: 1 stop) |
85B |
A13 (A13.1) |
2/3 stop |
American |
European |
turns this into 5,500 K |
turns this into 3,200 K |
81 & 81A |
CR 1.5 |
6,000 K |
3,360 K |
81B & 81C |
CR 3 |
6,600 K |
3,500 K |
81EF |
CR 6 |
8,200 K |
3,960 K |
85C |
CR 8 |
9,900 K |
4,300 K |
CR 9 (CR 6 + CR 3) |
10,900 K |
4,500 K |
|
85 and 85A |
CR 12 |
16,200 K |
5,200 K |
85B |
CR 13.1 |
19,700 K |
5,500 K |
Cooling
American |
European |
Exposure Compensation |
82 |
B1 |
1/3 stop |
82A |
B2 (B1.8) |
1/3 stop |
82B |
B3 (B3.2) |
2/3 stop |
82C |
B4 (B4.5) |
2/3 stop |
80D |
B6 (B5.6) |
2/3 stop |
80C |
B8, KB9 (B8.1) |
1 stop |
80B |
B12 (B11.2) |
1-2/3 stops (Hoya 80B: 1 stop) (Nikon B12: 1-1/6 stop) |
80A |
B12 (B13.1) |
2 stops (Hoya 80A: 1.26 stops |
American |
European |
turns this into 5,500 K |
turns this into 3,200 K |
82, 82A |
CB1.5 |
5,100 K |
3,050 K |
82B |
CB 3 |
4,700 K |
2,920 K |
80D |
CB 6 |
4,100 K |
2,685 K |
80C |
CB 8.1 |
3,800 K |
2,540 K |
80B, 80A |
CB 12 |
3,300 K |
2,300 K |
CB 18 |
2,760 K |
2,030 K |
|
CB 19 |
2,700 K |
1,990 K |
|
CB 19.5 (CB 12 + CB 6 + CB 1.5) |
2,650 K |
1,970 K |
© Ken Rockwell. All rights reserved. Tous droits réservés. Alle Rechte vorbehalten.
Help Me Help You
I support my growing family through this website, as crazy as it might seem.
The biggest help is when you use any of these links when you get anything. It costs you nothing, and is this site's, and thus my family's, biggest source of support. These places always have the best prices and service, which is why I've used them since before this website existed. I recommend them all personally.
If you find this page as helpful as a book you might have had to buy or a workshop you may have had to take, feel free to help me continue helping everyone.
If you've gotten your gear through one of my links or helped otherwise, you're family. It's great people like you who allow me to keep adding to this site full-time. Thanks!
If you haven't helped yet, please do, and consider helping me with a gift of $5.00.
As this page is copyrighted and formally registered, it is unlawful to make copies, especially in the form of printouts for personal use. If you wish to make a printout for personal use, you are granted one-time permission only if you PayPal me $5.00 per printout or part thereof. Thank you!
Thanks for reading!
Mr. & Mrs. Ken Rockwell, Ryan and Katie.