Home Search Gallery How-To Books Links Workshops About Contact
|
technical marketing terms specific to Nikon lenses explained here Glossary
of Lens Terminology
Coatings Coatings are treatments applied to the outer surfaces of lens elements to reduce reflections. They are a layer (single coating) or layers (multicoating) that are a fraction of a wavelength of light thick. Without coating most glass reflects about 7% of the light! This is important since coating eliminates ghosts, low contrast and other annoying flaws caused by light reflecting inside the lens to places it shouldn't go. Reducing reflection also increases transmittance. Increasing transmittance is critical to allowing zoom lenses to work. A window only has one piece so losing 7% of the light isn't important. A zoom lens may have a dozen or more pieces of glass ("elements"), so without coating so little light would make it through that zoom lenses would not be practical. Coating was invented and kept as a military secret by the Germans in World War two. Thus no coatings were used before the 1940s, although some people noticed that old lenses left sitting around acquired a tarnish that served a similar purpose. After the 1940's camera lenses started to be coated, and by the 1950's most were. In the 1970's multicoating became popular, which works even better than a single layer coating. It is easy to see what kind of coating you have: No coating: bright white reflections from the glass, just like a window, drinking glass or most TV sets. (Better TVs and computer monitors are coated so you see less reflections from room lighting.) Single coating: dimmer blue or sometimes amber reflections when looking straight into the glass. Multicoating; much darker reflections of many colors, especially green or dark red. Hint: Multicoated Schneider lenses are usually marked "MC"
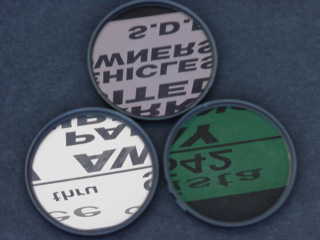
This photo shows the three types of coatings. Note the reflections in each filter. The filter on the left is an uncoated Tiffen filter. Note the bright white reflection. The top filter is a single coated Nikon filter. Note the darker blue reflection. The right filter is a multicoated Hoya HMC filter. Note the much darker green reflection.
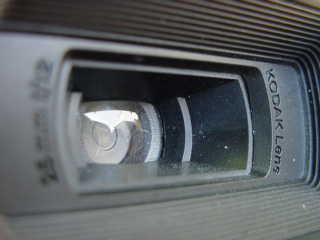
Uncoated lens typical of disposable cameras. Note the white reflection.
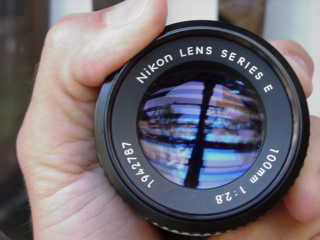
Single coated lens typical of simple cameras today and most lenses from 1950s-1970s. Note the typical blue and amber colors.
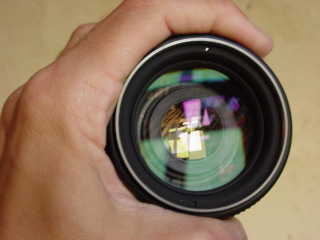
Modern multicoated lens. Note the typical green and magenta colors. Distortion Ideally straight lines would stay straight in a photograph. In reality they often curve a tiny bit in or out when they run along the sides of an image. If they curve out from the center of the image they are called "barrel" distortion, as these lines would mimic the shape of a wooden barrel. If they curve inwards, this is referred to as "pincushion" distortion, since the shape mimics a pincushion or pillow as seen from above. Most zooms have problems with this. Just find a straight line (like the horizon of the ocean) and line it up along the top or bottom of your viewfinder. Zoom in and out, keeping the line referenced along the edge of your finder, and oh-my-God, it will change its shape very slightly as you zoom. Most zooms have barrel distortion at their shorter end, and pincushion distortion at their longer end. They usually have a point in the middle where they are pretty free from distortion. It's good to know where this point is so you can use it when photographing something that has straight lines that you want to remain straight. Most view camera and rangefinder lenses have little to no distortion. You easily can check the view camera lenses on your etched lines of your ground glass. Most wide angle SLR lenses have some barrel distortion. Ignore the idiots who try to get you to believe that that's just "the curve of the Earth." Since you can change the direction of that curve by changing the position in your image it's obviously not a constant feature of our planet. Don't make a final determination of distortion based on what you see through your viewfinder, since most viewfinders have some distortion. For instance, the Nikon F2 has a distortion free finder, but most other Nikon cameras have pincushion distortion deliberately designed into their finders to compensate for the barrel distortion typical in the 50mm f/1.4 lens and almost all of Nikon's wide angle fixed-focal-length lenses. You need to shoot film and look at it directly if you are looking for distortion. Don't try to project your slides to measure this, either, since projector lenses can have distortion, too. Some of the newer AF cameras like the F100 have more complex distortion signatures in their viewfinders making any TTL guestimate of distortion difficult. I measure distortion by photographing straight lines, be they a wall or the horizon, and then laying a straight edge over my chrome on a light table. I then drop a big loupe over all this, and if I can't see any variation from straight on the film, pronounce that as no distortion. Of course instruments could measure levels so low I can't see them, but as an artist if I can't see it I don't care. Kodak carousel zoom lenses are popular and awful. You can see the distortion vary as you zoom from one end to the other. Distortion is a complex phenomenon. It cannot be specified with a single number, although most reviews you read do just that. It varies with: 1.)
Distance to subject (reproduction ratio) To specify this clearly requires a series of graphs of distortion vs. angle or distance from the center of the image. On each graph one needs several lines corresponding to different reproduction ratios, and if you have a zoom you need different graphs for each focal length. Therefore when you see Mamiya quoting the distortion of their superb 43mm f/4.5 lens for the Mamiya 7 as "0.04%" you need to know that what they aren't telling you is that that's the figure measured at the edge of the frame, and that they forgot to let you know that the distortion at other parts of the frame can be 0.2% or more. In practice none of this is visible (I start to see distortion at about 1%), so don't worry too much. Just know that if you want to see well specified distortion you can get data from Schneider. Schneider's website has great distortion curves for their lenses, and they can publish them because their lenses don't have enough to worry about. Simple distortion can usually be fixed in Photoshop with the "spherize " and "pinch" filters. Just increase the canvas size to about twice the size of your image and experiment. More complex, higher order distortions require fancier filters to correct. Light Falloff Most lenses, due to mechanical vignetting, lose some illumination towards the sides of the image at full aperture. This goes away when the lens is stopped down a stop or two. A tradeoff is made in practical photographic lenses to save size and cost by not designing each and every element to as large a diameter as would be required for the entire full aperture to be visible from all angles as seen by the lens. If lenses were designed this way they would be twice as big as they are today, all for an almost invisible performance improvement at the full aperture which usually isn't used anyway. You can check for this visually. Just look through the front of your lens at full aperture from as far away as you can get. Look straight into it and you'll see a round aperture through which you can see the focusing screen. Now rotate the camera a bit to look through the lens to the sides of the focusing screen. Instead of seeing a round aperture, you'll most often see a smaller hole cut off in part by the edges of the lens elements. The smaller this aperture gets, the more falloff you get. If you stop down your lens a stop or two and repeat the process you'll not see any part of the smaller aperture cut off. In this case you don't have light falloff. This effect is most visible with long lenses because you are more likely to have 1.) a solid background and 2.) be using them at full aperture in good light. Ideally the falloff is gradual and not too noticeable. On some lenses it starts abruptly and becomes more visible as one approaches the edges. The Nikon 80-200 f/2.8 AF-S zoom is pretty bad at this. In wide angle lenses designed for view cameras and rangefinder cameras there usually is light falloff at all apertures. This is because, unlike SLR retrofocus lenses, these lenses are not designed to compensate for 1.) the effect of the longer distance the light needs to travel from the rear nodal point of the lens to the far edges of the film, and 2.) the fact that at the far edges of the film that the light is hitting the film at an angle other than 90 degrees. In these cases one may use a center filter that is darker in the center than at the edges to compensate. Center filters cost about $300 and don't have much visible effect unless you enjoy photographing evenly lit walls. The advantage to these lenses is that they do not have any of the distortion or loss of sharpness in the corners that retrofocus lenses may have. Their design gives you sharpness and freedom from distortion in trade for some light falloff. You can correct falloff with a filter or in printing, but you can't correct distortion or lack of sharpness. Vignetting Vignetting is a darkening of the corners. Wide angle lenses on view cameras tend to do this wile other lenses don't. It's not a bad thing. Artists like Ansel Adams often deliberatley add this in printing to keep your eyes from wandering off the image. Like everything else in photography, try it yourself on film and see if you are concerned about a particular lens and filter combination. In addition to film tests, another way is to take the film out of the camera, set the shutter on BULB and look through each end of the lens. You ought not see the open aperture of the lens cut off by the filter as you peer through it at large angles. Shooting some film is still a better way. Flare and Ghosts These are the various blobs and things you see in an image when the sun or other brilliant source of light is in the image. All lenses handle this very differently. Diaphragm Blades 3: Poor.
Seen only on some motion picture lenses and old electric eye cameras. Turns of the AF Screw (Nikon)
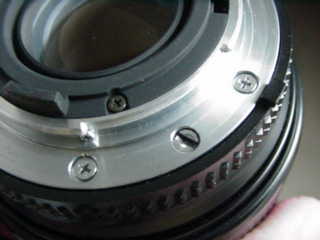
Figure 1.) The slotted screw head is really the rotational coupling for the camera body's AF motor. Most AF Nikkors, except the AF-I and AF-S lenses, focus with a motor in the camera body. The camera body motor couples to the lens with what looks like slotted, retractable slotted screwdriver that pokes out of the camera's lens flange into a slotted recess in the lens mount. The camera's coupling retracts when you press the lens release button, and stays retracted if you mount a manual focus lens. This couples to the mechanics inside the AF lens. The lens focuses as this rotates. On most AF lenses you can see this rotate as you turn the manual focus ring with the lens off the camera. One may estimate AF speed by observing how far this coupling needs to turn to move the lens' focus ring a certain amount. It's sort of like the gearing on a bicycle: some lenses move the focus ring a lot when this coupling rotates, other lenses require a lot more turns to get the focus ring to turn the same amount. I standardize this test by seeing how far the focus ring moves in one complete turn (that's two half-turns) of this screw. For the same focal length, the closer a lens focuses in one turn of this screw, the faster it will tend to autofocus. For instance, the non-D 80-200/2.8 AF lenses only focused to 60 feet in one turn, the first 70-210mm AF lens only got to 40 feet with one turn; the current 70-210D gets to 15 feet in that same turn. Remember, you aren't turning this screw. The camera does. If you want to check for this yourself, 1.) take the lens off the camera, 2.) focus the lens at infinity, 3.) look at the screw while turning the manual focus ring and turn that ring until the screw has rotated a full turn, 4.) look at the focus scale and see where it is. On lenses that have a rotating AF/MF switch you instead will need to turn this screw yourself: 1.) take the lens off the camera, 2.) put the lens in the manual mode and focus it to infinity, 3.) take your Swiss Army knife and rotate the screw one full turn, 4.) Look at the scale and see where it stops. Color Rendition Spherical Aberration Focus Shift Longitudinal Spherical Aberration (Coma) Chromatic Aberrations This is when all colors don't come to focus in exactly the same place. It has nothing to do with color rendition, purity or saturation, which are related to color transmission and contrast. When you have chromatic aberration you lose sharpness and may see various colors fringes on bright edges. See a great article by Zeiss explaining the different ways different lens design tackle this here. These explanations are about the different ways one corrects color fringing, which is completely different from color rendition (transmission) Chromatic aberration is classified by which colors are affected (primary or secondary) and in what direction (axial or lateral). Thus you talk about a kind of chromatic aberration by combining the two terms, for instance,"secondary lateral chromatic aberration." Lateral Chromatic Aberrations are colored fringes seen on sharp, contrasty edges in the sides and corners of pictures. It's something you'll see if you enjoy photographing white lawn furniture against dark backgrounds. This happens because lens' magnifications can vary very slightly with different colors. This means the image can be very slightly different sizes at different colors. When this happens, the colors don't line up perfectly and you'll see colored fringes towards the sides. This is the aberration most often seen today. It doesn't vary with aperture, although a lack of sharpness will hide it. Axial or Longitudinal Chromatic Aberration means colors focus nearer or farther away. The problem is they come to focus at different places along the lens axis. You see this manifested as different colors coming in and out of focus at different places. This was last seen in photography with fast telephoto lenses and was cured with Nikon's ED glass. Primary Chromatic Aberration is where the far ends of the spectrum, red and blue, focus differently. Modern lenses have this completely corrected. This is when light is spread out exactly as a prism does. Photographic lenses are corrected so the red and blue ends of the spectrum focus in the same place. That's the easier part. Secondary Chromatic Aberration is what's left when primary chromatic aberration is corrected. Now the middle of the spectrum, green, is doing different things than the two ends, red and blue. This has never been completely corrected, with the exception of true apochromatic lenses. The lenses sold to photographers for less than a month's salary aren't really apochromatic. Nikon's ED glass likewise was invented to minimize this. Secondary chromatic aberration manifests itself as green/magenta artifacts. The only chromatic aberration seen commonly today is secondary lateral chromatic aberration. Lay people call this "purple fringing" for the green/magenta artifacts seen at the corners of images on bright, contrasty things. Canon has a great write up here. Diffraction |