Home New Search Gallery How-To Books Links Workshops About Contact
Graduated Neutral-Density Filters (Grads)
© 2009 KenRockwell.com. All rights reserved.
Summary Intro Specs Performance Usage Recommendations

I personally buy from Adorama, Amazon, Ritz, B&H, Calumet and J&R. I can't vouch for ads below.
|


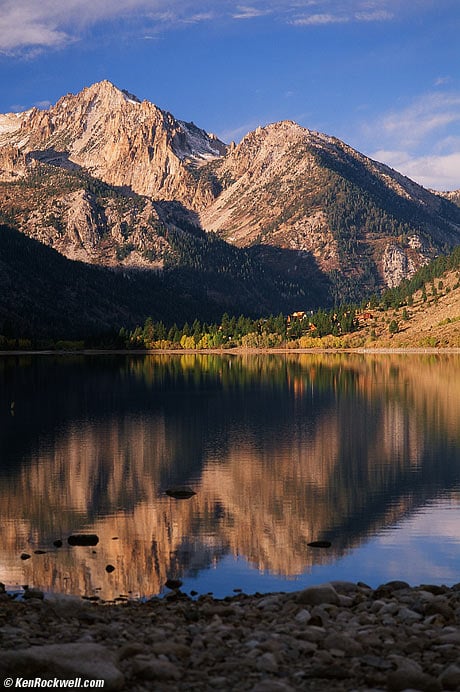
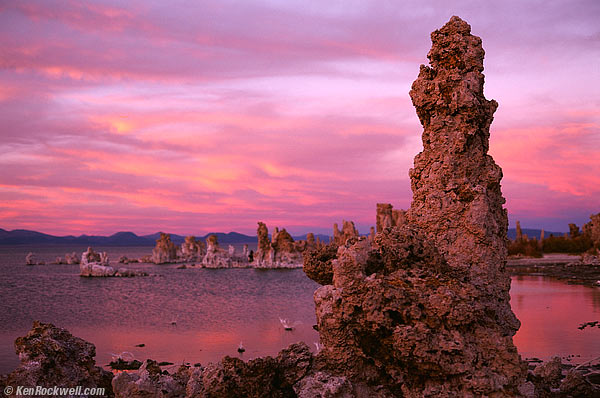
Twin Lakes, 8AM, 19 October 2008. Contax G2, Tiffen grad, Zeiss 90mm, Velvia 50. It helps me keep adding to this site when you use these links to Adorama, Amazon, B&H, Calumet, Ritz, J&R and eBay to get your goodies. Thanks! Ken.
April 2009 How to Make Great Photos
Tiffen Multicoated HT Grad Filters
Summary top
Intro Specs Performance Usage Recommendations
Used for: One of the most important filters for digital and film shooting, grads are used to tame harsh or contrasty light. Grads add shadow detail and keep color in skies at sunset which otherwise might get too bright and wash-out to white.
Not for: Everyday use or use during the day. Using a grad for a normal outdoor scene, even if the sky is bright, will make the sky look evil.
Our eyes and brains are very smart. They can see improper grad use, just as they automatically adjust themselves to see the scenes for which grads are required.
Our eyes have the ability to alter their sensitivity by region. If you're indoors and look out a window, you can see everything because our eyes and brain drop the sensitivity to the window, and keep the sensitivity to the inside of the room high. If you close your eyes, you'll see the mask created by your eye which varies the sensitivity by area.
Grads are only used in extreme conditions where our eyes have to do this, like looking into a sunset. Normally high contrast doesn't warrant a grad. If the range from light to dark is so broad that our eyes have to compensate, then the grad attempts to do what our eyes would do, so that our cameras can capture the scene. Cameras can't vary their ISO from point-to-point as our eyes can.
Raw capture still needs grad filters. Even though you might be able to grab an extra stop or two in raw, using the grad lets the camera operate within its optimum dynamic range, lets you see what you're doing as you do it, and saves all the post-processing hassles later.
HDR is a pain, and looks awful. Just use a grad filter, or turn on your flash, for much better results much easier.
Example
Roll your mouse over to see before and after.
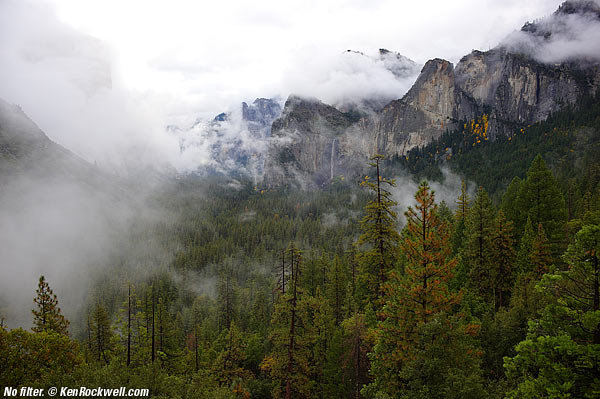
Tunnel View, Yosemite Valley, 19 October 2009, 4:07 PM.
I shot this with a rangefinder camera, the LEICA M9, which is just as easy as using an SLR.
You should be able to see all the detail returning to the blown-out sky, and detail filling in the dark trees in the lower right.
Introduction top
Summary Intro Specs Performance
Grad filters have been a pro secret for ages.
Grads are used to control light that gets too bright in one part of the picture, like the sky.
Grads are important. Even with digital, I won't leave home without both a grad and a polarizing filter.
Grads give better results than screwing with HDR, and give you those results immediately in-camera. In fact, you can see what you're doing through your camera's viewfinder as you move the filter around!
A grad filter is a clear filter that becomes gray on the top. Your car windshield probably does the same thing at the top, although this was more popular on cars in years past.
"Grad" is short for graduated neutral-density filter, which is also known as a gradated neutral-density filter. They are all the same thing: gray on top, clear on the bottom.
"Neutral Density" or "ND" is how geeks say "gray."
Grads work because you rotate them so the gray part covers the part of the image you want to darken.
Grads also allow you to lighten parts of the image, like the foreground above. Grads lighten dark parts of the image because you use more overall exposure when the overly bright parts are dimmed through the gray part of the filter.
Grads work with every camera, even point-and-shoots. Here's a snap made with my Canon SD880 pocket camera:
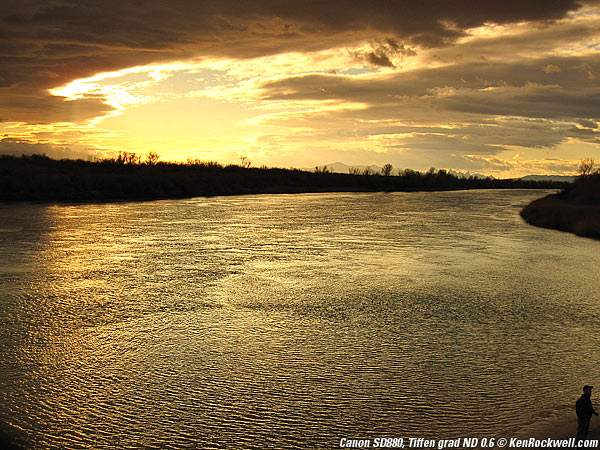
The River, Needles, California, Monday, February 9th, 2009, 7:25AM. Shot with a Canon SD880 point-and-shoot and a Tiffen 0.6 ND grad. Roll your mouse over to see as shot with no filter.
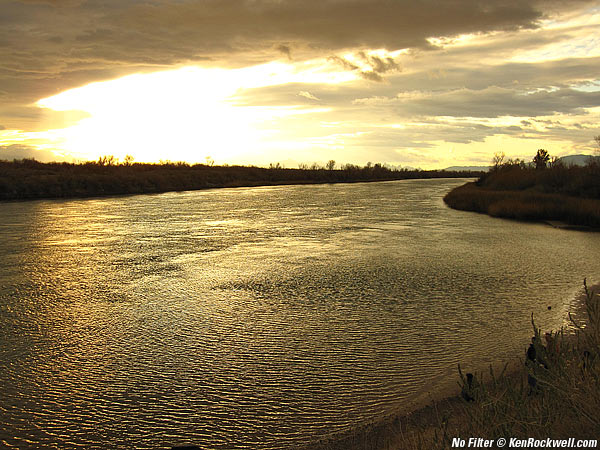
Same shot, no filter (for you iPhone people without mice).
Specifications top
Summary Intro Specs Performance Usage Recommendations
Grad filters are filters with a dark section and a clear section. It's that simple.
Grads are such important filters that they come in a zillion variations, which is too bad because this scares people away.
I only use one kind, but let me explain the various types you'll find out there.
Coatings top
Most grads are uncoated.
Coated grads, like the newest Tiffens, are nice because they are far less likely to cause problems with reflections between your lens and the grad filter. Remember, since you're using these in harsh, unfavorable light, you're far more likely to have problems with reflections.
Multicoated filters are usually delicate and need a microfiber cloth to clean, but since the only multicoated grads are the Tiffens which claim a magic coating, they are probably resistant to damage and easy to clean. I haven't gotten mine dirty yet, and when I do, I'm sure the $1 cloth I keep in a ziplock in my bag will clean it.
Sizes and Mounts top
Grads come both as flat, rectangular sheets that are used in dedicated holders, as well as in ordinary screw-in rotating mounts just like polarizers.
Rectangular Filters
Geeks love the square and rectangular filters because they love to move them up and down.
I hate these, because by the time I get the filter and filter holder put together, my light has changed.
Worse, when you use clumsy component systems, often you'll have open space between the filter and your lens. With a wide lens, the lens will see reflections off the filter through the gaps in the mount of the bright sky behind you!
This has happened to me, and it destroyed my images when I had these dopey reflections all over the top of my image. To get around this, you can try to cover the gaps, or use screw-in grads.
I don't know that TIffen's multicoated HT filters solve this, since the problem with reflections at the sides are at steep angles, where coatings are far less efficient than usual. Even with Tiffen's HT filters, I'd still cover any gaps in my mount.
Screw-In Grad Filters
I use these. They screw in and rotate just like a polarizer.
No, you can't adjust them up and down, but you don't need to. Since the filters are usually smoothly graduated from clear to gray, their exact vertical position doesn't matter.
The angle at which you place them matters, and that's easy to do with the screw-in filters.
Strengths (Densities) top
The clear part is always clear, but the gray parts come in various darknesses (densities).
These are expressed in stops, or just as often, in logarithmic (base-10) geek-speak.
Here's how to make sense of them:
Numerical (log) Designation |
Stops |
Used for |
0.3 |
1 |
Weak filter, rarely seen. Why bother? |
0.6 |
2 |
Everything for which you use a grad. |
0.9 |
3 |
Very extreme cases. |
1.2 |
4 |
Rarely, if ever. |
1.5 |
5 |
I use a two-stop (ND 0.6) grad. I have a three-stop someplace, but never use it.
I don't bother with anything else.
Transitions (gradation or step type) top
Just to keep things confusing, the way in which the filter transitions from clear to gray comes in several types.
Hard Edge
These have a sharp cut between light and dark.
Soft Edge
I use these.
They have a gradual change from light to dark.
Reverse Grad
These go sharply from clear to dark, and then smoothly back to less dark!
These are used for sunsets, where you want clear for the foreground, very dark right at the sun at the horizon, and then less dark as the sky goes up above the sun.
Curved
Got mountains? Then get a custom grad where the transition is curved to fit the landscape!
Colors top
You'd think gray (neutral) would be enough — but no!
You can buy grads in any color you want.
Tobacco grads are popular in travel photography. They turn everything orange-brown. Think I'm nuts? Look at ads for resorts, and half the time, their skies are brown!
Grads come blue, coral, sepia, CC10M, and the list goes on. Each is clear on the bottom and colored on the top.
Sunset grads are orange on the bottom, and deeper orange on the top.
Tiffen does its best to confuse us because their neutral grads are part of their "Color Grad" series, so Tiffen's neutral gray ND grads are sold as "Color Grad ND."
Have fun!
What I Carry top
You can go crazy if you worry about all this.
All I carry is a gray (neutral) two-stop (ND0.6) grad in a screw-in mount to fit whatever lens I have, for instance, a regular Regular Tiffen 77mm ND 0.6 Grad (about $60) or a Multicoated Tiffen 77mm ND 0.6 Grad (about $140) would be all most people ever need.
Performance top
Summary Intro Specs Performance Usage Recommendations
Unlike ordinary filters, grads get weird enough that every brand is very different. Some are glass, and just as many are plastic!
Makers of plastic filters call them "resin," which is another word for plastic.
I'll cover some of the differences, and then rate the various brands.
Criteria top
Glass or Plastic?
Half the world's grad are glass, and the other half are plastic. I'll cover which are which below.
Beware plastic filters. I will suppose they are very easy to damage, and since by definition you're using them pointed into harsh light, any scratches will be highlighted!
Plastic filters are often not perfectly flat. Beware; check yours by looking through them with one side of a binocular or small telescope and any lack of flatness will be obvious.
Uncoated glass filters are very tough and easy to clean. The right tools are a $1 microfiber cloth or poisonous laboratory methyl alcohol, but if you're out in the middle of nowhere, Windex, or soap and water in a motel sink, work fine on plain glass.
Neutrality
Sad to say, many neutral grads aren't neutral.
Some brands, like Cokin, vary from sample-to-sample. Others, like Tiffen, really are neutral.
Many add a magenta tint, and others tend towards other colors.
You won't see this looking through the filter; you only see it on your LCD or on your film.
You may like these color distortions, or maybe not. In all cases, try your filter and look at the results before you go shot anything important.
Brand Ratings top
B+W's grads are plastic. I have not tried them.
Cokin's grads are French plastic.
They are very inexpensive, and if you don't mind the lack of color neutrality, a great way to try out grad filters.
I have a few, but the color shifts drove me crazy, as well as the square mounts.
Cokin's P size is universal, Tiffen also makes fantastic grads in the Cokin sizes. You can buy the Cokin mount and filters inexpensively, and then get the Tiffen filters to fit your mount if you like what you're seeing.
Tiffens are my favorite grads.
Tiffen's grads are glass, and genuinely neutral.
That's why I've used them for decades.
Tiffen has a new line of multicoated HT grads, which add multicoating to their already fantastic grads.
HiTech
HiTech's grads are plastic.
I have not tried them.
Hoya makes fantastic filters, but their grads are plastic and not particularly neutral. They only appear to come in smaller sizes, like 49mm, 52mm, 55mm and 58mm.
I'd pass on these for serious use, but since they are so inexpensive, try them if you're unsure about grads.
I see some glass Hoyas listed; I have not tried them or even knew they existed.
Lee's square grads are plastic.
I have not tried them.
Schneider's grads are coated glass.
I've got a Schneider grad on its way to me to test.
Schneider filters are sold mostly to the motion picture industry (Hollywood), and built to a quality level you'd expect for a filter that's put on the front of a $250,000 lens on a $750,000 camera in front of a cast and crew getting paid a boatload of money each day to shoot. (Tiffen also sells a lot into Hollywood, as well as to us still photographers.)
Hollywood uses square filters in elaborate matte boxes, and thus the Schneider grads are squares and rectangles.
Since the Schneiders are pro filters used in many oddball applications, I'm told that these grads can be special-ordered in screw-in sizes without much problem. Schneider is set up to make custom sizes to order, so ask if you need them.
I've not used these plastic square and rectangular filters.
People who use them love them.
Singh-Ray makes the widest selection of ND grads. You'll find a broader selection of densities and gradations of neutral filters than from any other maker.
Usage top
Summary Intro Specs Performance Usage Recommendations
When (and When Not) to Use a Grad
Grads are for use in extreme and unfavorable lighting conditions. Grads allow cameras to see a scene more naturally when the light gets very contrasty. Our eyes adjust to this, but cameras don't.
Do not use grad filters unless you have to.
Do not use grads to darken daytime skies, unless you want a deliberately somber look. Skies are supposed to be bright. If you use a grad to darken the sky under normal conditions, you wind up with a sinister, stormy look, not a better picture.
If you want to sadden an otherwise nice day, use a grad for effect, but never add a grad unless the light is truly extreme.
Grads are most often used to darken an extremely bright sky and lighten a foreground when shooting into a sunset, or when shooting landscapes where the top is in sunlight and the bottom is in deep shadow. If the shadows are open shadows, don't use a grad.
Grads are also used indoors to lighten the subject and darken a window.
Grads work extremely well when the dividing line between light and dark is straight.
Grads don't work well when this line is curved or zig-zagged.
For example, a simple sunset over the ocean is perfect for use with a grad.
If you have a mountain rising on the right, but flat horizon on the left, you'll have to rotate the grad a little clockwise, but you'll still darken more of the mountain than you'd like.
Tufa, Friday, 17 October 2008, 6:20PM. Don't use a grad on this! Contax G2, 85 warming filter, Zeiss 35mm, Velvia 50, hand-held at 1/8 second at f/2.
Grads are tough to use if you have a series of little peaks, a hoodoo or tufa sticking up. A grad will darken the top of the stone, as well as the sky. Darkening the tops of things looks stupid, so lay off the grads. In this shot, there's no reason to use a grad anyway; the light is soft.
If you can see that a grad filter was used, then it was used incorrectly. If mountain tops go dark or low-lying sections of sky get bright, you goofed. The only correct way to use a grad is when the image shows no signs of its use. The example at the top is correct; there are no tell-tale signs that a grad was used.
How to Use Grads top
SLRs top
With digital and film SLRs, just put the filter over the lens and look through your finder.
Adjust the filter until it looks best.
Rotate the filter to match the scene. If a mountain is on the left, rotate the filter so the gradation is higher on the left and follows the shape of the mountain.
Rangefinder Cameras top
Use screw-in grads.
Screw it on your lens, and rotate it so the gradation line follows the subject.
It's easy to see the gradation looking at the front of the filter. Be sure not to confuse the dark and light sections and have it rotated 180º in the wrong direction!
Through-the-lens metering compensates for the filter. With external meters see Exposure below.
View Cameras top
Use grads just as you would with an SLR.
The only hard part is computing exposure, which I cover below.
Point-and-Shoots top
Hold the grad in front of the camera and shoot.
You'll want to have it far enough away that the different parts of the filter cover different parts of the subject, but not so far away that you have problems with reflections or seeing your fingers holding the filter.
Digital compact cameras view and meter through the lens, so you can se what you'll get on the LCD as you compose.
Film point-and-shoots like the Nikon 35Ti rarely meter through-the-lens, so you'll have to fiddle a bit with experience and subtract some exposure compensation (darken or minus) since the meter is probably looking through the top (darker) part of the filter.
Exposure top
TTL Meters
With through-the-lens meters, which is every digital camera and most film cameras made since the 1970s, just shoot as you normally would. Since the grad filter is bringing the subject contrast back to more reasonable levels, your meter will work even better than without the filter!
Non-TTL and External Meters
If you're using an external meter, or your camera's meter doesn't reads through the lens, like in the Mamiya 6 and Mamiya 7, simply use a filter factor of one-half the filter's rated value.
For instance, I use 2-stop (0.6) grads. One-half of two is one, so I add one stop of exposure. I set an ISO or ASA of one-half, or dial in +1 or 2x exposure compensation. Easy!
If you're using the Zone System, the bottom of the image will be as read, the middle will be reduced half as many zones as the filter's rated value, and the top will be as many zones darker as the filter's rated value.
I used to worry about the Zone System with my 4x5, this, but now that I've had such great results so much easier with a tiny Gossen Digisix meter, I'd just use a regular light meter and add a stop for my two-stop grad.
Recommendations top
Summary Intro Specs Performance Usage Recommendations
For nature, landscape, outdoor and indoor photography, the ND Grad is a standard tool of the trade.
Get one, and use it for the few shots for which it's needed, and your results will be worlds better.
PLUG
I support my growing family through this website.
If you find this as helpful as a book you might have had to buy or a workshop you may have had to take, feel free to help me continue helping everyone.
If you've gotten your gear through one of my links or helped otherwise, you're family. It's great people like you who allow me to keep adding to this site full-time. Thanks!
If you haven't helped yet, please do, and consider helping me with a gift of $5.00.
The biggest help is to use these links to Adorama, Amazon, B&H, Calumet, Ritz and J&R when you get your goodies. It costs you nothing and is a huge help. These places have the best prices and service, which is why I've used them since before this website existed. I recommend them all personally.
Thanks for reading!
Ken
Home New Search Gallery How-To Books Links Workshops About Contact