Home Donate New Search Gallery Reviews How-To Books Links Workshops About Contact
Nikon
D800 and D800E User's Guide:
Top Panel Controls
© 2012 KenRockwell.com. All rights reserved.

July 2012 D800 and D800E Review Nikon Reviews Nikon Lenses All Reviews
Top of D800 and D800E User's Guide
Help me help you top
I support my growing family through this free website. The biggest help is when you use any of these links when you get anything, regardless of the country in which you live.
If you find this page as helpful as a book you might have had to buy or a workshop you may have had to take, feel free to help me continue helping everyone.
While free to read online, this page is formally registered and copyrighted, so it is unlawful to make copies, especially in the form of printouts for personal use or saving these pages or files. If you wish to make a printout for personal use, you are granted one-time permission to print from your browser (there is no PDF) only if you PayPal me $5.00 per printout, file save, or part thereof, unless of course you bought your D800 through one of my links. This is how I justify spending weeks away from my family writing and sharing all this for free online.
Thank you and thanks for your support!
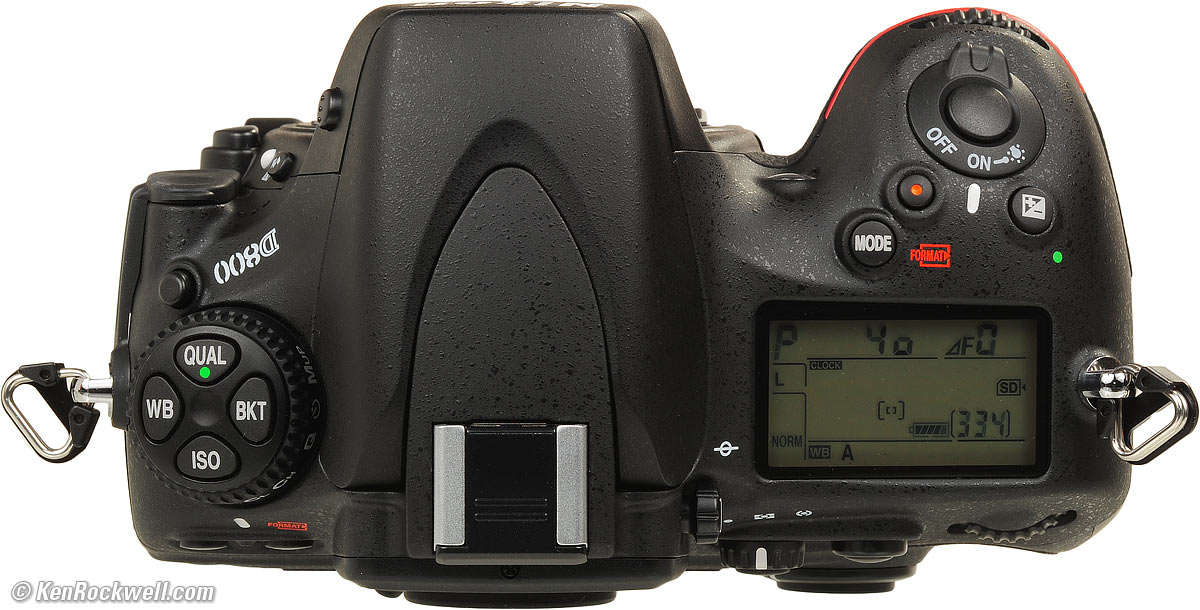
Nikon D800 and D800E top controls. bigger.
Want free live phone support? In the USA, call (800) NIKON-UX, 24 hours a day, 365 days a year.
Top Left Controls: QUAL, WB, BKT and ISO
Nikon D800 and D800E top left controls. bigger.
These buttons are for Quality, White Balance, Bracketing and ISO.
Hold any of these and spin the control knobs on the right to adjust.
You'll see your adjustments possibly in the finder, and always on the top LCD and rear INFO screen. Watch whichever screen you prefer.
Quality (QUAL • ) top
QUALity sets the file format, compression levels and file and image sizes.
Hold QUAL and turn the front dial to change JPG and TIF image size in pixels.
Hold QUAL and turn the rear dial to choose the kind of file (JPG, TIFF or raw), and the level of JPG compression. Keep spinning the dial, and you can record raw at the same time as JPG.
Here's a little about each of the file types:
JPG
JPG is the world standard for still images.
All my pro friends and I shoot everything as JPG.
A JPG is a finished, saleable image that everyone can see and use.
Shoot JPG, and you're done. See also Raw vs. JPG.
JPGs come in many different "quality" settings: NORMAL, BASIC and FINE.
NORMAL is the default. Images look great.
BASIC looks 99.999% as good as NORMAL, but takes up only half the file space, so images save and transfer twice as fast, and twice as many fit on a card. I always shoot in BASIC.
FINE looks the same as NORMAL, but takes up twice the file space (or four times the file space as BASIC).
At lower resolutions like 2.7 MP in the first Nikon D1 DSLR these differences were sometimes visible, but today at high resolutions, even at "only" 9 MP at the D800's lowest resolution settings, even BASIC looks great. As resolution increases, the size of any artifacts become smaller, and therefore invisible in any size print made from any size image from the D800 or D800E today.
Of course if you don't worry about file size, shoot anything you want — that's why the D800 and D800E have all these options.
You have other options for how each of these JPGs are saved; see the JPEG compression Shooting Menu item. I leave mine at their default SIZE Priority.
I particularly love shooting JPG on my Nikons because Nikon's Picture Controls have a magic look to them that I can't get in any other aftermarket software like Aperture. I set my colors to VIVID and +3 Saturation and let my D800 use its magic Active D-Lighting to give wonderful colors, highlights and shadows right out of the camera. I won't run Nikon's buggy software on my computer, and no other software lets me get these great colors out of my D800 or D800E's NEF files : the colors don't happen until after they pass through the trade-secret color matrices and dynamic processing used by Nikon in-camera
RAW
RAW records NEF (Nikon Electronic Format) files.
These files are not actual images; they are the raw data from the camera's sensor before being converted and refined into an actual image.
NEF or raw files don't become images until processed further in software later, although you can see them on your camera.
NEF files are huge, close to 100 MB, or as much 100 times the size of a SMALL BASIC JPG as I prefer to shoot.
Not only will very few NEFs fit on your card, they take much longer to transfer and backup, and if all you have NEFs, you still don't have pictures until you use software on your computer to process the files into formats we can see, like JPG.
The reason some beginner photographers prefer NEF is because it allows them to apply image parameters like White Balance and Picture Styles after the image is shot.
If you shoot less than 100 images a day and/or if you like to spend hours agonizing over each image later in Photoshop, consider NEF.
If you just want pictures, or are shooting more than 100 images at a time, forget NEF (raw).
As I said, everyone I know who knows what they're doing shoots smaller JPGs.
See more at Raw vs. JPG.
JPG + RAW
This simply records each image as both a finished JPG and the raw NEF data.
Use it if you don't mind a lot of data and are willing to sort it out later.
TIF
Forget TIF.
TIF is simply a complete image, but saved as a huge file.
TIF is simply the raw image after the Picture Controls have been applied, but before JPG compression. Open a JPG, and it's the same as the TIF, but at a fraction of the file size. The only time anyone complains about their camera being very slow, it's always because they've accidentally selected TIF as their format.
TIF is the raw data processed into an image in-camera, and saved as a huge file before being converted into a JPG.
Consider TIF only if you're immediately loading these images into your computer for immediate processing; otherwise they are just too cumbersome.
As always, if you really want TIF, don't let me stop you, but if you're asking, know that TIF is very likely to slow down everything about how your D800 or D800E shoots since it takes so long to write the huge files to your card.
Here's a little about the image sizes:
LARGE
This is all 36 Megapixels. This is why most people paid good money for their D800s, but it's an image so huge that it's only needed if you're printing 10 feet (3 meters) wide, are going to look at the prints very closely, and then use only the finest lenses and technique.
I only use LARGE when testing lenses.
MEDIUM
At 20 MP, MEDIUM is still ridiculously large.
I never use MEDIUM for anything.
SMALL
At 9 megapixels, even the SMALL size is bigger than I need for anything.
9 MP is enough resolution for fantastic 20x30" (50x75cm) prints.
I use SMALL JPG BASIC.
Only use MEDIUM or LARGE if you're really going to print more then a few feet wide, otherwise you clog discs and cards and waste a lot of time waiting for all this to process in your computer later.
If memory is cheap, shy do I worry about file size? Simple: I shoot a lot, and bloated files waste time and money in transfer, backup and storage. Try it: shoot the same thing at several settings, and you won't be able to see the difference. See this on my D200, whose resolution at its largest setting is about the same as the D800 at its smallest!
Green Dot •
The green dot, when held along with the green dot on the ISO button, resets most things back to normal.
I don't use this. It sets too many things back to normal for me.
White Balance (WB) top
Nikon D800 and D800E top left controls. bigger.
This is critical to getting the photos you want right out of your D800 and D800E.
Spin the rear knob for broad changes. Spin the front knob to fine tune. See my White Balance Examples page and my White Balance page for the specifics of each setting.
I use AUTO1 and set A3 M1 WB Trim.
Here is a run down of the individual settings from left to right, as shown along the bottom of the top LCD and as set with the rear dial:
Auto (A)
I use this all the time. It makes its best guess for WB. It's usually very good.
I prefer AUTO1, which tries to give a neutral rendition under all light.
If you prefer indoor tungsten shots left as orange, use the AUTO2 setting.
Tungsten (hanging light bulb icon that's easy to confuse with the sun)
I never use this.
This makes the picture very blue.
Use this only for deliberate freezing Arctic effects, or under conventional tungsten light bulbs.
Honestly, under tungsten light, I use the Kelvin setting below to dial-in my exact preference.
Fluorescent (glowing tube icon)
I never use this.
Used to make crappy fluorescent light look less crappy.
These settings rarely work; use the preset setting below for better results.
Direct Sunlight (smiling sun icon)
I never use this.
Use this outdoors with sun shining directly on the subject.
I only use this when testing lenses where I don't want AUTO white balance compensation for lens color balance.
Flash (lightning bolt icon)
I never use this.
It's almost the same as direct sun.
I'm told it's really for studio strobes, since the Auto mode compensates magically for flash if you use it on-camera.
The reason to use this is if you use a different trim value for your strobes than you do for sunlight. I'll get to trims in a bit. I use the PRESET setting for my studio strobes.
Cloudy (cloud icon)
I never use this.
Warmer (more orange) than the sunlight position.
Shade (house casting a shadow icon)
I never use this.
Very warm. It adds extra orange to your photo.
Use this for sunset shots, or shots in open shade lit by the sky.
Continuously Variable (Kelvin)
I use this in place of all the other settings I never use. This Kelvin setting lets me set between all the other settings continuously, instead of in fixed steps as the above selections.
This setting lets you choose any amount of blue or orange tint, so you can select what looks neutral in whatever light you have.
Once you select "K" you choose the value, from 2,500 to 10,000, with the front knob while holding WB. The calibrations are abstract in what we scientists call (degrees) Kelvin. More degrees look warmer. There are no rules in real-world photography: use whatever setting looks best to you. It adjusts in random small steps you can't hit every single degree.
2,500 K is very, very blue. I'll use something around 2,650 K in dim home lighting to get neutral results.
3,200 K is the same as the tungsten setting above.
I'll use something around 4,000 K indoors with a mixture of sun and tungsten light.
5,400 K is the same as direct sun above.
The shade setting is similar to 7,500 K, and 10,000 K is the warmest (most orange). 10,000 K is very, very orange.
I use this setting with a white or gray card to get perfect color matching.
I use this in my studio for perfect color balance with my studio strobes.
The D800 and D800E can save recall four settings: just hold "WB" and spin the front knob after choosing PRE with the rear knob for d-1, d-2, d-3 or d-4. You can to use menus to save, name and lock the four settings.
I never use an actual card. I always grab a napkin, t-shirt, back of a menu or other piece of white. Black text on the paper makes no difference, so long as the background is white. If you choose a bluish piece of paper (like a glossy printed piece), your results will be warmer (more orange), and if you use a more orange piece of paper (like a cheap paper napkin), your results will be more blue.
Avoid gray items unless they are a real Gray Card. Random gray items very rarely neutral, even if they look gray.
To set your white balance with something white or really gray:
1.) Ensure your card or other neutral object is in the same sort of light as your subject. Changing the angle of the object often will favor one kind of a light or another in mixed light, which will greatly affect your result.
2.) Hold WB and spin the rear dial to get to PRE, and spin the front dial to select which of the four memories (d-1, d-2, d-3 or d-4) you wish to set.
3.) Release WB.
4.) Press and hold WB again for a few seconds.
5.) PRE starts to blink.
6.) Release the WB button.
7.) Point your D800 and D800E at the card and press the shutter.
8.) If the display flashes "good" you're set.
9.) If the display flashes "ng" then repeat from step 4.)
The D800 and D800E stores this in whichever of the four locations (d-1, d-2, d-3 or d-4) you selected.
You can edit, save and play with these four settings in the Shooting Menu.
White Balance Trims (fine tuning)
These are critical to getting the photos you want right out of your D800 and D800E.
I rarely get what I want as set above, and usually set my image slightly warmer (more orange or amber (A) as "A3."
The Nikon D800 and D800E, at least my two samples anyway, have a color balance flaw that makes them usually shoot too green. Therefore I set them a little more magenta (M1) in this same menu, and all is well.
This is easy, but often overlooked by beginners. All you need to do is look at the image you just made on the LCD. Like it? You're done. Too cool (blue)? Then hold WB and move the front dial a couple of clicks to about A3 and try again. The more A you add, like A5 or A6, makes the image more orange, and the more blue you add, like B4 or B6, makes it bluer.
You also can set this amber/blue trim in the in the Shooting Menu. You only can set the magenta/green trim in the menu.
Once set, I always use A3 M1.
Easy! Do this and all your photos will be bang-on and you can stop wasting your time waiting for raw images to process.
ISO top
Nikon D800 and D800E top left controls. bigger.
ISO is pronounced Eye-Ess-Oh, not "eyeso." It is an acronym for the International Standards Organization, which defines the test for film speed. This is how we set the camera's sensitivity to light.
Hold this button and spin the rear dial to change ISO. Default is 1/3 stop steps. I prefer to change ISO in more meaningful full stops as you can set in a menu here.
Firmware Flaw: ISO goes from 50 to 25,600. Above ISO 6,400 or below ISO 100 Nikon uses bizarre terminology to scare amateurs away from setting these ISOs because these same amateurs would clog up Nikon's (800) NIKON-UX support lines complaining about grain or squashed highlights. Nikon calls ISO 12,800 "H+1.0" and ISO 25,600 as "HI+2." Likewise, ISO 50 is called "L-1.0."
Hint: Since ISO is displayed in the finder, you can set this without taking your eye from the finder.
Hint: If you've selected Auto ISO, then you cannot set a manual ISO higher than you allow in Auto ISO.
BKT top
Nikon D800 and D800E top left controls. bigger.
As shipped, press this and spin the front and rear dials to select the bracketing range and the EV steps between bracketed shots.
I prefer to set my BKT button to engage the HDR feature.
Top Right Controls

Nikon D800 and D800E, general top right controls.
Power Switch top
Tap it past ON to turn on the LCD illuminators and the meter.
There's no need to turn OFF the D800 or D800E except to prevent accidental operation when squashed in a camera bag. The D800 and D800E turn themselves off after a few seconds of ignoring them. The only thing the OFF position does is act as a lock against unintended operation.
You can set this in CFN f1 so that it lights up the rear INFO screen in addition to the top LCD illuminator.
Eyepiece Focuser top
This is the little +- knob, to the right of the eyepiece.
Pull it out and twiddle with it to clarify the finder, especially if you wear glasses.
Push it back in to lock.
Exposure Mode & Format Button top
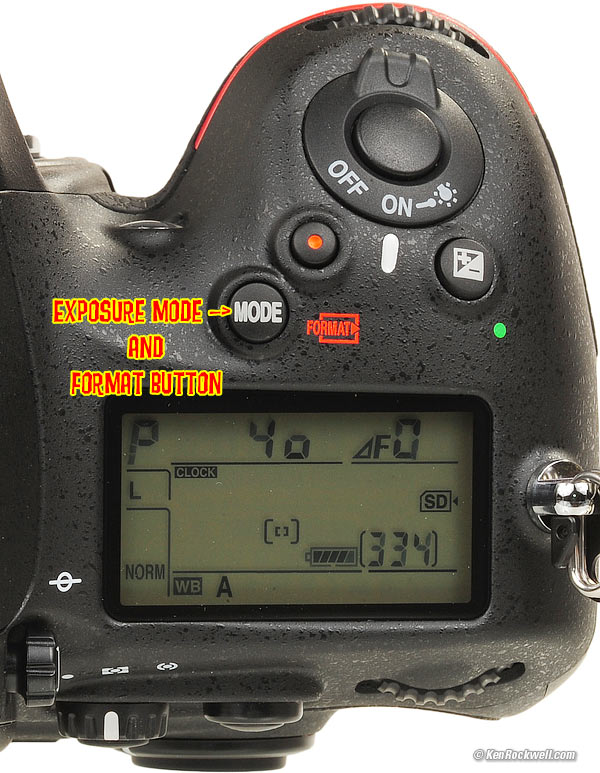
Nikon D800 and D800E, Exposure Mode and Format control.
To select among P, S, A and M exposure modes, hold this MODE button and spin the rear dial.
Here are the modes:
P: Professional (a.k.a. "program")
I always use Pro mode. In Pro mode, the camera picks the best combination of aperture and shutter speed all by itself. If I want a faster shutter speed or smaller aperture, I just flick the rear dial, and in that one flick I've set whatever new combination of aperture and shutter speed I need.
We use Pro mode because it always gets us our shot faster than any of the other modes.
This mode was called "Program" when it was first widely made available in the late 1970s, but since it's the mode used most of the time by all the pros I know, has been renamed to Pro mode years ago. Too many of us who lead workshops have to spend half our time teaching photo learners to use this mode and just flick the rear dial as we do ourselves instead of them trying to use the older A, S and M modes some high-school photo teacher mistaught them 20 years ago to do the same thing with far more difficulty.
Rotating the rear command dial selects alternate combinations of f/stops and shutter speeds, all of which give the same exposure. Nikon calls this "Program Shift," and an asterisk ( * ) shows up next to the P on the top LCD and rear INFO screen to let you know you've chosen a different combination for exposure. The asterisk doesn't appear in the finder, but you can see the apertures and shutter speeds. The asterisk goes away when you return to the standard combinations. The standard combinations are f/1.4 @ 1/8, f/2 @ 1/15, f/2.8 @ 1/30, f/4 at 1/60, f/5.6 @ 1/125, f/8 @ 1/250, f/11 @ 1/500, etc.
An easy way to return to the standard combinations is to flip to a different mode and back to P, or turn the D800 and D800E off and back on.
A, S and M Modes
If you want to use a fixed aperture or shutter speed, then use S or A mode and the camera will automatically pick the other value.
If you want to set both the hard way, use M, manual, mode.
In these three modes you select the aperture with the front dial and the shutter speed with the rear dial. You can reverse which dial does what in the Custom Setting: Controls Menu. Of course in A or S mode you can't set one of the two values because the camera is setting one for you.
A Mode: Aperture Priority
In A mode you choose the Aperture, and the D800 or D800E chooses the shutter speed for you.
S Mode: Shutter Priority
In S mode you set the Shutter and the D800 or D800E sets the aperture.
You easily can get under or over exposure in S mode if your lens runs out of valid apertures. Watch that your D800 or D800E doesn't get "stuck" at either end of you lens' aperture scale.
M Mode: Manual
You set everything the hard way. Look at the LCD to check exposure.
I only use manual when I want to force my D800E or D800 to use the same exposure even if the light is changing on me, which is rarely.
You can use the bar graph in the finder, but why? If you wanted to do that, use another mode and let the D800 and D800E do the setting for you.
Hint and Firmware Defect: AUTO ISO doesn't deactivate in Manual mode. I always turn off AUTO ISO when I enter Manual Mode, which is now as easy as holding the ISO button and flicking the rear dial.
Hint: You can see P, S, A and M displayed in the finder, so you can adjust them without taking your eye from the finder.
FORMAT (combined with MODE button above)
Hold this along with its brother FORMAT button on the back left rear of the camera (combined with the trash button). You'll get a blinking "For" and one of the cards blinking on the top LCD, and, if activated, the INFO screen.
To format the other card, move the rear dial to select one card or the other. It will format the same card next time without having to fiddle with it again.
Hold both of these FORMAT buttons again and you'll completely reformat the memory card.
Professionals reformat a card each and every time a card is put in the camera. This is because files and folder structures are sometimes messed up or changed when read with a card reader, read in-camera by a computer or used in any other camera. Professionals prefer to be safe than sorry. They don't use cards to archive previous photos.
Ten years ago I kept saving my winner shots on a card by simply erasing the rest each time. After a few months I started to get errors. These went away as soon as I reformatted the card. Reformatting completely renovates the card. Erasing does not, and may leave the potential for errors.
Exposure Compensation Button • top
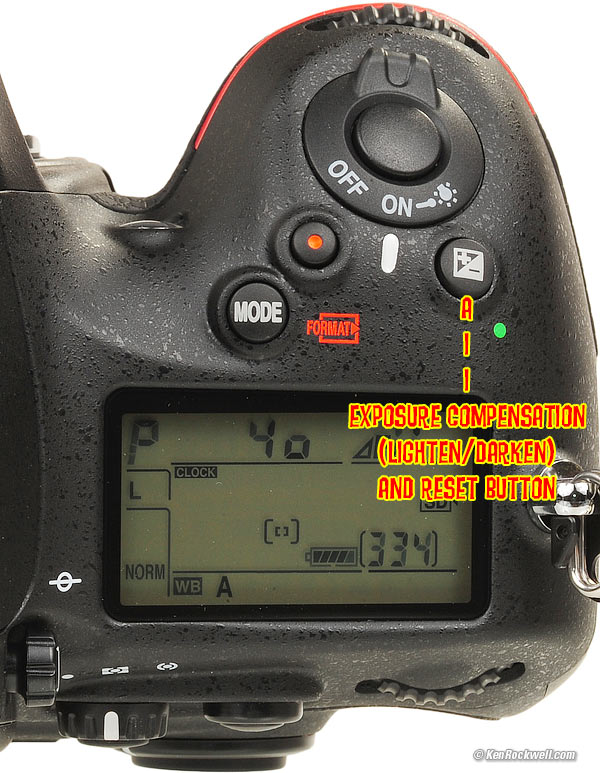
Nikon D800 and D800E, Exposure Compensation and Reset control.
This is the most important control on the D800 and D800E or any other camera.
Hold the button and spin the rear dial to make the next pictures you take lighter or darker.
Look on the top LCD, the rear INFO screen or the bottom of your finder to see how much you've adjusted it.
+ makes the next picture you take brighter, and - makes it darker. If your photo is too dark or light, just change the setting and try again. Easy!
Remember to set it back to zero when you're done. If you don't, you'll see a bar graph on the bottom of the finder and on the top LCD.
See more at How to Set Exposure, which simply says to turn it until the picture comes out as you want it. Ignore Nikon when they suggest you don't use this with Matrix Metering; I do it all the time.
Hint: You can see the + or minus value displayed in the finder as well as the top LCD, so you can adjust this without taking your eye from the finder. The two displays only read the value when the button is held, otherwise those digits read exposures remaining.
Hint: This changes the setting for the next photos you take. It doesn't change any photos you've already made.
Hint: A firmware defect prevents the in-finder compensation bar graph from showing the ±0.3 stop compensation settings if you've set the exposure increments to full stops as I do in CSM b2. The firmware is defective in setting the compensation bar graph to the increments selected for exposure, not to the increments we've selected for exposure compensation. Exposure compensation increments are set in CSM b3, and the in-finder compensation bar graph ought to follow that. The top LCD and rear INFO screen work fine.
Hold this button along with its companion QUAL button with a green dot, and it resets much of the camera back to defaults.
Movie Button top
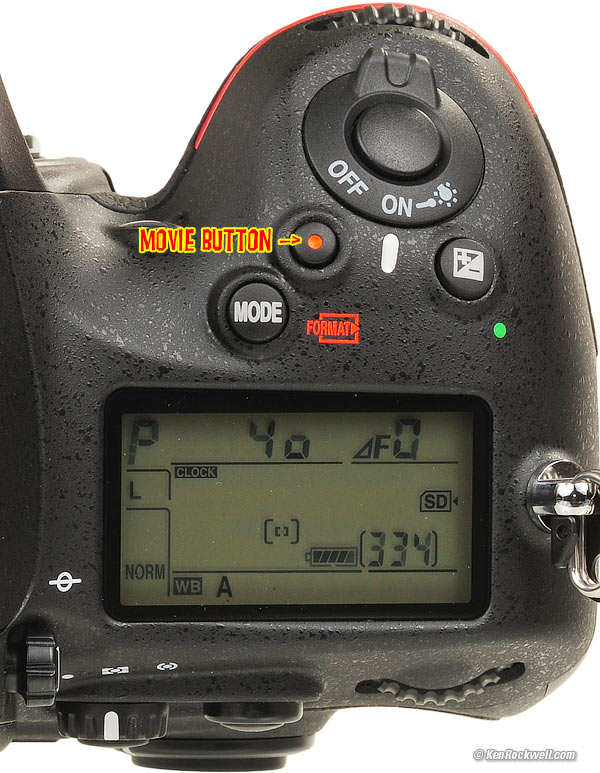
Nikon D800 and D800EMovie button.
To shoot movies, you first have to activate Movie Live View with the rear Live View Control.
I cover movies at the Live View Control.
Since movies have their own red button, the shutter button may be reassigned in the movie mode.
Top of D800 and D800E User's Guide
AUTOFOCUS
Setting the D800 and D800E's Autofocus System
KNOBS and BUTTONS
BACK < < NEXT
MENUS
Home Donate New Search Gallery Reviews How-To Books Links Workshops About Contact