Home Search Gallery How-To Books Links Workshops About Contact
Nikon
D200 Image Quality Settings
© 2006 KenRockwell.com
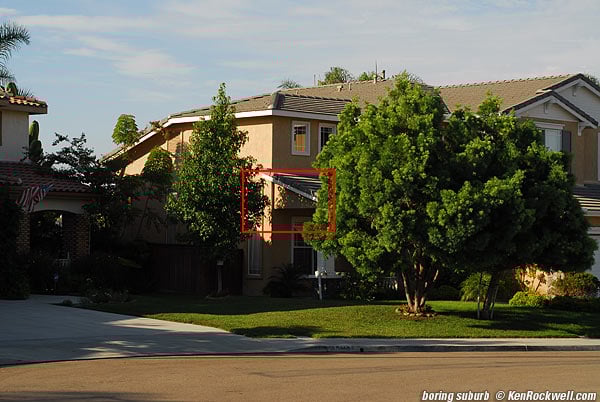
I bought mine from Ritz here. I bought another D200 from Adorama here. Also try Amazon here. Adorama usually has D200/18-70 kits in stock here. It helps me keep adding to this site when you click these links to get yours. INTRODUCTION What's the best image quality (QUAL) setting? JPG or raw, or raw + JPG? If JPG, should you use FINE, NORMAL or BASIC? Should you use Size Priority or Optimal Quality JPG Compression? How about Large, Medium or Small image dimensions? If raw, should you use compressed or uncompressed? In a fantasy world you'd use uncompressed NEF or FINE JPG, but after you shoot for a while you'll get logjammed with all the data you have to store, forward, process and archive. Ideally we want a setting that gives us spectacular quality with as small a file size as possible. This also lets you get the greatest number of shots on a card and download them the fastest. Let's make some tests and compare resolution, artifacts and sharpness. The good news is the comparison images on this page are sent with extremely high quality so nothing, not even the artifacts, are altered. The bad news is it will take forever to load over a dial-up Internet connection. I used my D200's raw + JPG mode to make pairs of identical images for comparison. I've put the same 100% crops from different quality settings on top of each other so you can switch between them simply by moving your mouse over the image! This makes it easy to see the slightest difference between quality settings. You can see minute differences which would be invisible in side-by-side comparisons. I chose to compare everything to perfection, which is the uncompressed raw (uncompressed NEF) option. Roll your mouse over to see the NEF image and move it away to see the other version. Each image has the particulars burnt into the bottom to keep everything straight. I explain the terminology on my File Formats page if I start to lose anyone. As you will see, most cameras including Nikon won't give you an option to let you make a crummy image file. The default LARGE NORMAL JPG is wonderful. Let me stress that this page gives you the ability to see minute differences that none of us would see in prints. These 100% crops are identical to making prints 40" (1m) wide and looking at them from as close as your computer screen. Properly adjusted LCDs have 100% MTF while prints are much less sharp, hiding this even if you do print that big. 2 years ago I made comparison shots with my D70 and printed everything out at 12 x 18" on real photo paper (not an inkjet). I couldn't tell which was raw and which was a Basic JPG! I could see the differences on-screen, but not in prints as small as 12 x 18." The D200 is even better and the differences even smaller. RECOMENDATIONS I'll cheat for you and give the results first. On my D200 I use JPG Large image size, BASIC quality, Optimal Image Quality mode. To me it looks the same as uncompressed NEF and only has a file size of 1.7MB. For parties, people, sports and other high-volume uses I use the same setting, with Medium size. It looks 99% as good as uncompressed NEF, with only 1MB per file. This makes a big difference if you have thousands of shots from an event to load and sort and backup to CD on your laptop. For Nikon cameras without the Optimal Image Quality JPG mode (D1X, D70, D50, D100) I use NORMAL JPG. On Canon Cameras I use Large JPG, Normal Quality. Normal is Canon's lowest choice. Canon also provides FINE and sometimes SUPERFINE JPG. GUIDE IMAGE Here's the overall image from which the 100% crops below are taken. I made these with my 55mm Micro lens at f/5.6, the sharpest thing I've got.
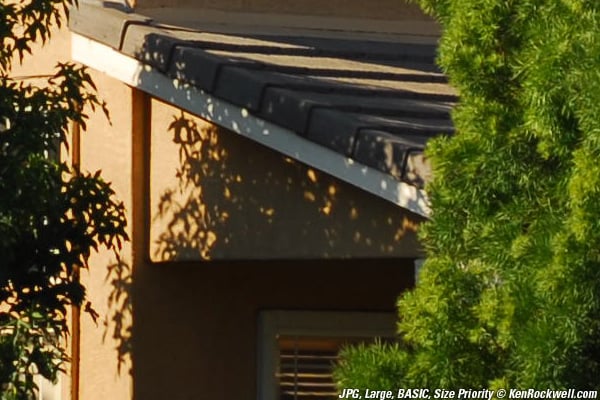
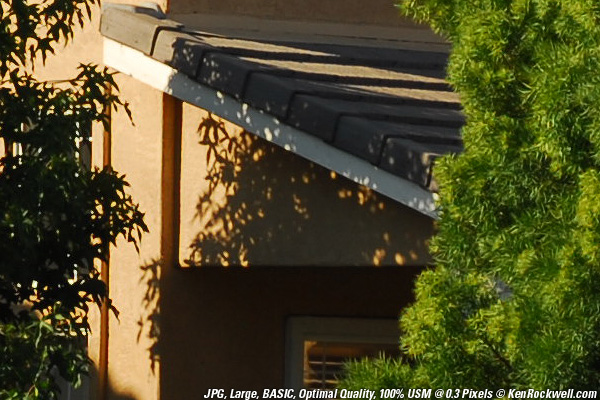
Guide image, full frame. Each image below is a 100% crop of the red area. Uncompressed NEF vs. JPG BASIC, Size Priority This compares a 16 MB uncompressed NEF with the crummiest 1.2 MB BASIC Large (3,872 x 2,592 pixel) JPG you can get. Roll your mouse over the image to see the NEF. Move the mouse away to see the JPG.
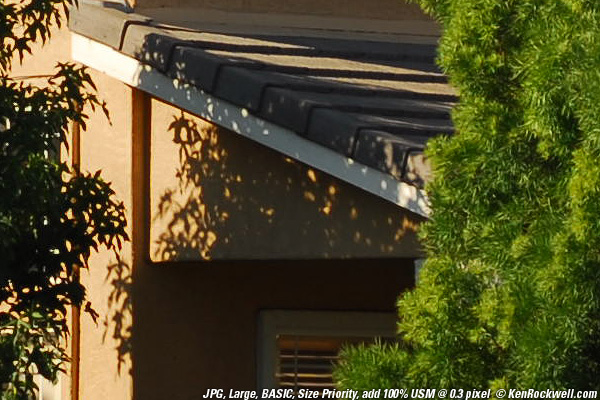
JPG BASIC, Large Even at the equivalent of a 40" print these look pretty much identical. The JPG has the same resolution, but looks slightly softer then the NEF because it uses less sharpening. I can't see any JPG artifacts unless I enlarge the image on my screen to the equivalent of 10 feet wide and stick my nose in it. The D200 does a spectacular job of encoding JPGs. A busy scene like this is a bear for a fixed-size JPG, and the harsh edges of the tree against the sunlit wall make them easy to see if you can. This is another reason I love my D200. Older cameras like the D70 couldn't make JPGs this good and small. Add Sharpening to Make Them Match: Let's add some sharpening to the JPG and see if we can match the sharpening used by Nikon's software for the NEF. This isn't cheating - the software that opens the NEFs has this sharpening hidden inside as part of the Bayer Interpolation recovery. The JPGs don't have as much sharpening added in-camera because it would require larger files sizes to store well. I added some delicate sharpening at 0.3 pixel radius, 100% to the JPG. See how they compare now:
JPG BASIC, Large, with sharpening They look identical to me, except for some minor contrast variation and some barely visible JPG artifacts. Unless you know how to look, JPG artifacts are invisible and certainly don't affect the picture. The sharpening has exaggerated these artifacts and they are only barely visible at this high magnification. Not bad for the crummiest JPG setting and a 40" wide print! Even I don't use this low a setting, and I'm a data cheapskate. If you do know how to see the artifacts, let's crank up the quality and see what happens. Uncompressed NEF vs. JPG BASIC, Optimal Quality On older Nikon DSLRs you can get this same improvement by going to NORMAL JPG. There is an obscure JPG compression menu choice in the D200 and D2X: Size Priority or Optimum Quality. Size Priority, shown above, is the default. It was the only option in older cameras like the D1X, D50 and D70s. Since it was the only option in those cameras they have no menu option for it. JPGs need more data (file size) to maintain quality as the subjects contrast and complexity climbs. A blank sky is easy for a JPG, and a busy tree with a zillion branches requires a much bigger file to retain quality as a JPG. Size Priority keeps the file size constant regardless of image detail or subject complexity. The Optimal Quality JPG compression option lets the file size grow if needed to maintain quality, and otherwise keeps it smaller. The Optimal Quality option lets the camera allot bits intelligently based on the subject, instead of making big files when they aren't needed for flat subjects like blank skies. Using the Optimal Quality option in BASIC JPG lets the file size grow to the same size as JPG NORMAL if the subject needs it, and lets the file size shrink back to JPG BASIC when it's not. Set the Optimize Quality JPG option in the D200 at MENU > SHOOTING (green camera icon) > JPEG Compression > Optimal Quality. Once set it stays this way even when the camera is green-dot reset. Here's the same thing at JPG BASIC, Optimize Quality. Roll your mouse over the image to see the uncompressed NEF for comparison. I added the same sharpening to the JPG so it matches the NEF. This isn't cheating: the processing used by the NEF software already includes this extra sharpening.
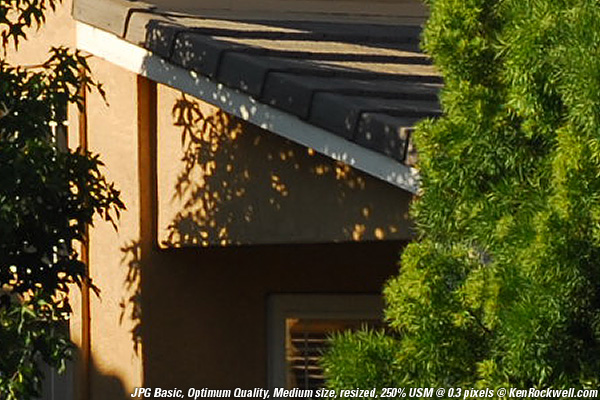
JPG BASIC, Large, Optimal Quality, with sharpening Now they look the same. The minor artifacts from the BASIC Size Priority JPG are mostly gone. This is why I shoot at this setting. It looks great! If anything I see more detail in the green tree in the JPG and more hard contrast between the wall and black tree in the NEF. This is more a function of slight differences in the levels of the two files than differences in sharpness or resolution. The wall is slightly lighter in the NEF. JPG NORMAL and JPG FINE I've just shown that there isn't any visible difference between perfection and JPG Basic Optimal Quality. I could show examples at NORMAL and FINE, but they'd be wasting your time: they'd look identical to perfection just as JPG BASIC Optimal Quality does. EDITING Bad photographers make mistakes and have to tweak colors and levels afterwards. My decades of shooting film has taught me to nail my shots on the first try, not to waste time trying to rescue it later. It's easier and better to get it right the first time. It you have to tweak an image later, by all means shoot at the larger sizes to give yourself more leeway. Tweaking will exaggerate any imperfections in direct proportion to how far you have to tweak. If you underexpose by two stops and have to pull your histogram from the middle back to the right then you'll also double the visibility of any artifacts. If you're that blind a photographer you have other things to worry about! If you don't have to make huge corrections than the increase in artifacts is negligible for normal editing. If you create your images by playing in Photoshop instead of in the field and spend most of your time in post production, by all means shoot raw. Just know that you don't have to unless you feel like it. JPG BASIC, Medium Since any increase in JPG quality to NORMAL or FINE wouldn't get any better, I wonder how the smaller JPG image sizes compare to the NEF? Since Bayer Interpolation limits the real resolution of digital cameras, how much would we lose by going to the smaller image sizes? In other words, since digital camera sensors don't have their full claimed resolution anyway, will lowering the image size lose anything? I shot this Medium JPG (also at BASIC and Optimal Quality JPG) and then increased its image size in Photoshop to match the larger NEF. I added more sharpening (200% @ 0.3 pixels) to get the best match to the NEF:
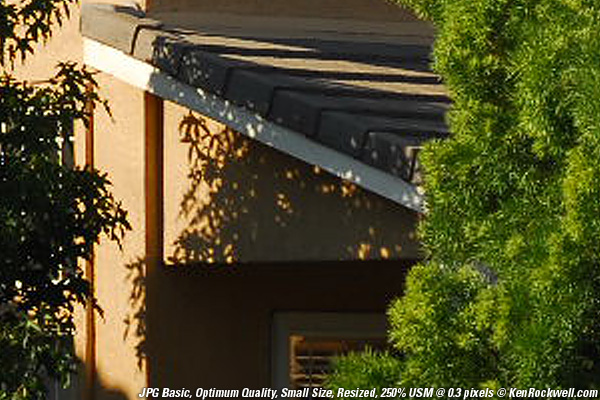
JPG BASIC, Medium (2,896 x 1,944), Optimal Quality, resized and sharpened They are similar, but the detail is a little finer in the NEF. This is shown as the equivalent of a crop from a 40" wide print. This is why I use this setting for people, parties and sports. The image is 99% of the NEF, but the files are only 1MB vs. 16MB for the uncompressed NEF! Viewed at any reasonable distance, or next to each other instead of on top of each other here, they would be the same. Details are a very small part of total image quality. The two images don't exactly match position because the NEF and JPG at this size are recorded with very slightly different aspect ratios in the D200. I gave up before going to anamorphic translations to get a perfect match. JPG BASIC, Small Let's push our luck for the sake of science. Just how bad will a BASIC Small JPG look compared to an uncompressed NEF? The JPG was less than 500kB and the NEF was 16 MB. Again I increased the image size of the JPG to match the NEF and added sharpening to match.
JPG BASIC, Small (1,936 x 1,296), Optimal Quality, resized and sharpened The difference is visible at this extreme magnification. I see mostly JPG artifacts, and I see them because they have been magnified with the increase in image size and the added sharpening. Even at this 40" wide equivalent print size it's not at all awful. This "Small" size is the same size and much sharper than the original Nikon D1! The NEF has more fine detail, but the overall impression of clarity and sharpness is the same. If anything, the added JPG artifacts add texture, and many normal people would think the JPG is sharper because of them! Compressed vs. Uncompressed Raw Seeing how well the BASIC JPGs look, why worry? I never even stepped up to NORMAL JPGs, much less FINE, in this comparison. Take a look for yourself: the BASIC JPGs look the same as the NEFs. Uncompressed raw makes 16MB NEFs and compressed raw makes 9MB NEFs. I tried to make duplicate shots to compare. I gave up. The mechanical exposure repeatability of my camera and nature itself aren't stable enough to let me make two captures close enough to see any possible difference between compressed and uncompressed raw. People do see differences. They are seeing fluctuations in their technique shot-to-shot, not any differences due to the compression. Since the compression is lossless and the only potential issue is some curve shaping, I wouldn't worry. I always use compressed raw if I shoot anything raw. When I use raw I always use raw + JPG. I usually throw away most of the NEFs if the JPGs are OK. Using this option saves me from having to convert the NEFs to JPGs manually. Test Details I opened each file in Photoshop and cropped them. They were saved at 80% in Save to Web, which shows you exactly what I was seeing on my screen. To open the NEFs I used Nikon's free NEF opener that comes with the camera. Third-party NEF openers, like Photoshop's Camera RAW or Apple's Aperture, don't have access to Nikon's secret sauce curves and will have different colors. Then the NEF colors won't match the JPG. I have no idea what people see in third party NEF openers that they consider better quality. I haven't tried them. The smaller JPGs were resized in Photoshop using bicubic Sharper, and to match the size of the NEF. Actually Nikon plays some funny business with the sizes, and the smaller sized JPGs don't match the scale of the NEFs exactly. I resized the Medium JPG to 3,865 pixels wide to get the best match. The small JPG was resized to 3871 pixels wide for the best match to the NEF. PLUG If you find this as helpful as a book you might have had to buy, a workshop you may have had to take, or a day wasted as I did doing all this research, feel free to help me write more with a donation. Thanks for reading! Ken back to D200 review page index back to top of D200 review |


