Nikon
D700 User's Guide:
Front Controls
© 2008 KenRockwell.com. All rights reserved.


Front, Nikon D700. enlarge
August 2008 Top of D700 Users Guide D700 Review More Nikon Reviews
NEW: Nikon D700 User's Guide for iPhone and iPod. 12 December 2009
Want free live phone support? In the USA, call (800) NIKON-UX, 24 hours a day, 365 days a year.
Left to Right, Top to Bottom:
Depth-of-Field Preview Button top
The preview button lies naturally under your middle finger.
Tap this to stop the diaphragm down to the taking aperture. The viewfinder gets darker, but look carefully and you can see what's in focus or not. This is a legacy feature from film days. Today most people look at the LCD playback.
You can program this button do other things as explained in Custom Functions.
FUNCTION Button top
The Function (Fn) button lies naturally under your ring finger.
I program this trick button for many different things depending on what I'm doing.
This button is programmed as explained in Custom Functions.
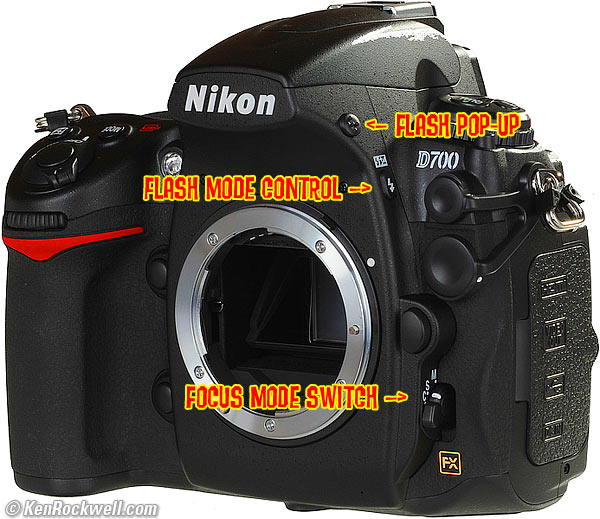
Front Controls, Nikon D700.
Flash Pop-Up Button
This is an unmarked bumpy black button on the top right of the viewfinder as seen from the front.
Press it to pop up the flash.
Flash Bolt +/- Button (right side of flash hump as seen from front) top
This sets the flash sync mode and the brightness of the flash. Flash brightness is more formally called "flash exposure compensation."
Press and hold the flash button and turn the front dial to change the flash exposure compensation. This sets the brightness of the flash. + makes the flash brighter, - makes it dimmer. This setting only changes the brightness of the flash. It leaves the background (ambient) exposure alone. Set it to - if your subjects are getting washed out. If you run out of flash power beyond 10 to 20 feet, then setting it to + can't make the flash any brighter.
If you set flash exposure compensation to anything other than zero, you'll see a little "+/- bolt" icon in the finder and on the top LCD. This resets when you do a green reset.
Press and hold the flash button and turn the rear dial to change the flash sync mode. You'll see the mode shown on the top LCD in the box with the bolt.
Flash Sync Modes top
Select these by holding down the flash button on the side of the flash hump and spinning the rear dial. Your selection is shown on the top LCD in the box with the bolt.
Normal (blank on the top LCD)
This is the default position.
In Program and A exposure modes, the shutter won't stay open longer than about 1/60 second.
You can change this 1/60 minimum speed in Custom Setting Menu option e2, which defaults to 1/60 second. I have mine set to 1/30. Set a longer time, like 1/8, to allow more ambient light in the photo and prevent inky black backgrounds. Set it shorter to prevent subject motion blur.
This is brilliant! In the old days we'd have to use Manual exposure to set this to a reasonable number like 1/8. The problem with using the slow mode, explained below, is that in dark locations the shutter may stay open a stupidly long time and ruin the shot. This Custom Setting lets you have the camera adjust itself automatically and stop at the longest time with which you feel comfortable.
I usually use Normal mode, since if I don't I can get some scary long exposures if I'm not expecting them in the dark.
Red-Eye (eyeball icon)
I never use this. It shines an obnoxious light in your subject's eyes for a couple of seconds and then releases the shutter after you've already missed the picture. Use this only if you have some people you want to get rid of at a party.
Warning: If I set the Red Eye mode by accident it bugs the heck out of me, because the camera doesn't go off until several seconds after I've pressed the shutter, but I've set no self timer! It doesn't do much to reduce redeye anyway. Skip this mode. You won't know you've set it, since there is no in-camera indication. If for some reason the shutter seems to have a weird delay, check this!
SLOW (called SLOW on the top LCD)
This mode lets the shutter stay open as long as it needs to so dim ambient light can expose properly with flash. These exposure times can get stupid long, in which case you want to use the setting I covered under Normal.
In daylight, SLOW is the same as NORMAL, since exposure times are short. SLOW unlocks the camera in P and A exposure modes to make exposures as long as it wants to in dim light.
Have a look at most issues of National Geographic and you'll see many indoor shots made in this mode. The background exposes correctly, people may be blurred, and a burst of flash freezes them along with the blurry ghost images.
Normal and SLOW do the same thing in S and M exposure modes, since you or the camera may select any shutter speed in these modes regardless of flash sync.
The default apertures and shutter speeds are unchanged in Program mode, unlike in the D70.
Red-Eye SLOW (eye and SLOW icon)
This is the SLOW mode and redeye. I don't use it for the same reason I don't use Redeye mode.
REAR (called REAR on the top LCD)
When you're shooting with flash and long exposures, this makes the blur come from behind moving subjects.
Normally the flash goes off the instant the shutter opens. This makes sense, but looks stupid if you have motion blur because the blurs will be in front of the moving subject. Select REAR mode to have the flash go off as the shutter closes. Now you'll have motion blurring from behind the frozen flash image, which looks great.
Another reason to select REAR is because people presume photos are made the instant a flash fires, then they leave. This wreaks havoc with long exposures, since people will leave at the beginning of the exposure! Use the REAR mode and the flash doesn't go off until the end of the exposure. You'll also want to select flash lock to eliminate the preflash. Read about programming the FUNC button to do that here.
REAR doesn't do anything with short exposures. REAR also engages SLOW, but SLOW doesn't light up on the LCD until you take your finger off the flash mode button.
Trick Flash Exposure Lock Mode: You can set your FUNC button in the Custom Menus here to lock flash exposure and eliminate preflashes which make people blink.
Focus Mode Switch top
See my complete Guide to Setting the D700's AF System.

Nikon D700 covers and buttons.
Studio Flash Connector top
Pop open the tethered rubber cover to connect a PC cord from your professional flash system to your D700.
PC stands for Prontor Compur, a popular German shutter back in the 1930s who invented this connector. The PC connector has nothing to do with personal computers.
Idiotic Remote Terminal Connector top
Pop open the tethered rubber cover to connect one of Nikon's expensive electronic remote controls, like the $55 MC-30 and $130 MC-36.
Since Nikon overprices these, you can buy counterfeits cheap, but honestly, the release you buy today will last you far longer than any digital camera. I still use the one I bought back in the 1990s before the practical DSLR was even invented. These work on just about all motorized Nikon film and digital cameras.
Sorry, but the D700 won't work with the superb pocket-sized $17 ML-L3 wireless cable release, as the cheaper cameras can. Since Nikon knows you're a big spender with the D700, you'll have to buy the clumsy $175 ML-3 wireless release system.
Nikon doesn't bother to thread the shutter release, so you have to buy one of these gizmos instead of a standard $6 cable release on a tripod.
Lens release top
Push this button and turn the lens to remove it. It locks automatically when you attach and rotate a lens.
My D700 User's Guide continues below.
I support my growing family through this website.
This guide is free to read online, but copyrighted and formally registered. If you haven't helped yet and would like to save or make a printed copy of this article for your camera bag, please send me $5.00 for each complete or partial copy that you print or save, for personal use only. Others charge $29.99 for crappier information, and with your honesty I can continue to offer these guides online for less.
If you bought your D700 by clicking through my links, then you've saved money and also helped me write this guide. Thank you and please enjoy it. It's great people like you, and those who help me otherwise, who allow me to keep adding to this site for everyone's benefit.
The biggest help is to use these links to Adorama, Amazon, B&H, Ritz and J&R when you get your goodies. It saves you money and is a huge help to me. These places have the best prices and service, which is why I've used them since before this website existed. I recommend them all personally.
Thanks for reading!
Ken
Back to Top of D700 User's Guide or Top of Nikon D700 Review
KNOBS and BUTTONS
TOP PANEL < < NEXT
MENUS