|


Nikon
D200 User's Guide
© 2007 KenRockwell.com

I bought mine from Ritz here. I bought another D200 from Adorama here. Also try Amazon here. Adorama usually has D200/18-70 kits in stock here. It helps me keep adding to this site when you click these links to get yours.
New: Printable PDF Version. $5 mandatory donation per print or file-saving, thanks! Many thanks to Paul Deakin in Hong Kong for converting it.
See also Nigel Jackson's D200 Menu Guide.
Want free live phone support? In the USA, call (800) NIKON-UX, 24 hours a day, 365 days a year.
Looking for a specific control? Use my Search page. Be sure to mention the D200 in your search.
This lengthy article will teach you to be an expert on the Nikon D200's controls and menus. It also includes a lot of tips, tricks, and the settings I prefer to use.
To get great photos you still need to get yourself to the right place at the right time and point the camera in the right direction, which is a lot harder than mastering the D200. Right out of the box at default settings the D200 does a great job. Making a great photo involves locations, timing, patience and a whole lot more. I cover general photography issues here.
For more examples of why you'd want to change these settings and why, also see my Maui Photo Expedition page.
Below are the basics. Explicit details follow in later pages linked at the bottom.
My many tricks are highlighted in bold throughout these many pages. Feel free to skim to find these great tricks, like getting wild colors, inserting your © and contact info automatically into every file, instant high magnification zooming with the navigation button, preventing blinking with flash photos, getting useful histograms, Auto ISO and How to Use Manual Focus Lenses.
This took a long time to explain clearly because the D200 isn't clearly organized itself. I set my D200 and leave it alone most of the time because many settings are so well hidden.
BASICS:
CAMERA SETTINGS
I leave most settings at their defaults.
I reset everything every time I use my camera, much as a pilot uses a checklist before flight to prevent any switches from being in the wrong position. When I don't check first, I often have left my D200 in some screwy mode from shooting in the dark the night before.
Nikon has an easy reset feature. I use it every time! My standard operating setting only is one click different than the defaults, and that's only because I use one trick I'll explain in the menus to improve image file size.
RESET: Find the * QUAL and +/- * buttons on the top of the camera. Hold them both down for a few seconds. The top LCD blinks and everything is back to normal.
I do this every time I use my D200. If I forget, I may have the resolution or White Balance or ISO or God knows what set to something screwy and spoil all my shots. I'll see WB problems on the LCD, but I won't notice if I left my D200 at ISO 1,600 from the night before. That's why I always use reset.
Reset leaves the detailed menu tweaks alone and is smart enough to reset only the big dumb things I might have moved overnight.
QUALity: Large, JPG, BASIC, Optimal Quality Mode
Reset brings you to NORMAL JPG. Once I've reset I'll immediately change to my preferred QUAL setting: BASIC. Do this by pressing the QUAL button and spinning the rear dial one click to the right. This shows as L and BASIC on the top LCD. L stands for Large image size (3,872 x 2,592 pixels) and BASIC JPG compression.
This is the only thing I change from the reset mode. Everything else I tweak below is unchanged by reset.
I use a hidden menu option to set the JPG compression mode to Optimal Quality instead of the default Size Priority. Do this at MENU > SHOOTING (green camera icon) > JPEG Compression > Optimal Quality. Once set it stays this way even when the camera is green-dot reset. This mode gives smaller files than NORMAL and better quality than BASIC. See details here.
I'll set the size down to Medium JPG BASIC, Optimize Quality mode for parties and sports when I'm shooting many hundreds and hundreds of images at once. In these cases I'm more concerned with time wasted for the files to transfer, copy and archive than I am about the 1% quality loss if I made a 12 foot print from any of the files. Medium Basic looks 99% the same as NEF, even blown up big.
See my D200 Quality Settings page for more explicit detail and examples of these settings.
ISO: I use 100 and Auto ISO. Auto ISO increases the ISO automatically as it gets dark so I don't have to. It shoots at ISO 100 in good light, and at 1/15 of a second it starts ramping up the ISO to a maximum of 1,600 as it gets darker. Only if it gets still darker will it let the shutter speed go below 1/15 at ISO 1,600, exactly as I'd do manually.
I explain how to select the shutter speed at which the ISO starts to increase and the maximum ISO to which it will increase in the Custom Setting Menu.
I set Auto ISO to 1,600 max because the noise from the D200 at ISO 1,600 looks much better than blur. I set 1/15 because my 18 - 200mm gives great results down to 1/15. I adjust the lowest shutter speed setting in the AUTO ISO menu if I change conditions or lenses. Unlike film, the D200 looks great at high ISOs, so I use them anytime I need them. More details, including how to set ISO to 3,200, here.
WHITE BALANCE : I use AUTO and a clear UV filter to protect my lens. The D200 has a much warmer color balance than earlier cameras like the D70 so I don't need the 81A filter or the -3 trim. See examples of different settings here and details on my White Balance page. White balance is how you set the color balance, and color is critical.
Luckily AUTO works great most of the time. I look at my LCD, and if it's not right, I'll set it to whatever looks good. Usually that's the Direct Sun or Cloudy positions. These settings give much warmer results than earlier cameras. I rarely use the warmer Shade setting on my D200 while I used Shade often on my D1H and D70.
OPTIMIZE IMAGE: This is set in the menus. I crave vivid color! I tweak my D200 to give color as vivid as I can get. If it went to 11 I'd use that, too.
I go to MENU > Shooting Menu (green camera icon) > Optimize Image > Custom.
Here's how I set each item under Custom:
Image Sharpening: Auto (default).
Tone Compensation (contrast): Auto (default). The D200 automatically adjusts its contrast and dynamic range to each and every shot. It works great.
Color Mode: III (three). This is critical: this gives brighter colors than the default of I. No, color mode II is pronounced "two" and not to be confused with 11 (eleven). I had Nikon lock mode II out of production cameras. You don't want Mode II even if you could use it. Details are here.
Saturation: +, of course. This gives brighter colors in addition to the boost from Color Mode III.
Hue: 0 (Default). Don't touch this! it will subtly mess around with your colors. Leave it at 0.
After setting this it's critical to save it by selecting " Done" and clicking to the right actively to select OK. If you forget to hit OK it won't remember all these settings!
Shooting Menu Banks
Shooting Menu Banks let you save and name groups of all these settings. I'll get to specifics on the Shooting Menu page.
Once I have my Optimize Image options set, I save them as a Shooting Menu Bank and name it BOLD.
For photos of people I like this bold look on the D200. People look vibrant and alive with the stronger colors. If you prefer a more subtle look for people, use a different Shooting Menu Bank, leave the colors alone, and name it PEOPLE (I call mine DULL, sorry). Now you can select either of these depending on your conditions. Much more later on Shooting Menu Banks.
Color Space: sRGB (default). I don't touch this. I explain it here.
Still subjects: AF-S (single AF: focus once and hold) set as "S" of the C-S-M lever switch on the bottom front by the lens. Single AF area, set on the AF area mode switch on back of the D200.
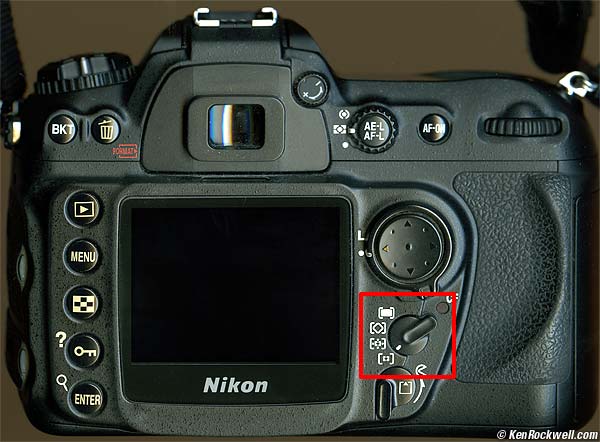
D200 AF Area Mode Switch. Here it's set to use a single AF area.
Moving subjects (sports): AF-C (continuous AF) set as the "C" position of the C-S-M switch on the bottom front of the camera. Set the rear AF area mode switch to either of the two middle positions (more later on that). These middle positions let the D200 use all its sensors to track moving objects! It really works for tracking birds in flight, runners, and anything that moves.
Wild times, or handing someone my D200 to take my picture: Set the rear AF Area Mode selector to the top position, which looks like a big white rectangle. The D200 will now look at all the sensors and guess which is your subject. If I'm too lazy to define a focus area, or if things are happening around me faster than I can respond to them, I use this position. It works great! I shot hundreds of shots of kids in this position and they all were dead-on. I was impressed: all I had to do was point and shoot and the results were great.
I use AF-C (continuous AF) if shooting wild times. Either AF-S or AF-C is OK if handing your camera to a stranger to take your picture.
METERING: Matrix. You set this on the switch to the right of the viewfinder window. Matrix is the middle position. I always use Matrix. That means I never use center weighted (top position), and I certainly never use spot (bottom position). I use the exposure compensation control if I need to correct it. See my Exposure page for details on getting perfect exposures. I ought to weld my selector switch somehow, since sometimes it can get knocked off of Matrix. No big deal; I just feel stupid.
LENS SETTINGS
Many lenses have no switches or settings. If so, don't worry.
If the switch says "M/A - M " then use M/A. This gives autofocus, and if I grab the focus ring it instantly lets me make manual corrections. As soon as I tap the shutter button again I get autofocus. This M/A setting, if the lens has it, provides both kinds of focus without ever having to move any switches. It's the best.
Older lenses may have an "A - M" switch. Leave those at "A." To get manual focus you must move the switch on the lens, and/or the switch on the camera. It's not automatic. Different lenses require different settings on the camera and lens to get manual. Some, like the old 300mm f/4 AF, required moving both the camera and lens switches! That was a pain.
Non-G lenses will have an aperture ring on the base of the lens where it's attached to the camera. Set this this ring to the smallest aperture (largest number), usually 22, if not 32 or 16. This number will be orange on autofocus lenses. There usually is a lock to keep this ring set there, since if it comes off that setting you'll get an error message from most cameras.
PLUG
My D200 User's Guide continues below.
It took me two months to write this D200 User's Guide. No one pays me anything. If you find it as helpful as a book you might have had to buy or a workshop you may have had to take, feel free to help me share more.
Thanks!
Ken
These were the basics. Keep reading for explicit details.
KNOBS and BUTTONS
FRONT < < NEXT
MENUS (See also Nigel Jackson's D200 Menu Guide.)