Nikon
D300 User's Guide:
Rear Controls
© 2008 KenRockwell.com. All rights reserved.


Nikon D300 rear. enlarge.
August 2008 Top of D300 Users Guide D300 Review More Nikon Reviews
NEW: Nikon D300 User's Guide for iPhone and iPod. 12 December 2009
Want free live phone support? In the USA, call (800) NIKON-UX, 24 hours a day, 365 days a year.
From left to right, top to bottom:
Play [>] Button top
Press it to see your pictures. Press again to turn them off.
There are a lot of trick play modes, like zooming all the way in with the center control button and being able to scroll around with the dials.
My favorites are explained under the settings for the rear thumbswitch and the Command Dials.
Trash (also doubles as one of the two FORMAT buttons) top
With an image on the LCD, press once. You'll get an "Are you sure?" message. Press again and the shot's gone. The D300 ignores this button if it's not playing back.
Hold this along with its brother (the MODE button) to format a memory card.
MENU top
This gets you inside your D300.
I'll cover what you can screw up with this in the 11 long pages that follow.
?/Key/INFO top
While in Menus: "?." Press for more information about whatever you're setting, if you see a gray "?" on the lower left of the color LCD. If no gray "?," then there is no help available.
While in Playback: "Key." It protects (locks) the image from erasure.
Warning 1.): It marks the file so well that it won't empty out of my trash on my computer unless I go in and remark the file on my computer first!
Warning 2.): These images are erased from your memory card when you format anyway. Now you see why I don't use the lock feature.
While Shooting: "INFO." It calls up a display of just about everything you might want to know on the huge rear color LCD. I find this far more useful than the vestigial top or rear LCDs.
Checkerboard (-) top
Playback Only: Tap it to select one, four or nine shots up at once. If zoomed, tap it to reduce the zoom.
Trick: When you have 4 or 9 images up, spin the front knob to flip more quickly between rows of images, presuming you've turned this on in custom setting f7.
Magnifier (+) top
Playback Only: Tap it to zoom in. If you have 4 or 9 shots up at once, tap it to get to 4 or just one.
Trick: When you have 4 or 9 images up, spin the front knob to flip more quickly between rows of images, presuming you've turned this on in custom setting f7.
OK top
While playing back at normal size: Tap it to get to the Retouch menu.
While playing back with zoom or with 4 or 9 images: Tap it to return to one image on-screen at normal size.
While in menus: Takes action on what you've set.
Nikon D300 rear. enlarge.
Eyepiece Focuser top
This is the little +- knob, under the rubber just above and to the right of the eyepiece.
Twiddle with it to clarify the finder, especially if you wear glasses.
AE-L AF-L (Top center) top
Hold this to lock exposure settings while shooting. You may change what this button does in the Custom Setting Menu f6.
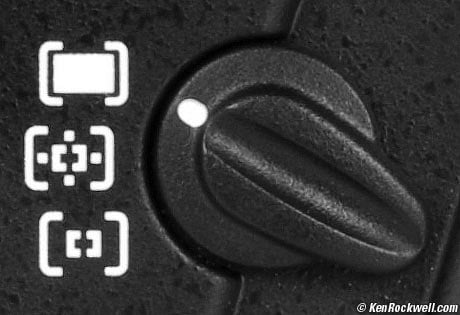
Metering Mode Selector (around AE-L AF-L button) top
It has three positions: Center Weighted, the circle on the top, Matrix, the rectangle in the middle, and Spot, the dot on the bottom.
I always use Matrix, the center rectangle. Matrix is a magic system which really figures out what you're shooting, even if it's very dark or very bright and white, and just gives the correct exposure. It sees in color, sees depth, it sees in over 1,000 places in the finder, and has an astounding amount of perception in getting exactly the exposure I want. Even with Nikon's first Matrix meter in the FA of 1983, I could point the camera at anything, even right into the sun, and always get perfect exposures.

Sunrise, Mono Lake.
I shot this with a Nikon FA, 600mm f/5.6 ED Nikkor AI-s, Matrix Meter, Program Auto exposure and Fuji Velvia. I just pointed and shot; the Matrix meter does the exposure calculations so I can pay attention to the composition.
The meter in the D300 is many times better.
I never use center weighted, and I certainly never use spot. With the Matrix meter, just shoot. It's smart enough to do all the compensation and locking that you used to have to do in the older modes.
The other positions are left-overs from earlier decades. They are blind to color, blind to absolute luminance, blind to distance, and blind to relative position in the frame. Matrix sees in many dimensions at once, while these blind old meters see in only one dimension. The Center-Weighted (CW) meter was Nikon's most poplar meter in the 1960s and 1970s, and the Spot meter is left over from the 1980s.
The CW meter was useful in its day because it measured just the right area of the finder so you could point the camera at the main subject, set a manual exposure, recompose, and shoot. Unless the subject just happened to be the right tone, you'd always have to use exposure compensation for light and dark subjects. In the 1970s, AE cameras had AE locks, so you'd point, meter, lock, recompose, and shoot. What a pain!
The Spot meter sees only a small spot in the finder. It requires knowing the Zone System to use well, since few scenes actually have any tones at exactly Zone V from which to spot meter. See How to Use the Nikon Spot Meter.
I wish there was a way to lock this in Matrix, as there is on the pro cameras. It's easy to knock this and not realize that it's been changed.
AF-ON (Top center right) top
Focuses the lens, but doesn't take a picture.
This button is helpful if you disable the AF from activating when you press the D300's shutter in CSM a5. If you do, then you can focus with this button, and have an AF lock when you release it. I'd rather it was a self-timer, but Nikon didn't ask me about this one.
Nikon D300 rear. enlarge.
Big Thumb Button top
This is used for everything: menu navigation, selecting AF areas, scrolling through playback images and a whole lot more.
You can configure this button in custom settings f1, f2 and f3.
I set mine to zoom way into an image when pressed in the center.
Trick: If you set a center push to zoom on playback, you can spin the rear dial to move to different images at the same position and zoom! This makes it easy to pick out the sharpest image. Unfortunately as soon as you hit the delete key it goes back to unmagnified, sort of making this less useful for in-camera selection and deletion.
L - • (around Big Thumb Button)
This is an electronic lock.
It's smart: it only locks the AF selection.
It doesn't lock you from anything else.
Because of this, if you can't select AF areas, check it because it can get knocked. Even in L you can still do everything except select AF areas.
AF Area Mode Selector (below Big Thumb Button) top
Focus Area Mode Selector Switch
This lets you choose how the D300's brilliant AF system uses all its sensors. This switch is important for switching from shooting static subjects to action. I explain this on an entire page on How to Use the D300 Autofocus System.
Pac-Man Lever (below AF Area Mode Selector) top
The Pac-man lever pops open the CF card door.
My D300 User's Guide continues below.
I support my growing family through this website.
This guide is free to read online, but copyrighted and formally registered. If you haven't helped yet and would like to save or make a printed copy of this article for your camera bag, please send me $5.00 for each complete or partial copy that you print or save, for personal use only. Others charge $29.99 for crappier information, and with your honesty I can continue to offer these guides online for less.
If you bought your D300 by clicking through my links, then you've saved money and also helped me write this guide. Thank you and please enjoy it. It's great people like you, and those who help me otherwise, who allow me to keep adding to this site for everyone's benefit.
The biggest help is to use these links to Adorama, Amazon, B&H, Ritz and J&R when you get your goodies. It saves you money and is a huge help to me. These places have the best prices and service, which is why I've used them since before this website existed. I recommend them all personally.
Thanks for reading!
Ken
Back to Top of D300 User's Guide or Top of Nikon D300 Review
KNOBS and BUTTONS
MENUS
PLAYBACK < < NEXT