Nikon
D300 User's Guide:
Top Panel Controls
© 2008 KenRockwell.com. All rights reserved.

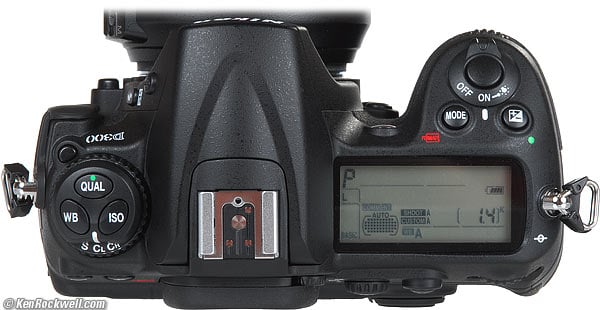
Nikon D300 top controls.
August 2008 Top of D300 Users Guide D300 Review More Nikon Reviews
NEW: Nikon D300 User's Guide for iPhone and iPod. 12 December 2009
Want free live phone support? In the USA, call (800) NIKON-UX, 24 hours a day, 365 days a year.
Nikon D300, top left controls.
Advance Mode Dial (S, CL, CH, [Lv], clock and Mup) top
This doesn't turn unless you press the release button just above it.
This sets the frame advance rate, Live View, the self timer, and the mirror lock up. It's just under the BOLT, BKT and [L] buttons.
S: Single Frame
One frame for each press of the shutter button.
CL: Continuous Low
I use this setting. Press the shutter once and you get one photo. Hold it down and the D300 takes pictures continuously at any speed you choose in Custom Function d4.
Default is 3 FPS, which I use. You can set this to any integer between 1 FPS and 7 FPS in Custom Function d4.
If I need one shot I get one shot. If the light is dim and I want a few shots to ensure I get a sharp one, I hold the release down and make several from which I'll pick the sharpest. Faster selections make it more likely that I'll get two shots when I want just one.
CH: Continuous High
The D300 runs at its top speed (6 or 8 FPS depending on grip and battery) as long as you hold down the shutter.
I don't use CH because it's so fast that I often get 2 or three shots when just one will do.
[Lv] (Live View)
Unlike Canon, it's easy to use Live View. Set this and press the shutter. Press the shutter again to get out of Live View. I'll explain the various Live View options under the Shooting Menu.
Self Timer (clock icon)
Press the shutter and the D300 takes a picture some seconds afterwards. We can set the delay in CFN c3.
Mup (Mirror Up)
Press the shutter and the mirror flips up. Nothing happens until you press the shutter again, at which time the picture is taken and the mirror flips back down.
Note 1: The Self Timer and Mirror Up modes are defective in design. If you forget to set either back to the other modes (I always forget) you'll still be in these weird modes tomorrow! Worse, the Mirror up mode is still stupid, since just like the D700 you need to buy a $100 cable release to release the shutter after the mirror goes up.
The correct design for these two functions, as done on the Mamiya 7, is to add a dedicated self timer button. Press this button and the shutter fires several seconds later. On an SLR the correct implementation is to have the mirror flip up at the beginning of the self timer interval. You'd get sharper pictures, not have to screw with screwing and unscrewing expensive electronic cable releases, not have to remember a cable release, and not miss tomorrow's shots because you forgot and left the D300 selector in last night's position.
Note 2: If you have no cable release, you can use the Mup mode and wait 30 seconds. 30 seconds after you press the shutter, the mirror flips up the D300 fires the shutter anyway.
Note 3: At default, the D300 needs perfect locked focus to take a picture in S mode, and locked focus to start the Mirror Up or self timer modes. If you don't have perfect focus, the D300 ignores you in these modes. Sometimes bad lenses may not be sharp enough to get good enough focus to let the D300 take a picture in these modes, especially with other than the center AF sensor. You can set the D300 to shoot even if it's not in perfect focus here.
By default, the D300 takes pictures whether or not it's in focus in the AF-C modes.
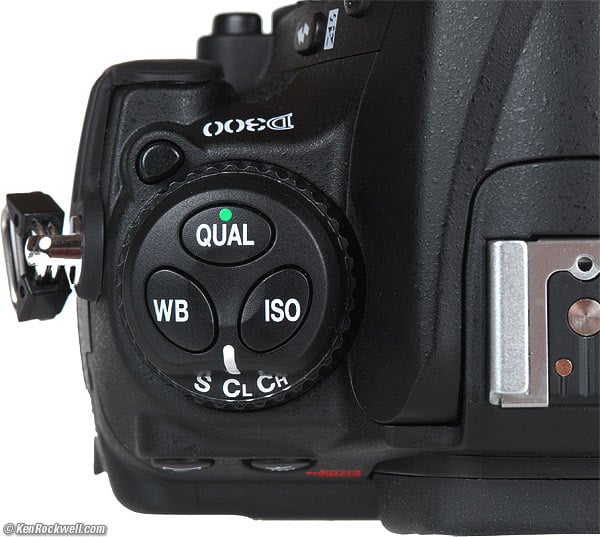
Nikon D300, top left controls.
WB, QUAL, and ISO
Hold any of these and spin the control knobs on the right to adjust.
White Balance (WB) top
This is critical to getting the photos you want right out of your D300.
Spin the rear knob for broad changes. Spin the front knob to fine tune. See my White Balance Examples page and my White Balance page for the specifics of each setting.
Here is a run down of the individual settings from left to right, as shown along the bottom of the top LCD and as set with the rear dial:
Auto (A)
I use this all the time. It makes its best guess for WB. It's usually very good. Indoor tungsten can be too orange unless you have some bright tungsten light also in the image. If you do, it removes the orange and compensates completely. If not, the D300 only partly compensates and you have a nice warm image instead.
Tungsten (hanging light bulb icon that's easy to confuse with the sun)
This makes the picture very blue. Use this only for deliberate freezing Arctic effects, or under conventional tungsten light bulbs.
Fluorescent (glowing tube icon)
Used to make crappy fluorescent light look less crappy. These settings rarely work; use the preset setting below for better results.
Direct Sunlight (smiling sun icon)
Use this outdoors with sun shining directly on the subject.
Flash (lightning bolt icon)
I never use this. It's almost the same as direct sun. I'm told it's really for studio strobes, since the Auto mode compensates magically for flash if you use it on-camera. The reason to use this is if you use a different trim value for your strobes than you do for sunlight. I'll get to trims in a bit.
Cloudy (cloud icon)
Warmer (more orange) than the sunlight position. I use this in shade, too.
Shade (house casting a shadow icon)
Very warm. Adds orange to your photo. Use this for sunset shots, or shots in open shade lit by the sky.
Continuously Variable (K)
This setting lets you choose any amount of blue or orange. Once you select "K" you choose the value, from 2,500 to 10,000, with the front knob while holding WB. The calibrations are abstract in what we scientists call (degrees) Kelvin. More degrees look warmer. There are no rules in real-world photography: use whatever setting looks best to you.
2,500 K is very, very blue. I'll use something around 2,650 K in dim home lighting to get neutral results. 3,200 K is the same as the tungsten setting above. 5,400 K is the same as direct sun above. I'll use something around 4,000 K indoors with a mixture of sun and tungsten light. 10,000 K is very, very orange. The shade setting is similar to 7,500 K, and 10,000 K is the warmest (most orange).
Preset (PRE)
You use this setting with a white or gray card to get perfect color matching. The D300 can recall five settings: just hold "WB" and spin the front knob after choosing PRE with the rear knob. You can to use menus to save the five settings.
I never use an actual card. I always grab a napkin, t-shirt, back of a menu or other piece of white. Black text makes no difference, so long as the background is white. If you choose a bluish piece of paper (like a glossy printed piece), your results will be warmer (more orange), and if you use a more orange piece of paper (like a cheap paper napkin), your results will be more blue.
Avoid gray items, since they are very rarely neutral, even if they look gray.
To set your white balance to something white:
1.) Ensure your card or other neutral object is in the same sort of light as your subject. Changing the angle of the object often will favor one kind of a light or another in mixed light, which will greatly affect your result.
2.) Hold WB and spin the rear dial to get to PRE.
3.) Release WB.
4.) Press and hold WB again for a few seconds.
5.) PRE starts to blink.
6.) Release the WB button.
7.) Point your D300 at the card and press the shutter.
8.) If the display flashes "good" you're set.
9.) If the display flashes "ng" then repeat from step 4.)
The D300 stores this as value d-0. You can save five different values using the menus, numbered d-0 through d-4. d-0 is always the value you just saved. You can recall the other saved values by holding WB and spinning the front knob. Thank God you can recall them without menus. The menus (explained later) are only for storing, sorting and managing these. I have mine set to 1.) indoors under crummy residential light, 2.) the screen of my laptop computer, 3.) mercury street lights and 4.) a cloudy day. I'm sure you will be more inventive.
White Balance Trims (fine tuning)
These are critical to getting the photos you want right out of your D300.
I rarely get what I want as set above, and usually need to set my image slightly warmer (more orange or amber (A)).
This is easy, but often overlooked by beginners. All you need to do is look at the image you just made on the LCD. Like it? You're done. Too cool (blue)? Then hold WB and move the front dial a couple of clicks to about A3 and try again. The more A you add, like A5 or A6, makes the image more orange, and the more blue you add, like B4 or B6, makes it bluer.
Easy! Do this and all your photos will be bang-on and you can stop wasting your time waiting for raw images to process.
QUALity • (also has a green dot) top
QUALity sets the file format and compression levels.
Hold it and turn the rear dial to choose the kind of file (JPG, TIFF or raw), and the level of JPG compression. Keep spinning the dial, and you can record raw at the same time as JPG.
Hold and turn the front dial to change JPG and TIF image size in pixels.
I use Large or Medium and JPG BASIC.
The D300 has enough resolution for great 20x30" (50x75cm) prints. Even the Medium setting has plenty of resolution for great 12 x 18" (30x50cm) prints, so I usually shoot in Medium unless I plan to be making huge enlargements.
As I explain on page one, I chose JPG Optimal Quality, and then Basic. This gives me great quality at the smallest possible file size.
Why do I worry about file size? Simple: I shoot a lot, and I bloated files waste time and money in transfer, backup and storage. Try it: shoot the same thing at several settings, and you won't be able to see the difference. See this on my D200.
Green Dot •
The green dot, when held along with the green dot on the ISO button, resets most things back to normal.
ISO top
ISO is pronounced Eye-Ess-Oh, not "eyeso."
Hold this and spin the rear dial to change ISO. Default is 1/3 stop steps. I prefer to change ISO in more meaningful full stops as you can set in a menu here.
Firmware Flaw: ISO goes from 100 to 6,400. Above ISO 3,200 Nikon uses bizarre terminology to scare amateurs away from setting these ISOs because these same amateurs would clog up Nikon's (800) NIKON-UX support lines complaining about grain. Nikon calls ISO 6,400 "H+1.0." Likewise, ISO 100 is called "L-1.0."
Hint: Since ISO is displayed in the finder, you can set this without taking your eye from the finder.
Hint: If you've selected Auto ISO, then you cannot set a manual ISO higher than you allow in Auto ISO. To get weird ISOs like ISO 6,400 (H+1.0), you must turn off Auto ISO.
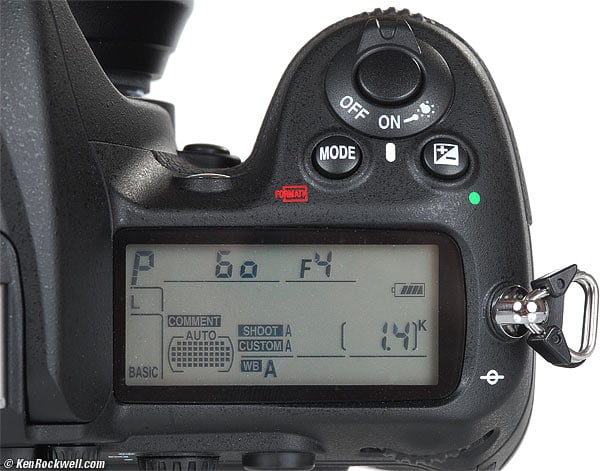
Nikon D300, top right controls.
Exposure Mode Button (MODE, right side) top
Hold it and spin the rear dial to select among P, S, A and M exposure modes.
P: Program
I use "P" for program auto exposure. In this mode the camera chooses the f/stop and shutter speed for you. If I want different apertures or shutter speeds I rotate the rear command dial, which selects alternate combinations of f/stops and shutter speeds which give the same exposure. Nikon calls this "Program Shift." An asterisk ( * ) shows up next to the P on the top LCD to let you know you've chosen a different combination for exposure. The asterisk doesn't appear in the finder, but you can see the apertures and shutter speeds. The asterisk goes away when you return to the standard combinations. The standard combinations are f/1.4 @ 1/8, f/2 @ 1/15, f/2.8 @ 1/30, f/4 at 1/60, f/5.6 @ 1/125, f/8 @ 1/250, f/11 @ 1/500, etc.
An easy way to return to these standard combinations is to flip to a different mode and back to P, or turn the D300 off and back on.
A, S and M Modes
If you want to use a fixed aperture or shutter speed, then use S or A mode and the camera will automatically pick the other value.
If you want to set both the hard way, use M, manual, mode.
In these three modes you select the aperture with the front dial and the shutter speed with the rear dial. You can reverse which dial does what in the Custom Setting: Controls Menu. Of course in A or S mode you can't set one of the two values because the camera is setting one for you.
A Mode: Aperture Priority
In A mode you choose the Aperture and the D300 chooses the shutter speed.
S Mode: Shutter Priority
In S mode you set the Shutter and the D300 sets the aperture.
If the D300 runs out of good apertures you easily can get under or over exposure in S mode: watch that the D300 can select a correct aperture for your lighting.
M Mode: Manual
You set everything the hard way. Look at the LCD to check exposure. You can use the bar graph in the finder, but why? If you wanted to do that, use another mode and let the D300 do the setting for you.
Hint and Firmware Defect: AUTO ISO doesn't deactivate in Manual mode. I always turn off AUTO ISO when I enter Manual Mode.
Hint: You can see P, S, A and M displayed in the finder, so you can adjust them without taking your eye from the finder.
FORMAT (combined with MODE button)
Hold this along with its brother on the back left rear of the camera (combined with the trash button). You'll get a blinking "For" on the top LCD.
Hold both of these again and you'll completely reformat the memory card.
Professionals reformat a card each and every time a card is put in the camera. This is because files and folder structures are sometimes messed up or changed when read with a card reader, read in-camera by a computer or used in any other camera. Professionals prefer to be safe than sorry. They don't use cards to archive previous photos.
One time I kept saving my winner shots on a card by simply erasing the rest each time. After a few months I started to get errors. These went away as soon as I reformatted the card. Reformatting completely renovates the card. Erasing does not, and may leave the potential for errors.
Power Switch (right side) top
Tap it past ON to turn on the LCD illuminators and the meter.
There's no need to turn OFF the D300 except to prevent accidental operation when squashed in a camera bag. The D300 turns off by itself after a few seconds of ignoring it. The only thing the OFF position does is act as a lock against unintended operation.
Exposure Compensation Button • (+/- and a green dot) top
This is the most important control on the D300 or any other camera.
Hold the button and spin the rear dial. + makes the next picture you take brighter, and - makes it darker. If your photo is too dark or light, just change the setting and try again. Easy!
Remember to set it back to zero when you're done. If you don't, you'll see a bar graph on the bottom of the finder and on the top LCD.
See more at How to Set Exposure. Ignore Nikon when they suggest you don't use this with Matrix Metering; I do it all the time.
Hint: You can see the + or minus value displayed in the finder as well as the top LCD, so you can adjust this without taking your eye from the finder. The two displays only read the value when the button is held, otherwise those digits read exposures remaining.
Hint: This changes the setting for the next photos you take. It doesn't change any photos you've already made.
My D300 User's Guide continues below.
I support my growing family through this website.
This guide is free to read online, but copyrighted and formally registered. If you haven't helped yet and would like to save or make a printed copy of this article for your camera bag, please send me $5.00 for each complete or partial copy that you print or save, for personal use only. Others charge $29.99 for crappier information, and with your honesty I can continue to offer these guides online for less.
If you bought your D300 by clicking through my links, then you've saved money and also helped me write this guide. Thank you and please enjoy it. It's great people like you, and those who help me otherwise, who allow me to keep adding to this site for everyone's benefit.
The biggest help is to use these links to Adorama, Amazon, B&H, Ritz and J&R when you get your goodies. It saves you money and is a huge help to me. These places have the best prices and service, which is why I've used them since before this website existed. I recommend them all personally.
Thanks for reading!
Ken
Back to Top of D300 User's Guide or Top of Nikon D300 Review
KNOBS and BUTTONS
BACK < < NEXT
MENUS