Canon EOS R User's Guide
Power Format Lens Changing Mode Dial
Autofocus Manual Focus Focus Magnifier
ISO White Balance Exposure Compensation
Fv Exposure Mode M-Fn Button M-Fn Bar
Display Options Display Brightness
Quick Control Screen Menu System My Menu
Custom Controls Lens Control Ring
Limit Setting Ranges Picture Styles
Image Tweaks HDR File Formats 8 FPS
Faster Finder Update Rate C1, C2 & C3 Modes
My C1, C2 & C3 Settings Lens Corrections
Non-EF Lenses on Adapters Video More
R1 R3 R5 II R5 R5C R6 III R6 II R6 R R8 RP R7 R10 R50 R50V R100
Bodies Compared RF Lenses EF Lenses Flash
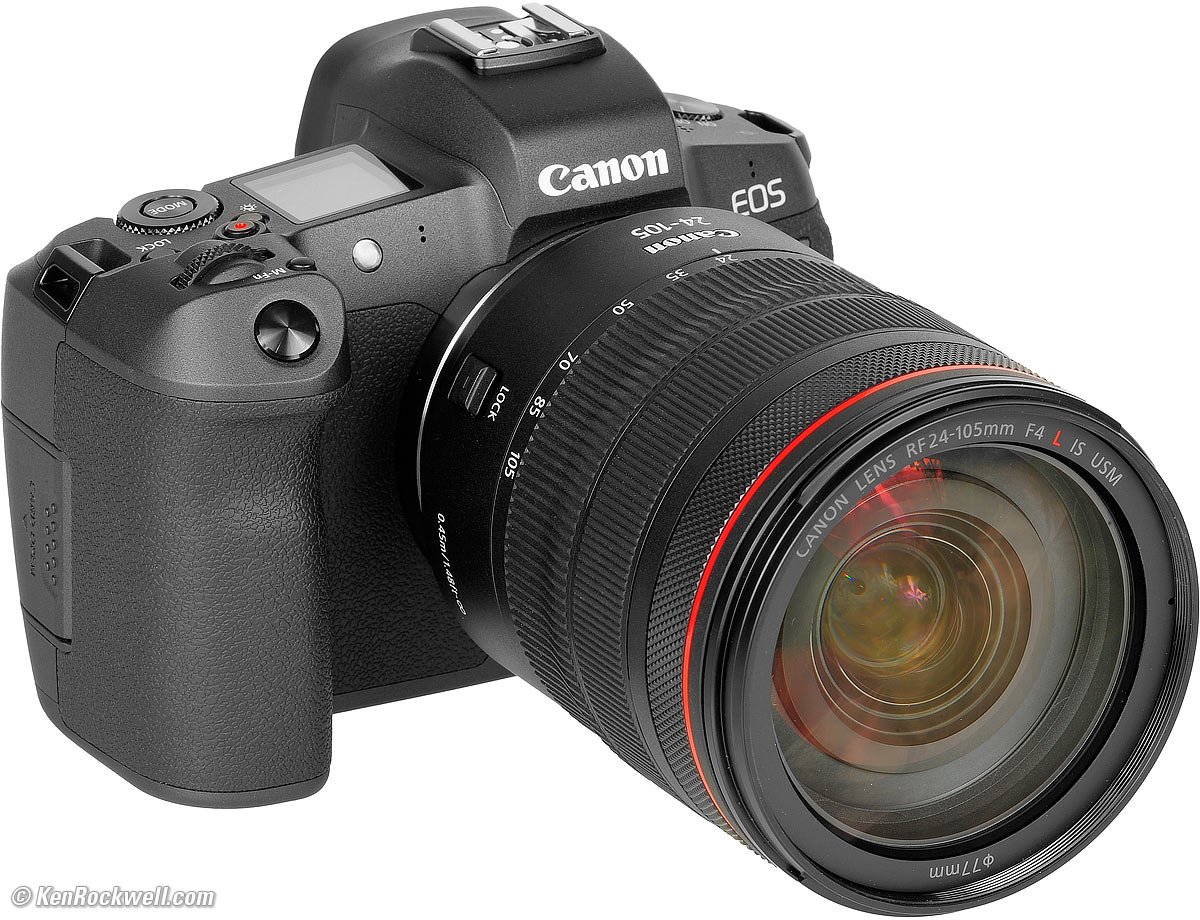
Canon EOS R (23.0 oz./652g with battery and SD card, $2,299) and RF 24-105mm f/4L IS. bigger. I'd get mine at Adorama, at Amazon, at B&H or at Crutchfield.
If you find this guide as helpful as a book you might have had to buy or a workshop you may have had to take, consider helping me write more of these with a gift of $5.00 — especially if you intend to make a printout of this copyrighted work.
This all-content, junk-free website's biggest source of support is when you use those or any of these links to my personally-approved sources when you get anything, regardless of the country in which you live. Canon does not seal its boxes in any way, so never buy at retail or any other source not on my personally approved list since you'll have no way of knowing if you're missing accessories, getting a defective, damaged, returned, non-USA, store demo or used camera. Get yours only from the approved sources I use myself for the best prices, service, return policies and selection. Thanks for helping me help you! Ken.
October 2018 Canon Reviews Mirrorless RF Lenses EF Lenses Flash All Reviews
Canon's own EOS R User's Guide

Power

I buy only from these approved sources. I can't vouch for ads below. |


Take out the battery to charge it. The LC-E6 folding plug charger blinks different ways in amber to let you see charge status from across the room, and turns green when done. Brilliant!
You can charge in-camera via USB, but you have to buy the optional $190 USB Power Adapter PD-E1 to do it. The $190 PD-E1 only charges the battery; it can't power the camera. Use the optional $145 AC Adapter Kit ACK-E6 for AC operation, or just get any of the Sony cameras which charge and operate with any 99¢ USB cord.
I get about 1,000~700 shots per charge with typical use and playing with the camera more than usual, and can get over 7,000 shots per charge if I just let it motor away in Continuous mode without playing anything back or making settings.
To read the exact battery charge percentage, number of shots made on this charge and general battery health, go to MENU > WRENCH page 3 > Battery info, which gets you this:
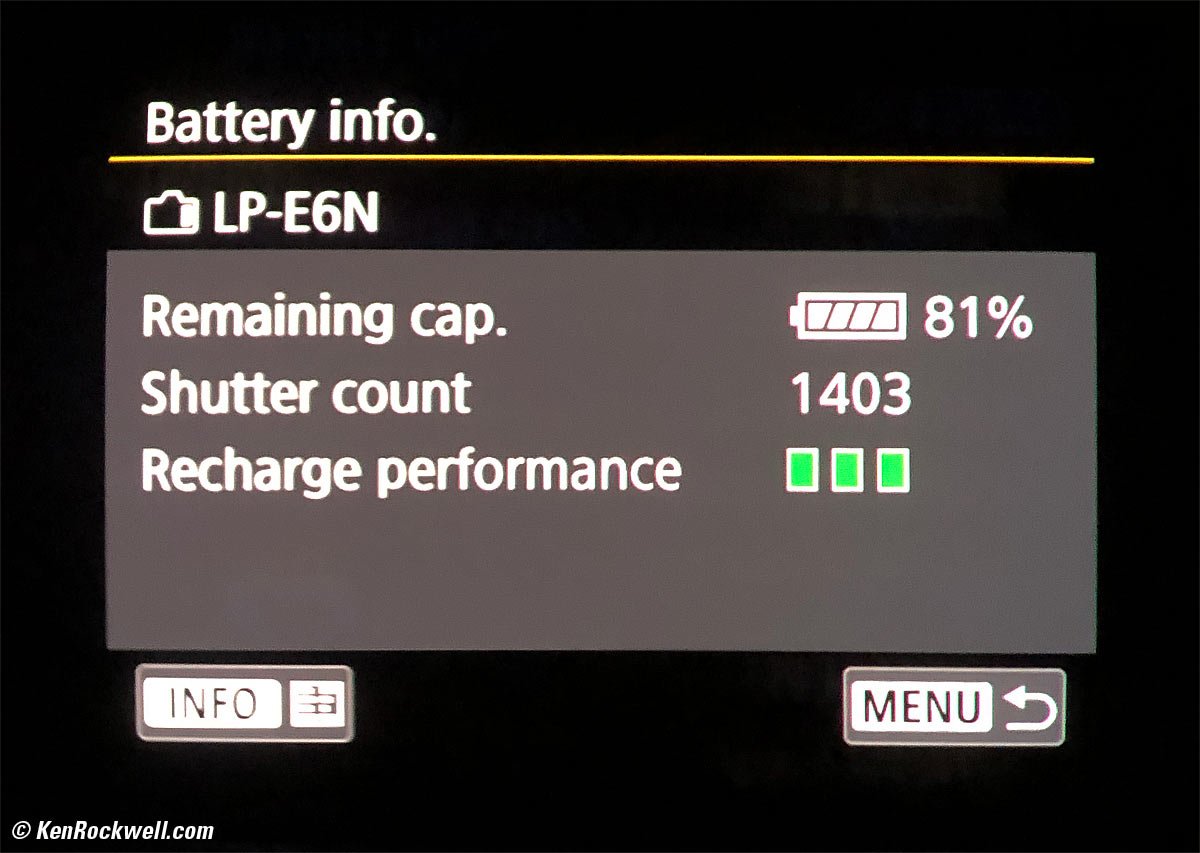
Canon EOS R battery charge percentage and long-term health.
The shutter count is the number of shots made on this charge, not the total on the camera.
Power Saving
Leave the power switch OFF while walking around. The camera sees your body behind the finder as you walk around, and mistakenly prevents it from sleeping as it should, thinking the camera is at your eye.
The Power saving and ECO modes don't slow the camera down and do extend battery life, so I use them all:
ECO Mode: MENU > WRENCH page 2 > ECO mode > On.
Sleep timers: I set to their minimums, as those work great for me: MENU > WRENCH page 2 > Power saving > Display off (15 sec.), Auto power off (30 sec.) and Viewfinder off (1 min.).
Finder Frame Rate [FPS]: The finder's frame (update) rate is fast enough that I can't see any delay, even in the lower-frame-rate power-saving mode I prefer: MENU > WRENCH page 4 > Disp. Performance > Power saving. This is a completely different setting from the High Speed Display option for high-speed continuous shooting.
Format Card
I do this every and any time I put a card in my camera, presuming of course that I've downloaded everything from my card.
To format the card, MENU > WRENCH page 1 > Format Card > OK.
Lens Changing
Turn off the power before changing lenses. This closes the shutter before you remove the lens to prevent dust getting on your sensor.
Exposure Mode Dial
To select exposure modes, tap MODE on the top right and then turn that dial as you look in the finder, at the rear LCD or at the top LCD to select the mode.
Autofocus
AF Modes
There are two main autofocus modes: ONE SHOT and SERVO.
ONE SHOT means the EOS R focuses, and locks. Use this for still subjects.
SERVO means the EOS R continuously autofocuses as subjects move.
AF Area Color
Blue boxes mean tracking SERVO AF.
Green boxes mean LOCKED ONE-SHOT autofocus.
Gray means unfocused.
Setting the Touch Screen to select AF areas, especially when using the finder
There's no 8-way nubbin; the LCD's better because it's both faster and more precise. You can use the 4-way rear controller if you insist, but do program the rear LCD like this:
MENU > AF page 1 > Touch & drag AF settings > Touch & drag AF > Enable,
MENU > AF page 1 > Touch & drag AF settings > Positioning method > Relative, and
MENU > AF page 1 > Touch & drag AF settings >Active Touch Area > Right. Depending on what eye you use and what part of the screen is away from your nose you might prefer a different area. This prevents false input from your nose hitting the screen.
Setting AF Area Modes Quickly
I set a faster way to swap between single-point AF from the all area/face detect mode: First I remove all the AF modes I don't use at MENU > AF page 5 > Limit AF methods > and uncheck all that I don't use (I only check the first two Face and Box options), then I set the ✱ button to swap among these AF modes at MENU > CUSTOM page 4 > Customize Buttons > click down to ✱ button > Direct AF method selection.
Changing AF Area Size
This is well hidden: To change the size of an AF area:
Press the rear AF-area selection ([ + ]) button. It's the button below the ✱ button.
Tap the M-Fn button near the shutter button or turn the front dial to select single-point AF, and now the INFO button will change the AF area size.
Eye Detection
Eye Detection means the EOS R focuses on the nearest eyeball. It's not eye-controlled AF like in the 35mm EOS 3.
I set EYE AF and leave it on: MENU > AF page 1 > Eye Detection AF > Enable. You can't enable it in any of the area-detect modes, so set this menu while the camera is in a single-point or similar mode otherwise Eye Detection AF is grayed-out.
Another well-hidden way to set or unset Eye AF is to:
Press the rear AF-area selector ([ + ]) button. It's the button below the ✱ button.
Tap the M-Fn button near the shutter button or turn the front dial to select Face/All-Area AF, and now the INFO button will activate or deactivate Eye AF.
You also can set this from the Q screen: select FACE AF, and tap INFO to enable or disable Eye Detect.
Stop AF from running all the time
By default AF runs all the time. This means often you'll already be in focus before you press the shutter, but it drives me nuts because it's running all the time while I'm composing or even with the camera ON and around my neck.
I turn this off at MENU > AF page 1 > Continuous AF > Disable.
Setting Tracking Autofocus and Exposure
Tracking AF in Continuous Advance Mode
Be sure to select SERVO AF in the Quick Control or any other screen.
It won't track focus if you leave it in ONE SHOT.
Tracking Exposure in Continuous Advance Mode
Not only do you have to select SERVO AF in the Quick Control or any other screen to get tracking autofocus, you also have to select this for exposure to track from frame to frame in Continuous advance mode.
Weird, but true. Leave AF in ONE SHOT and exposure locks at the first frame.
Exposure only tracks (changes) from frame-to-frame if you're in SERVO autofocus.
How to Lock Focus and Exposure in Continuous Advance mode
Weird, but true, set ONE SHOT AF in the Quick Control or any other screen and the EOS R will lock both focus and exposure at the first frame of any sequence shot in Continuous advance mode.
Face Detect and/or All-AF Area AF and Viewfinder Level
Auto AF Area Select and Face Detect only work together, and the Level and Face detect don't work together — so you have to turn off Face Detect to get the level display, and turn on Face Detect to get All-Area Auto AF-Area Selection mode. These shouldn't be linked together like this, but they are.
You have to use an AF area mode other than Face Detect to get the level display, and you have to select the Face Detect AF Mode to get Auto AF Area Select mode.
You set these at MENU > AF page 1 > AF Method.
Manual Focus
Focus Peaking
Set this at MENU > AF page 2 > MF peaking settings > Peaking > ON. It's OFF by default.
Focus Magnifier
By default tap the AF Area mode button [ + ] (below the ✱ button) and then tap INFO to magnify.
I set my AF ON button to be a focus magnifier at MENU > CUSTOM page 4 > Customize Buttons > Camera Column > AF ON :> Magnify.
ISO
There's no marked ISO button; use the M-Fn bar next to the eyepiece or the M-Fn button, or use the touch screen that auto-appears when the EOS R is pulled from your face. Personally I change ISO from within the Fv mode or I use the Quick control screen.
I almost always shoot in AUTO ISO unless I'm on a tripod. I set it so it can select anything from ISO 100~40,000 (MENU > CAMERA page 3 > ISO speed settings > Auto range).
For people I set Auto ISO Minimum Shutter Speed to 1/125.
For sports and action I set Auto ISO Minimum Shutter Speed to 1/500.
For everything else I set Auto ISO Minimum Shutter Speed to AUTO, which varies depending on focal length..
While the menu adjustments offer state-of-the-art flexibility, oddly I still can't get my EOS R to go to less than about 1/60 in Auto ISO with auto-selection of the slowest shutter speed, regardless of lens focal length. It works normally with longer lenses, but no longer wants to go below 1/60 with wide lenses. To get slower Auto ISO minimum shutter speeds, either set them manually MENU > CAMERA page 3 > ISO speed settings > Min. shutter speed > Manual > 1/8 or etc., or shift them to slower auto-selected speeds (MENU > CAMERA page 3 > ISO speed settings > Min. shutter speed > Auto > click towards minus).
Auto ISO always sets ISO 400 with flash. I wish I could program this to be smarter, but it's fixed at ISO 400 regardless of ambient light.
White Balance
I almost always shoot in Auto White Balance (AWB).
Exposure Compensation
Like every other EOS camera, the back (top) MODE dial adjusts exposure compensation at any time, unless you program it otherwise.
I prefer to use the Fv exposure mode which takes over the MODE dial, and program my extra lens control ring to become exposure compensation.
New Fv Exposure Mode
Try this new exposure mode, I really like it.
Fv mode is like Program mode, but lets you individually set any of Shutter, Aperture, Exposure Compensation or ISO, while the others continue to set themselves automatically. You can set more than one, and those you didn't set will change automatically as needed. Cool, huh?
While Program mode resets everything back to defaults every time the meter shuts off, anything you shift in Fv mode stays that way until you reset everything back to full auto simply by tapping the right side of the four-way rear controller, or turn off the power.
Once Fv is selected (tap MODE and turn its dial to Fv), you use Fv mode by now turning the same rear dial to select what you want to set (the finder or rear LCD shows an orange wheel left of the item while the top LCD shows a box around it). Once selected, turn the front dial to change it. Once you set one, you can set other things the same way.
It's easy to set even from the top LCD: turn the rear ring to highlight an option with a box around it, then turn the front dial to change it. In this case the front dial will change the ISO setting:
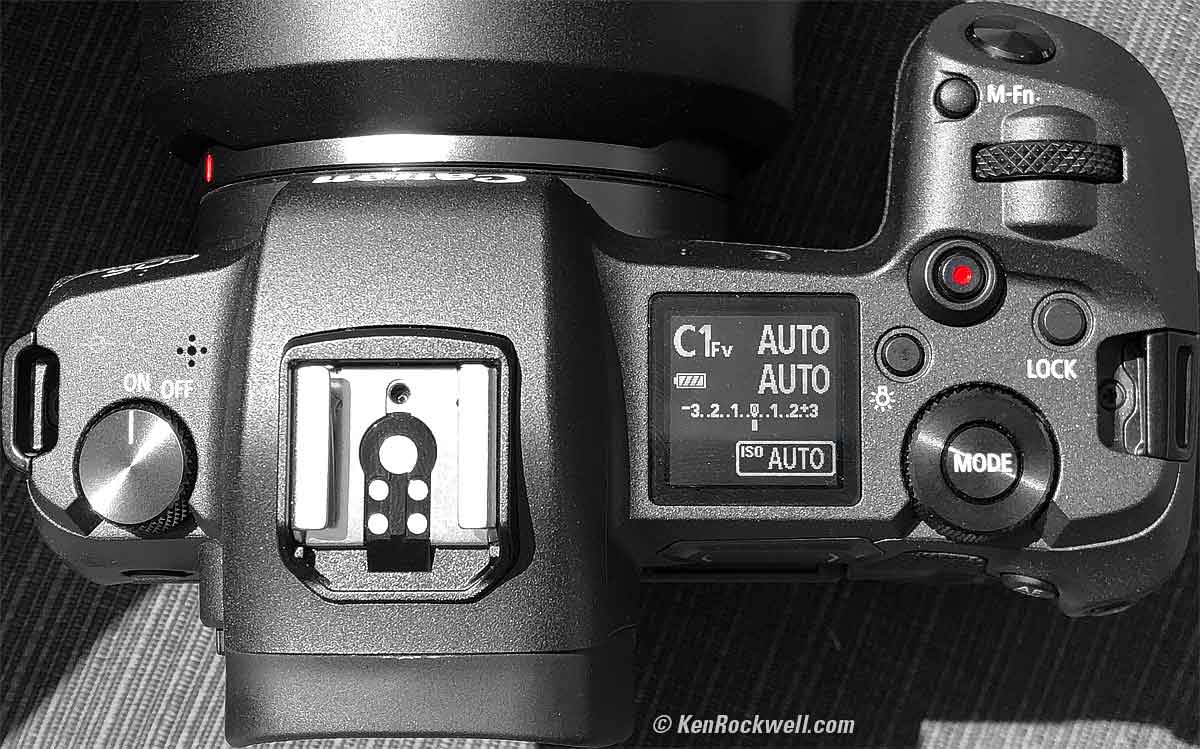
Canon EOS R top LCD. ISO is selected to change. It will change when you turn the front dial, while the rear dial will select other items.
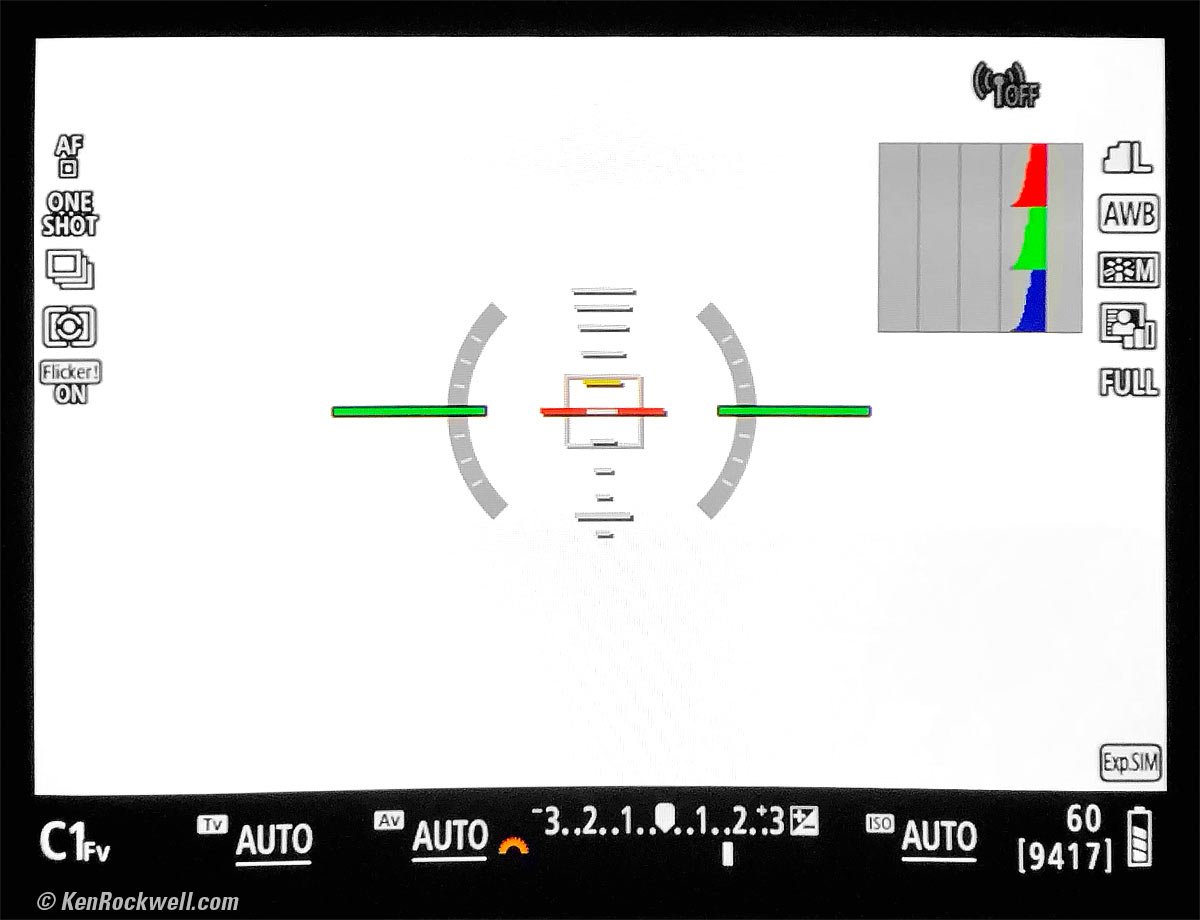
Canon EOS R electronic viewfinder (same for rear LCD). The orange dial is left of exposure compensation, which will change when you turn the front dial. Turn the rear dial to move the orange dial icon to select other items to set.
The display underlines whatever the camera is controlling automatically, and has no underline for what you've set. Simple.
Tap right on the rear controller to reset all to AUTO.
Even if you change Exposure Compensation by some other method like the lens' control ring, a right tap on the rear controller sets everything back to AUTO.
M-Fn Button
The M-Fn button near the shutter button is one of many ways to set ISO, advance mode, SERVO/ONE-SHOT AF, White Balance and exposure compensation.
Tap the M-FN button, move the rear dial to select what you're setting, and move the front dial to set it.
M-Fn bar
M-Fn bar to the right of the eyepiece. bigger.
The M-Fn bar is the "< >" bar to the right of the eyepiece.
To use it, hold your finger on it for a second to unlock, then move your finger left or right to select your setting.
By default it sets ISO, and you can change what it sets at MENU > CUSTOM page 4 > Customize M-Fn bar. The options are ISO, white balance, Check focus/disp. info, Movie recording (audio recording levels), Flexible-priority AE, AF, User customization and OFF. User customization lets you pick and choose more precisely what options are at your M-Fn bar.
The M-Fn bar safety lock option at MENU > CUSTOM page 4 > Customize M-Fn bar > Enable means that the M-FN bar ignores you unless you hold a finger there for a couple of seconds to wake it up. Disable means that bar responds any time you put a finger on it.
The INFO Full cover setting option at MENU > CUSTOM page 4 > Customize M-Fn bar means that if you cover the entire M-Fn bar for a moment that you'll get to the M-Fn bar settings screen.
Advance Modes
The easiest way to select among Self Timer, Single, Continuous, Continuous High, etc. is to press the M-Fn button, turn the rear dial to select advance modes, and then turn the front dial to select which advance mode.
You also can press the rear Q/SET button and find the advance mode settings on the rear LCD.
Long Exposures
It's easy to program your EOS R to make precisely timed exposures of any length up to 100 hours, with no need for a remote cord!
You set the exposure time at "Bulb Timer" and then shoot a Bulb exposure. The EOS R times off what you programmed, and closes the shutter itself without you having to babysit the camera all night.
1.) Set your advance mode to single. HINT: Set it to Self Timer and you won't need to use a remote cord to eliminate camera shake!
2.) Set your exposure time as a "Bulb timer" at MENU > CAMERA page 6 > Bulb timer > Enable.
3.) Shoot at the Bulb setting.
It will make an exposure as long as you've set, and then close the shutter. If you want to end the exposure early, just tap the shutter.
Since it closes the shutter on the second press, you can essentially reprogram BULB to TIME by setting a long value for Bulb timer, but you do have to enable the Bulb timer each time you go into Bulb mode.
The EOS R shows the elapsed time as MMM:SS on the top LCD as it exposes. You can't have the top LCD illuminated at the same time, but this is the best setup in the business letting you make a precisely timed exposure of any length without having to babysit the camera.
Finder & LCD Displayed Item Options
Set these at MENU > WRENCH page 4.
Display Brightnesses
MENU > WRENCH page 2 > Disp. brightness only applies to whichever display is active. Light up the other display if you want to change it, and if you go outside or work at night and use both displays, you'll have to change each individually.
While there are no AUTO brightness settings, the C1, C2 and C3 presets save and recall your brightness preferences.
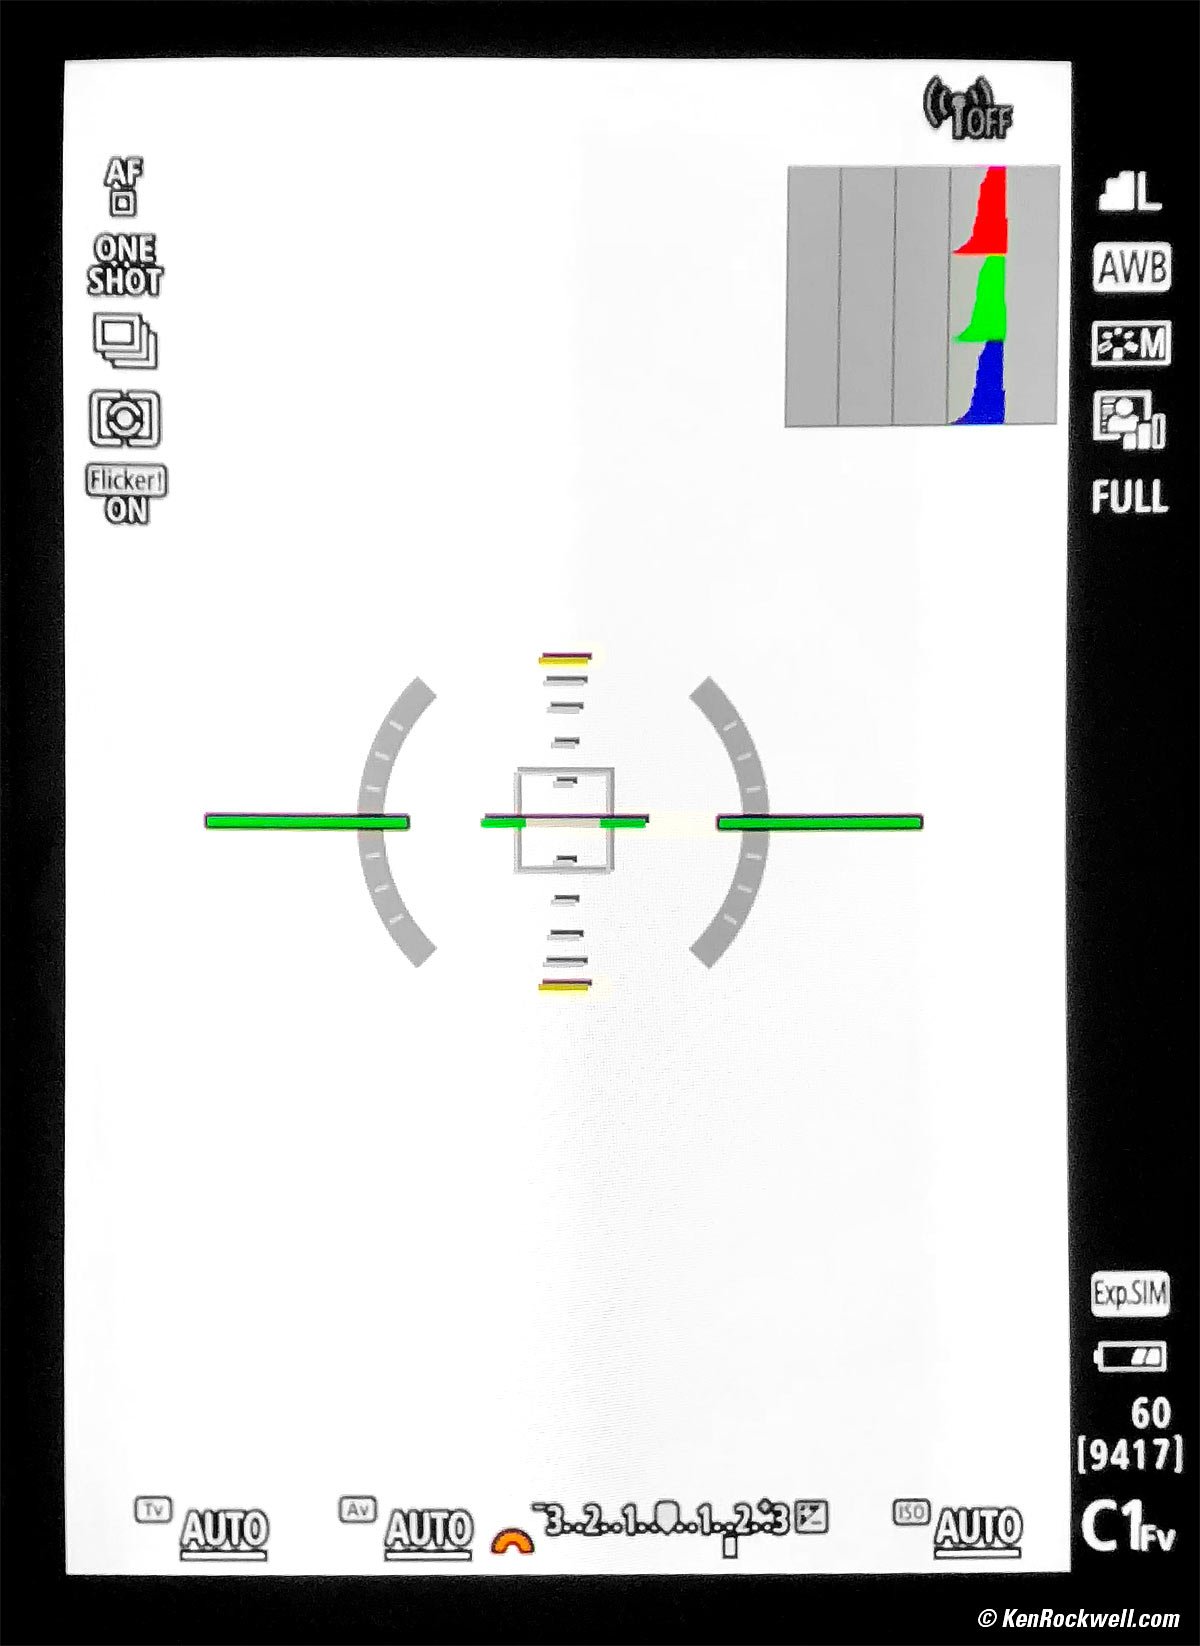
Vertical Finder Display
I set my finder data to rotate when held vertically! Set this at MENU > WRENCH page 4 > Shooting info. disp. > VF vertical display > ON:
Actual view through Canon EOS R Electronic viewfinder. (It's much sharper in actual use than in this special photograph.)
I've turned on almost every display option here; just press the INFO button a couple of times to get a clear window with which to compose if you prefer.
Top LCD
Tap the light (☀) button to swap between basic and detailed displays.
It's black with white letters, but hold the light (☀) button a couple of seconds and it changes to black-on-white and has a dim, cool-white backlight.
Even with the power OFF it shows the exposure mode.
Quick Control Screen
Press the INFO button a few times while using the LCD to get this. This is one of my favorite ways to get to a lot of shot-to-shot settings.
Once the Q screen is up, you either have to tap the "Q" on that screen to use the touch screen, or press the Q/SET button and use the rear 4-way controller to navigate around it.
Menu System
Pressing MENU on a sleeping camera simply wakes it. Just press twice, slowly, if the camera is off to get to MENU.
Pressing the INFO button while in MENU jumps directly to the first page of each of the color-coded sets of main menus (CAMERA, AF, PLAYBACK, WRENCH, CUSTOM and MY MENU (★)).
Use the right-left buttons or the front dial to move between the pages inside each colored category.
Use the up-down buttons or the rear dial to move up and down in each menu page.
My Menu
I add these items to MY MENU (★):
Battery info: Shows exactly charge level and shots made so far.
Disp brightness: This sets either the LCD or the EVF depending on which is active. You'll need to set the EVF to max outdoors, and the middle setting indoors. Setting the LCD to max works very well in direct sunlight; give it a try.
Custom shooting mode (C1-C3): I use this to save and modify the C1, C2 and C3 settings selected with the MODE dial
Lens aberration correction: I leave these all ON, except I may turn Distortion Correction OFF if I'm not shooting buildings, straight lines, or shooting with a fixed, distortion-free lens like the RF 50mm f/1.2L.
ISO speed settings: This is where you can unlock ISO 50, 51,200 and 102,400, and program the particulars of AUTO ISO.
Cropping/aspect ratio: I use this for square and 4:3 shooting, which I love.
Customizing Controls
Ring & Dial rotation directions: MENU CUSTOM page 3.
Buttons: MENU > CUSTOM page 4 > Customize buttons. I prefer to set my left rear clicker to MENU, so I can set my MENU without having to reach all the way over to the real MENU button on the left side of the camera. I also program my red MOVIE button to be a depth-of-field preview.
LOCK Button (near MODE dial): MENU > WRENCH page 6 > Multi function lock (Controls what the LOCK button locks; we can't otherwise reprogram the LOCK button).
Dials: MENU > CUSTOM page 4 > Customize dials.
M-Fn Bar by eyepiece: MENU > CUSTOM page 4 > Customize M-Fn bar.
Program the Extra Lens Control Ring
MENU > CUSTOM page 4 > Customize dials > Control Ring (bottom choice of three).
The options also showing a down arrow mean that the ring is only active during a half-press of the shutter to prevent accidental adjustment.
Limit selectable ranges of ISO, shutter speeds and apertures
Not that you'd want to, but you can set limits on the selectable ranges of aperture and shutter speed at MENU > CUSTOM page 2.
You can limit the ISO range at MENU > CAMERA page 3 > ISO speed settings > ISO speed range, which is also where you can enable the extreme high and and low ISO settings.
Picture Styles
"Picture Styles" are where we program sharpening, color saturation, contrast and etc.
Set these at MENU > CAMERA 4 > Picture Style, among other places.
I photograph places and things in the STANDARD [*S] Picture Style setting. I change the saturation to +4 and peg sharpening at their maximum settings of 7, 5 and 5.
For pictures of people I use the same sharpening, but leave saturation at 0 or +1.
More Image Tweaks
I always leave the shadow optimizer (Automatic Lighting Optimizer) ON, which is its default (MENU > CAMERA page 3 > Auto lighting optimizer > Standard).
I don't use highlight recovery (Highlight Tone Priority), since it deactivates the shadow optimizer above.
HDR Mode
Set the HDR mode at MENU > CAMERA page 5 > HDR Mode.
File Formats
I shoot at LARGE JPG, and set it to NORMAL (the stair-step icon) instead of FINE (quarter-circle icon). Canon defaults to the FINE (quarter circle icon) setting, so I always set the NORMAL options deliberately.
I never shoot raw, but you may do whatever you like.
Try it yourself: I've never seen any difference between NORMAL and FINE, and I do notice the smaller file sizes which transfer faster and take up much less space in my computer.
Getting 8 FPS
The EOS R only runs at 8 FPS in ONE SHOT AF or MANUAL focus modes, making 8 FPS only useful for a subject that stays in the same place. If you're in SERVO AF so you can track action, then Continuous Hi runs at 5 FPS instead and also tracks exposure from frame to frame.
To get to 8 FPS, first select the high-speed continuous advance mode (Q/SET > find advance mode on rear LCD > High Speed Continuous), and then select ONE SHOT as the AF mode on the rear screen, or move the lens' AF/MF switch to MF.
Exposure only tracks (changes) from frame-to-frame if you're in SERVO autofocus, so exposure is locked at 8 FPS.
Faster Finder Update Rate for Continuous High Shooting
There's a hidden menu option at MENU > CAMERA page 6 > High Speed display > ON which lets the finder update faster than the 5 FPS rate at which the EOS R shoots in Continuous Hi mode. It is set to OFF by default. I set mine ON which lets it run if it can.
Once set ON, it only works if you:
1.) Are using a native RF lens (doesn't work with EF lenses on adapters).
2.) Are in Continuous Hi advance mode (Doesn't work in low speed Continuous advance mode).
3.) Are in SERVO AF mode (doesn't work in ONE SHOT or MANUAL AF modes).
C1, C2 and C3 Modes
I live by these. I set C1 for photos of places and things, C2 for people, and C3 for sports and action. Everything about the camera: EVF brightness, frame rates, AF modes, resolution, and everything magically recall with the click of a dial.
Each time you turn the dial to one of the C1, C1 or C3 positions, everything is reset to what was stored in that position.
Feel free to change any settings as you shoot in the C1, C2 or C3 positions. You won't erase what you saved. These changes will stay until the camera times-out, usually one minute (you can change that duration in the menus), and the next time you go to shoot, even if you had changed something, you're back at your saved settings.
If you want to return to the saved settings more quickly, just move the dial to any other position and return.
To Save a Suite of Settings
To save a complete camera-state setting of your EOS R:
1.) Set the camera as you like. Everything is saved.
2.) Press:
MENU > WRENCH page 6 > Custom shooting mode > Register settings > choose C1, C2 or C3 position > SET > OK.
Permanently Change a Stored Setting
To change a stored setting:
1.) Set the dial to that setting, C1, C2 or C3. This recalls the setting.
2.) Change something.
3.) Save the camera's current state back into that dial position:
MENU > WRENCH page 6 > Custom shooting mode > Register settings > choose C1, C2 or C3 position > SET > OK.
If you select the wrong C1, C2 or C3, you will have overwritten the settings at that position.
Copy a Stored Setting
To copy a stored setting into another location:
1.) Set the dial to the setting you want to copy. This recalls that setting.
2.) Save the just-recalled camera state into another dial position:
MENU > WRENCH page 6 > Custom shooting mode > Register settings > choose C1, C2 or C3 position > SET > OK.
If you select the wrong C1, C2 or C3, you will have overwritten the settings at that position.
Make a Temporary Change to a Stored Setting
Just change something as you would anywhere else. By default, the next time the camera wakes up or you re-select that setting, it will be back as it was saved. The C settings are not altered unless you deliberately save something into them as described above, or if you set:
Have C1, C2 & C3 Settings Update Automatically
The EOS R resets the C1, C2 and C3 settings each time it turns on or you reselect C21, C2 or C3, unless you set:
MENU > WRENCH page 6 > Custom shooting mode > Auto update set > Enable.
My personal C1, C2 and C3 Settings
Everything about the camera is saved into each of these C2, C2 and C3 memories. This is what I save that changes for me from setting to setting:
C1 |
C2 |
C3 |
|
| Used for | General Scenics |
People & Family |
Sports & Action |
| Exposure Mode | P or Fv |
P or Fv |
P or Fv |
| Resolution | L |
M |
S1 |
| Picture Style | Standard with +4 Saturation and 7, 5, 5 sharpening |
Standard with 0 or +1 Saturation and 7, 5, 5 sharpening |
Standard with 0 or +1 Saturation and 7, 5, 5 sharpening |
| ISO | Auto |
Auto |
Auto |
| Max Auto ISO | 40,000 |
40,000 |
40,000 |
| Minimum Auto ISO Shutter Speed | AUTO |
1/125 |
1/500 |
| AF Mode | ONE SHOT |
SERVO AF |
SERVO AF |
| AF Area Select* | Wide Area | Face & Eye Detect/All-Area | Face & Eye Detect/All-Area |
| Finder Level** | ON |
Off |
Off |
| Advance | Continuous Low |
Continuous Low |
Continuous High (5 FPS) |
* All-Area AF only works with Face Detect, and Face Detect doesn't work with the level, so I use Wide Area when I need the level.
** You can't use the level and Face Detect at the same time.
Lens Corrections
Corner darkening, distortion and more are corrected by default.
You can switch any of these three corrections off at MENU > CAMERA page 2 > Lens aberration correction.
If you turn off the Digital Lens Optimizer (DLO), you're offered à la carte options of reactivating lateral color fringe correction and/or diffraction correction without the rest of the DLO.
The only reason to turn off the DLO or others if if for some reason these are using too much processor power and slowing down the camera. I've never seen this happen, but if it concerns you, you probably don't need distortion correction when shooting portraits.
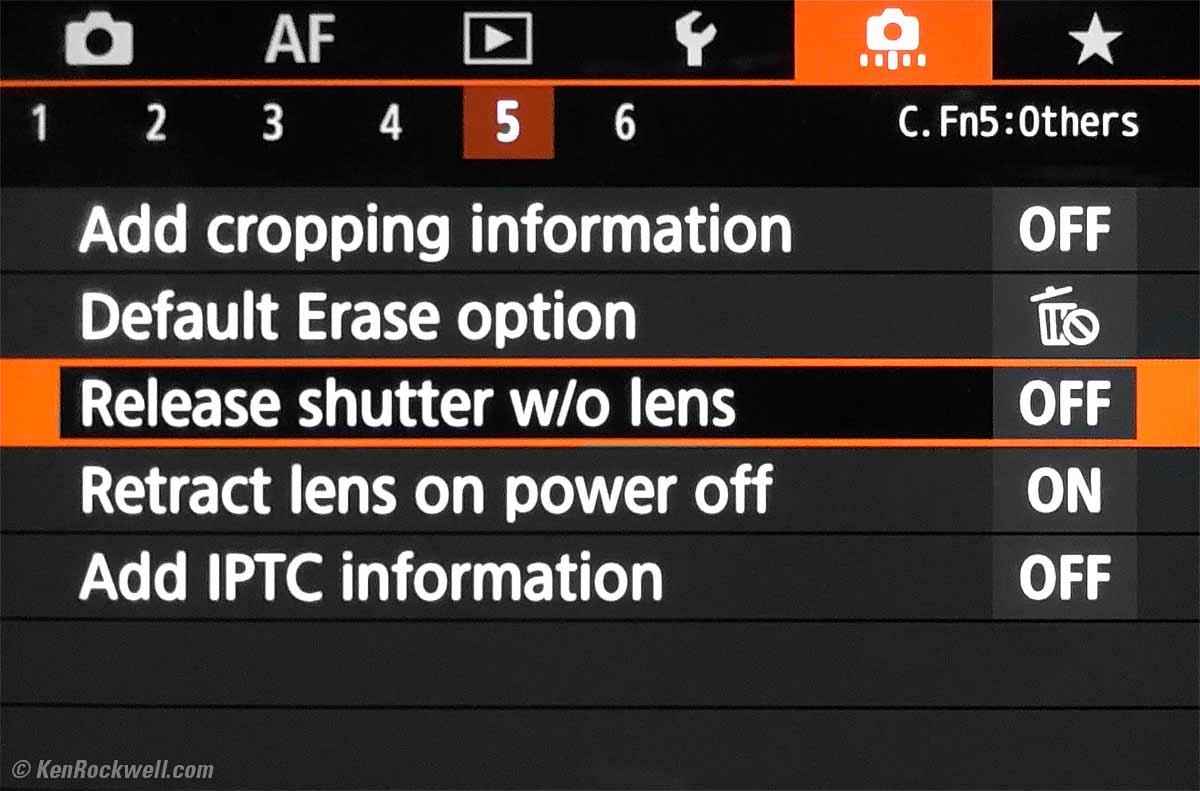
Non-EF Lenses on Adapters
The EOS R won't fire with off-brand lenses unless you set MENU > C.Fn > page 5 > Release shutter w/o lens > ON. This is OFF by default:
Video
Strange but true, movies by default use the C3 Picture Control settings unless you change that in a menu.
Press the MODE button and then press INFO to select other video shooting modes.
© Ken Rockwell. All rights reserved. Tous droits réservés. Alle Rechte vorbehalten.
More
Canon's own EOS R User's Guide
Help Me Help You
I support my growing family through this website, as crazy as it might seem.
The biggest help is when you use any of these links when you get anything. It costs you nothing, and is this site's, and thus my family's, biggest source of support. These places always have the best prices and service, which is why I've used them since before this website existed. I recommend them all personally.
If you find this page as helpful as a book you might have had to buy or a workshop you may have had to take, feel free to help me continue helping everyone.
If you've gotten your gear through one of my links or helped otherwise, you're family. It's great people like you who allow me to keep adding to this site full-time. Thanks!
If you haven't helped yet, please do, and consider helping me with a gift of $5.00.
As this page is copyrighted and formally registered, it is unlawful to make copies, especially in the form of printouts for personal use. If you wish to make a printout for personal use, you are granted one-time permission only if you PayPal me $5.00 per printout or part thereof. Thank you!
Thanks for reading!
Mr. & Mrs. Ken Rockwell, Ryan and Katie.