Home Donate New Search Gallery Reviews How-To Books Links Workshops About Contact
Pushing ISO in Photoshop

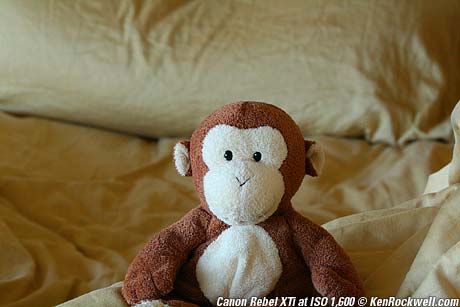
Self Portrait. Canon Rebel XTi at ISO 1,600. Roll over for pushed 3,200.
This free website's biggest source of support is when you use any of these links to approved sources when you get anything, regardless of the country in which you live — but I receive nothing for my efforts if you take a chance and buy elsewhere. I get no government hand-outs and run no pledge drives to support my research, so please always use any of these links to approved sources for the best prices, service and selection whenever you get anything. Thanks for helping me help you! Ken.
November 2017 Better Pictures Nikon Canon Fuji LEICA All Reviews

I buy only from these approved sources. I can't vouch for ads below. |


Digital cameras change ISO the same way we can lighten images in Photoshop.
It is trivial to shoot at the equivalent of any ISO. Of course noise gets worse, but highlight rendition is often extended.
I always shoot JPG. You can also do this in raw. This process doesn't care about format.
I wrote this orignally back in 2007. Today I find it simpler to use Perfectly Clear to do all this automatically rather than to mess with curves as I explain below, but it all ultimiatly does the same thing.
Background back to top
In film days, "pushing" film meant underexposing negatives, and then overdeveloping them.
This let us shoot in dimmer light, but boosted both grain (noise) and contrast. It also killed highlights along with the increased contrast.
We also could "pull" film by overexposing and under developing. This was great for controlling contrast in film.
We can do the same thing in digital. Digital pushing, unlike pushing film, greatly improves highlights while keeping contrast about the same.
Doing It back to top
To push, simply dial in negative exposure compensation before you shoot.
For a one stop ISO push (double the ISO), dial in -1 stop. For instance, if your camera stops at ISO 1,600, dial in -1.0 stops and shoot at ISO 1,600, and you're now shooting at ISO 3,200.
Of course the digital images will look too dark on your monitor, and the histograms will be too far to the left. They are supposed to be when you push it. All we have to do is to lighten them later.
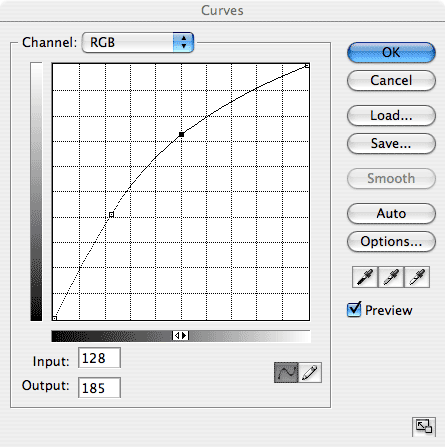
This curve lightens about one stop.
The best way to lighten them is to use Curves (Image > Adjustments > Curves, or on Mac, command+m). Better still is to make this adjustment in a new layer (Layer > New Adjustment Layer > Curves), which lets us tweak, retweak, and reuse this adjustment on other shots.
Once you get to the curves dialog box, stick your mouse in the middle and move it up until your image looks as light as you'd like it. I find setting a point at (input 128, output 185) looks great to add one stop. When I did the mouse-overs I saw a slight difference in the shadows, and added another point at (input 57, output 105) to fix that. Most cameras don't match themselves this closely when you change ISOs.
This curve isn't Gospel. Use whatever looks good to you.
Do not use levels, lighten/darken, a linear curve (one point on the top right), or move endpoint sliders around on a histogram.
Doing this clips the specular highlights and loses the benefits of capturing more highlight range. You'll clip your highlights, and the images will look suckier.
If you know what you're doing of course do what looks best, but if you're not an expert, please wiggle the middle of the curve, which retains all the highlights and shadows, and don't screw in levels or histograms, which is the best way to get bad digital images.
Noise
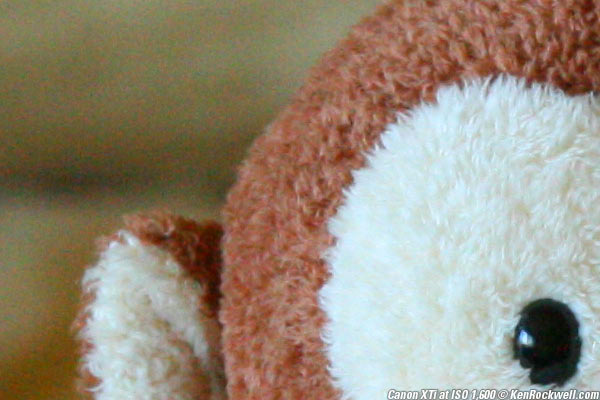
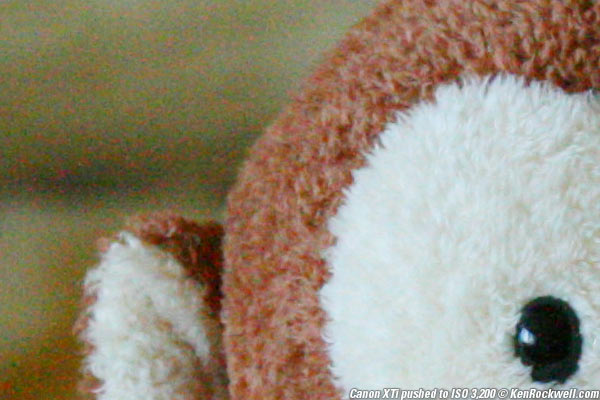
Of course there's more noise at higher pushed ISOs. Roll your mouse over to compare crops at 100% from the Rebel XTi at ISO 1,600 and pushed to ISO 3,200.
You'll also see reduced highlight contrast. You can change all this with the Curves as you like it, but at its simplest, this technique adds as many stops of extra highlight dynamic range as it does stops of ISO. Use a normal ISO in good light and this is the same technique as my Extending Dynamic Range Trick.
Screw Noise
Feel free to use any noise reduction of your choice in Photoshop. I used Visual Infinty Grain Surgery back in the day when I wrote this.
Roll your mouse over to compare the ISO 3,200 push before and after Grain Surgery.
It's not that much different than the ISO 1,600 shot, and if you played with the NR and the sharpening, you'd be much closer.
JPG vs raw
I shoot JPG.
You can shoot raw, and take your chances in how your particular raw converter does the conversion when you lighten it. I won't take that chance.
Raw converters use this same technique, or possibly a worse one, to change the apparent exposure. Raw converters can't change the actual exposure; they only can lighten or darken an image.
The advantage of using JPGs and curves, instead of using raw and tweaking the lighten-darken setting (usually mislabeled as "exposure"), is that no highlights are lost.
Some raw software adjustments may be as primitive as Photoshop's "lighten darken" command, which does a much poorer job than your good eye and curves.
Since you're underexposing in the first place, you're getting that many more stops of highlight extension. Raw converters may clip highlights when changing exposure settings. I would convert from raw with no change in the exposure setting, and then use curves.
Of course I'd experiment. I'm too busy shooting to waste any more time in front of my screen twiddling with raw files and software.
Bit Depths
I don't worry about bit depths, since the noise levels of current cameras swamp 8-bit JPG log coding. This is a self-redithering process.
© Ken Rockwell. All rights reserved. Tous droits réservés. Alle Rechte vorbehalten.
Help Me Help You
I support my growing family through this website, as crazy as it might seem.
The biggest help is when you use any of these links when you get anything. It costs you nothing, and is this site's, and thus my family's, biggest source of support. These places always have the best prices and service, which is why I've used them since before this website existed. I recommend them all personally.
If you find this page as helpful as a book you might have had to buy or a workshop you may have had to take, feel free to help me continue helping everyone.
If you've gotten your gear through one of my links or helped otherwise, you're family. It's great people like you who allow me to keep adding to this site full-time. Thanks!
If you haven't helped yet, please do, and consider helping me with a gift of $5.00.
As this page is copyrighted and formally registered, it is unlawful to make copies, especially in the form of printouts for personal use. If you wish to make a printout for personal use, you are granted one-time permission only if you PayPal me $5.00 per printout or part thereof. Thank you!
Thanks for reading!
Mr. & Mrs. Ken Rockwell, Ryan and Katie.