Home Donate New Search Gallery How-To Books Links Workshops About Contact
Gossen Digisix
© 2010 KenRockwell.com. All rights reserved.
Intro Specs Performance Usage Recommendations


Gossen Digisix, twice actual size (1.4 oz./39g with battery, about $135). enlarge. The biggest source of support for this free website is when you use these links, especially this one directly to the new version at Adorama, when you get anything. Thank you! Ken.
September 2010 Nikon Canon LEICA Pentax Contax Zeiss
Light Values (LV) and Exposure Values (EV) explained
Introduction top
Intro Specs Performance Usage Recommendations
I personally buy from Adorama, Amazon, Ritz, B&H, Calumet and J&R. I can't vouch for ads below.
|


The Gossen Digisix is a tiny featherweight lightmeter. It can sit on top of your camera, or vanish in a camera-bag side pocket or your pocket.
Everything is controlled with only two buttons.
It's always on. Once you tap the measure button, the reading stays there until the battery runs down, and remains in memory even if you go look at the temperature or the clock. It runs about 6 months to a year on one common CR2032 cell.
Gossen also makes this same meter with the ability to measure flash, called the Gossen Digiflash. The version discussed here only measures continuous light.
Not only does the Gossen Digisix measure an extremely wide range of light, it measures both reflected and incident light with the sliding dome, and also has a thermometer with min/max memory for documenting film storage safety, a clock, an alarm clock for pre-dawn shoots, and a count-down timer.
Its calculator dial is much better than needing a digital display. It shows you all the possible exposure combinations at a glance, even for half and third stops. Have a camera shutter that runs in 1, 2, 5, 10, 25 sequence? No problem: look at the third-stop ticks.
Even if the battery dies because you didn't replace it within a few weeks from when you saw the BAT warning, you can use EVs from memory to calculate exposures.
It can be forgotten in a pocket, or with the optional shoe-mount adapter, slipped into any camera's accessory shoe. You also can use the included neck strap, or use a hand strap stolen from any point-and-shoot camera.

Gossen Digisix on Nikon SP with 5cm f/2. enlarge.
Specifications top
Intro Specs Performance Usage Recommendations
Sensor
Silicon blue cell photo diode (all electronic).
ISO top
6 ~ 3,200
Metering Range top
LV 0 to LV 18, both incident and reflected.
(reads down to LV -9 with a trick.)
Also reads relative values to ±9 1/3 EV.
About 25º reflected light acceptance angle.
Calibration Offset top
±2 EV in third stops. (how-to)
Calculator Dial top
f/1 ~ f/32.
1/2,000 ~ 4 minutes.
Clock top
12 or 24 hour system.
Count-Down Timer top
Maximum time: 30 minutes, 59 seconds.
Settable in seconds and minutes.
Temperature top
5º to 160º F.
-15º to 70º C
Accuracy: rated ±2º C or ±4º F.
Records minimum and maximum.
Size top
3.0 x 2.0 x 0.9"
75 x 50 x 23mm
Weight top
1.365 (38.6g) with battery.
1.495 oz. (42.4g) with shoe-mount adapter.
(Shoe-mount adapter alone: 0.130 oz. (3.7g).)
Power top
One CR2032.
Actual life: about six months to a year.
Quality top
Made in Nürnberg, Germany.
I bought mine in 2008 for $160. The price dropped in 2009, so I don't know if they dumped production to China, or if today's Digisix are still made in Germany like real light meters.
Performance top
Intro Specs Performance Usage Recommendations
Overall
This tiny Gossen Digisix is a great light meter, as well as a virtual Swiss-Army Knife of electronic tools for any photo outing.
There is no backlight, and the big LCD digits are always easy to read.
Light Meter top
The light meter is great.
When used on top of a camera, simply tap the meter with your finger as you compose, and the reading is waiting for you on top.
It's very linear, so your ability to get great exposures rests on you to knowing how to use a lightmeter and the zone system. This tiny thing is as accurate as any other larger light meter.
It reads to light levels so low that you won't be able to read it on the unlit meter! Bring a flashlight.
Thermometer top
My thermometers usually agrees to within one degree Fahrenheit of all my other digital thermometers.
It's easy to read and reset the min/max readings.
Clock top
The clock reads only to minutes, not seconds.
Use the countdown timer if you need to clock long exposures.
Mine isn't very accurate. It gets a couple of minutes off as time goes on.
Alarm Clock top
I don't use the alarm clock.
I use the one in my phone instead.
Count-Down Timer top
I don't use the timer.
I use my watch instead for clocking exposures.
Usage top
Intro Specs Performance Usage Recommendations
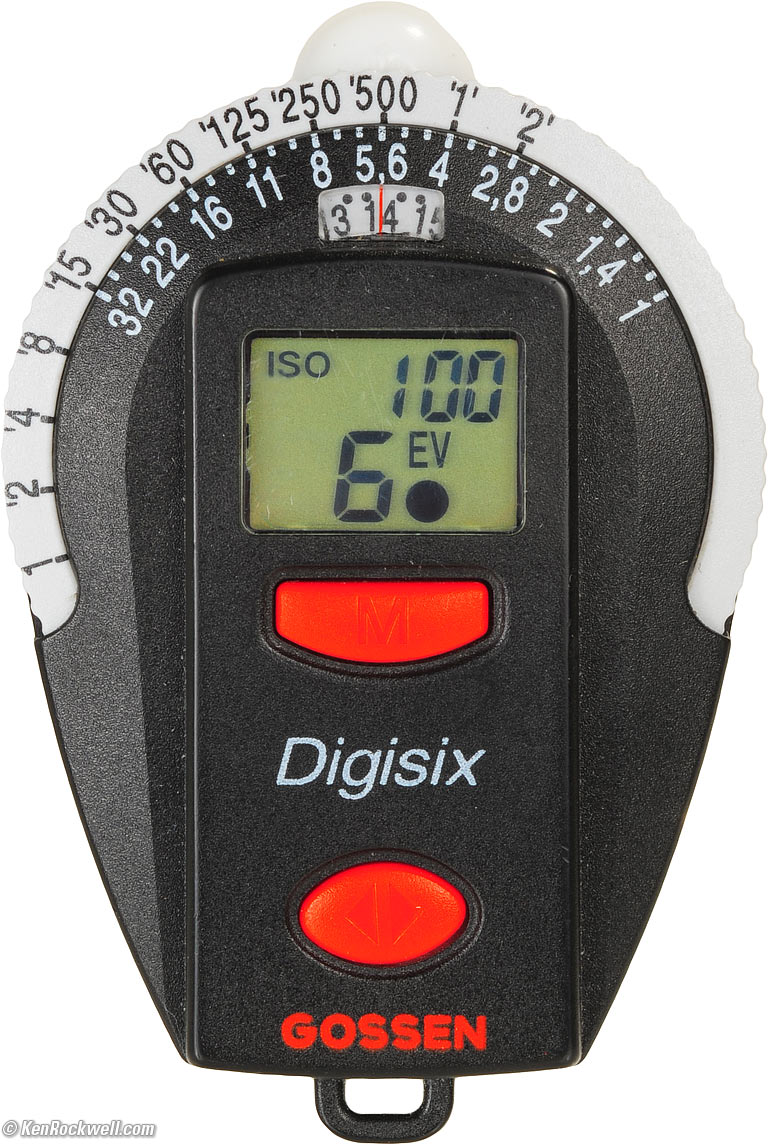
Gossen Digisix. enlarge.
Actual size on a typical 106 DPI monitor. enlarge.
Overall top
Everything is controlled by the two buttons.
The smaller < > button on the bottom generally selects the mode, and the larger M button on top generally controls operation within that mode.
To select among these modes, tap the < > button a few times.
To change things within a mode, hold the the < > button until something starts to flash.
Power
Slide the battery tray out of the bottom of the meter. Pop in a CR2032 cell, and slide it back in.
You'll see "BAT" displayed next to EV if the cell is low.
Light Meter top
General Use
Tap the M button.
The meter reads, and holds the reading on the top LCD.
Read the big EV number on the LCD, set it on the dial, and set your camera as shown on the dial.
Filters and your ISO
Most people set their film's ISO, and change it as needed for different filters (one ISO interval (1/3 stop) less for an 81A filter, one-half the ISO for a yellow filter for B&W, etc.)
This lets you take the EV reading from the meter, and use it directly on the dial.
This is fine, but means that you won't learn nature's own Light Values from experience because different film or filters will result in different readings under the same light. If your battery dies, you won't be able to recall LV 14 for most side-lit daylight shots, and shoot from memory.
I prefer to leave the meter at ISO 100 for everything, in which case the meter always reads in LV as well as EV. (LV = EV at ISO 100.)
This way I know that direct sunlight is LV 15, side light is EV 14, indoors is usually EV 8, etc.
I leave my meters at ISO 100, and for ISO 50 Velvia with an 81A filter (effective ISO 40), I simply count down four clicks from the indicated EV.
FOr instance, if the meter reads LV 12 1/3, I set that on the dial, and count four clicks down, which gets me to EV 11, at which I shoot.
This also lets the reading of the Gossen Digisix match the readings of both the analog and digital Pentax spot meters, which read only in LV.
Reading Contrast Ranges and Zone Values
Once you tap the M button to get a reading, hold the M button for a few seconds, and the LCD will indicate the relative brightness differences in stops as you move the meter.
Obviously, zone V = 0, Zone III = -2, zone VIII = +3, etc.
The lowest displayed EV is 0.
Using the relative reading trick above, the Digisix will read to -9 1/3 EV below whatever reading you've measured.
If you are in the dark, find something at EV 0, hold the M button for a few seconds, and now the Gossen Digisix is reading directly in EV from EV -9 1/3 to EV 9 1/3!
This will let you meter down to moonlight, but you'll have to do the math in your head (or simply count dial clicks) if you need to calculate below EV -4.
If you want the meter to read a little higher or lower to suit your tastes, you can program a permanent offset.
To set this offset:
Pull out the battery.
While holding both the < > button and the M button, slide-in the battery.
You'll hear a beep, see 0 and a flashing EV.
Tap the M button until you get the offset you want. If you miss it, keep pressing the M button until it comes around again.
The indication is added to the reading, for instance, "1" makes the meter read a stop higher and your photos come out a stop darker. "-1" reads a stop lower and your photos will come out a stop brighter.
When you have the offset you want, hold the < > button until you get another beep.
"EV" blinks forever to let you know you have an offset programmed.
To change it again, you must pull out the battery again.
I use -2/3, which makes my photos a little lighter than Gossen's default.
Thermometer top
Tap the M button to select among the current, minimum and maximum readings.
Hold the < > button and wait for a beep to shift between Fahrenheit and Celsius.
Hold the M button and wait for a beep to reset the minimum and maximum.
Clock top
To set the clock, hold the < > button and wait for a beep.
Set 12 hour or 24 hour by tapping the M button.
Tap the < > button to advance to setting the hours. Tap the M button to advance.
Tap the < > button to advance to setting the minutes. Tap the M button to advance.
Hold the < > button and wait for a beep to stop setting the clock.
Alarm Clock top
Once the alarm time is set, tap the M button to turn the alarm on and off. You'll see a little bell on the top left if it's armed.
To set the alarm time, hold the < > button and wait for a beep.
Tap the M button to advance the hours.
Tap the < > button to advance to setting the minutes. Tap the M button to advance the minutes.
Hold the < > button and wait for a beep to stop setting the alarm time.
After setting the alarm time, the alarm turns off, even if it had been on. Tap the M button to turn activate the alarm. You'll see a little bell on the top left.
Count-Down Timer top
To set the count-down time, hold the < > button and wait for a beep.
Tap the M button to advance the seconds.
Tap the < > button to advance to setting the minutes. Tap the M button to advance the minutes.
Hold the < > button and wait for a beep to save the count-down setting.
Tap the M button to start the count-down. Tap it again to pause, and again to restart.
To stop a count-down in progress and reset to the previously selected interval, hold the < > button and wait for a beep, and hold it again for another beep to exit the setting mode.
Recommendations top
Intro Specs Performance Usage Recommendations
This is my favorite light meter. It has modern electronic precision, reads in ultra-low light, adds a few fun features, and is so tiny I just can't leave it home.
I take it on every photo trip, even if just to leave it on the night stand in my cheap motel to set the thermostats of the typically crappy wall heating units.
I also use this on old cameras without meters.
I show it on a Nikon SP above, for which there is a dedicated clip-on Nikon light meter. I have yet to see one of these 1950's Nikon light meters that actually works, much less accurately, so I don't try. LEICA's clip-on meters, especially the CdS ones for M-kameras, usually work great, so I don't use this meter with my M LEICAs, either.
I use this meter with just about every other kind of camera, including LEICA screw-mount cameras and large-format.
More Information
Help me help you top
I support my growing family through this website, as crazy as it might seem.
The biggest help is when you use any of these links to Adorama, Amazon, B&H, eBay, Ritz, Calumet and J&R and when you get your goodies. It costs you nothing, and is this site's, and thus my family's, biggest source of support. eBay is always a gamble, but all the other places always have the best prices and service, which is why I've used them since before this website existed. I recommend them all personally.
If you find this page as helpful as a book you might have had to buy or a workshop you may have had to take, feel free to help me continue helping everyone.
If you've gotten your gear through one of my links or helped otherwise, you're family. It's great people like you who allow me to keep adding to this site full-time. Thanks!
If you haven't helped yet, please do, and consider helping me with a gift of $5.00.
As this page is copyrighted and formally registered, it is unlawful to make copies, especially in the form of printouts for personal use. If you wish to make a printout for personal use, you are granted one-time permission only if you PayPal me $5.00 per printout or part thereof. Thank you!
Thanks for reading!
Mr. & Mrs. Ken Rockwell, Ryan and Katie.
Home Donate New Search Gallery How-To Books Links Workshops About Contact