Home Donate New Search Gallery Reviews How-To Books Links Workshops About Contact
How to Shoot Film
Start Shooting The Details: Shooting Film Digitally What is Film? Handling
Kinds of Film Film Formats Recommended Films Filters More
Digital can't resolve detail or colors like this: Torino, Italy, October 2003. bigger or 10,000 x 8,000 pixel scan, shot with Mamiya 7 and Mamiya 43mm on 6x7cm 120-size Fuji Velvia 50.
I've been getting my film directly from B&H and Adorama ever since the 1970s; you've never been able to get pro film at local retail stores. I use NCPS to process and scan all my film. If you're reading this you have a mailbox and can get all the film and processing you need; B&H and Adorama ship worldwide, and NCPS does mail-order work from around the world every day.
I get my film at B&H: 35mm film, 35mm transparency (slide) film, 35mm B&W, 35mm color print (negative) film, 120 film, 620 film and 4 × 5" and larger sheet film.
This all-content, junk-free website's biggest source of support is when you use those or any of these links to approved sources when you get anything, regardless of the country in which you live. Thanks for helping me help you! Ken.
June 2026 Better Pictures Nikon Canon Fuji LEICA All Reviews
Zone System Film Speed Calibration12 February 2016
Just Use It 12 September 2014

Start Shooting Now top

I buy only from these approved sources. I can't vouch for ads below. |

Film is fast, easy and fun to shoot. It's so much easier than digital; there are no menus or computers, and batteries usually last a year or more!
Let's get started right away:
1.) Get a camera.
Any disposable camera is already loaded with film and ready to shoot.
You could also get a fancy 35mm camera, or just get one of my favorites like the Canon AE-1 Program or Nikon FE. Everyone's parents and grandparents have 35mm cameras in their closets, just ask and you'll be good to go.
See also Best Film Cameras for ideas if you actually have to buy one.
2.) Get some film.
See Recommended films, or just get some ISO 400 print film for people and general photos. I prefer Fuji 400H Professional, or the less expensive Fuji Superia 400.
Use Fuji Velvia 50 for brilliant colors for photos of places and things, or use Kodak T-MAX 100 for black-and-white.
You want 35mm (135) size, which is the most common. 24 or 36 exposures makes no difference, but know that regardless of how many pictures you have, the cost to develop and scan is the same. Only when you order prints does the processing price change.
Don't just get one or two rolls of film. Get a four or five pack and have some fun. Stick to one kind of film until you get familiar with it.
Once you graduate from digital into film, you probably will be shooting a couple of rolls every day you're out shooting — and it costs so much less then buying a new digital camera every few years!
3.) Load your camera.
Disposables are already loaded. Otherwise, your camera's manual (you can find it at Mike Butkus' site) will have detailed instructions specific to your camera.
35mm cameras are usually as easy as opening the camera, putting the film in on the left, pulling the leader across to the red dot (or thread it on the spool) on the right, and closing the back. Newer motorized cameras will wind to the first frame automatically, while older cameras will need you to use the thumb lever to wind and shoot a blank frame or two to get to frame number one. Your instruction manual will tell you, and for medium format, also see How to Load your Medium Format Camera.
4.) Shoot.
Older cameras and disposables need to be wound with your thumb for each picture, while newer motorized cameras will wind themselves after each shot.
Keep it simple; you only need one lens. A standard 50mm lens is perfect.
Most newer cameras set the ISO to the film's rated speed automatically using the DX system, which is in no way related to Nikon's DX lenses. If your camera has a manual ISO (or ASA) setting, set it to the same ISO as the film's rating (100 or 400 for instance). Unlike digital, a film camera must be set to the rating of the film which does not change. As the light changes, we use different film.
Shoot in AUTO or PROGRAM mode. Don't try to get fancy; your camera already knows the correct settings.
If shooting black-and-white film outdoors, be sure to use a yellow or orange filter so you can see the sky and clouds — otherwise the sky will be all washed-out. Set an ISO one or two stops less than the film's rating (one-half or one-quarter the rated ISO number to give more exposure) for best results.
5.) Rewind.
If shooting 35mm (you probably are), rewind the film back into its canister after the last photo is taken.
Newer, motorized cameras do this automatically, while older ones require pressing a button on the bottom and turning a crank on the top.
Medium and large format cameras don't need to be rewound, but you're probably not using one of them. Your camera's instruction manual has specific instructions.
Trick: I never do this, but experts can rewind a partially-shot roll of 35mm and change to a different one, and then change back to the first roll later! You have to rewind leaving the film tip out, write the number of exposures used on the canister, and then wind a few frames past when you reload that roll next time. Don't try this at first!
6.) Develop and Scan.
Your local Costco probably will develop and scan your film to a DVD in an hour for under $5.
If not, mail it to North Coast Photographic Services (NCPS) in California and save yourself two trips to a lab. With film, the biggest problem is having to get your film to a lab, and then having to pick it up. NCPS does mail-order from all over the world, and usually gets your order back into the mail the next day.
If shooting print (negative) film, the quality of what you get from the lab can vary wildly with your choice of lab — and even from day to day at the same lab . Your colors and exposure may look weird when you get your photos back, and it just as well could be the way the lab scanned or printed your order.
If shooting slide film, your pictures should look the same regardless of your choice of lab. What you get on the slide is exactly what you shot. Scan quality will vary from lab to lab; it's rare to get scans as brilliant and colorful as the original slide.
Color film is a pain to develop at home, but B&W film is easy to develop yourself. For B&W, you don't need a lab, you just need a "daylight tank" and some chemistry. Heck, some people even make their own chemicals from scratch. You load the film into the tank in the dark, and then in daylight you pour in developer, then a stop bath and then fixer, then wash it with running water. Open the tank and hang it up to dry. Photographers have been doing this since the 1800s; it's easy.
Have the lab scan your film as they develop it for a few dollars. I used to scan my own film ten years ago before labs did it for me. I hated scanning my own film; it takes at least a few minutes per frame!
7.) Print, share and enjoy!
You can order prints when your film is developed if you like, and you're done.
You can copy your photo scans from your CD or DVD into your computer and treat them exactly like the photos you make from a digital camera, with the advantage that you already have a disk and the original film as two backups. Post them to Facebook, email them to grandma, or optimize them in Photoshop and print them mural sized for your next one-man gallery show.
Ideally, hand-print B&W negatives by projection from an enlarger onto fibre-based paper. Ansel Adams did, and nothing else in B&W looks like this.
For color prints, have them printed on Fuji Crystal Archive paper from the lab's digital scans.
For slides, project them. Get a used LEICA projector, COLORPLAN CF lens and a real slide projector screen, and you'll be astounded at how big, sharp and colorful are your little slides. Kodak's Carousels and lenses were always pretty bad, and today, LEICA projectors are very affordable.
8.) Repeat
Since we don't see our results until an hour or more later, we don't have instant feedback. No worries, just always look at your results, ask yourself (or an experienced friend or the lab itself) what you can do better, and do it next time.
I've been shooting film for well over 40 years, and with each roll I'm always learning something new.
Cameras and labs vary. You have to optimize your technique to get what you want with the tools and materials you have. Buying new cameras only buys you new problems, never better pictures. Better pictures come from knowing your process better, practice, and paying more attention to your picture and subject than to your camera.
For instance, if your pictures are too light, use less exposure next time. This is easy with slides, where what you shot is what you get, but difficult with print film because the lab is also trying to compensate for each shot.
See also Modern Exposure.
The Details top
Film IS photography.
Film has been around almost 200 years since the invention of photography. In the 1800s we shot glass plates, which is the same thing coated on sheets of glass instead of flexible plastic film.
There are a lot of details to cover, but always feel free to skip ahead. You don't need these details unless you're curious. Most of everything below may be ignored; I've already covered 99% of what you need to know above.
Film has always been the medium of the masters. With this article above I've hopefully brought you up to speed on how to shoot film so you too can start creating your own masterpieces.
Shooting film costs less, is easier to do and makes better-looking pictures than digital. The reason digital was so popular in the 2000s was because digital requires much less knowledge; anyone can do it — and because foreign companies spend billions on publicity trying to convince you to by a new digital camera every few years. Geeze, all you need for digital today is an iPhone. What good are other digital cameras if you have to wait to email or share the pictures? You may as well save your money and shoot film.
Shooting film is easy, fun and inexpensive — exactly like riding a bicycle. Both take practice at first, and once learned, you'll never forget. Like riding a bike, film is easy to shoot. By comparison, shooting digital is like trying to pilot the Space Shuttle: immensely complex, with a zillion potential ways to make one wrong move that lead to complete disaster, it's easy to forget the myriad of details without a long checklist, and it's different every time — or goes obsolete, as has the space shuttle! Film just goes, while the shuttle program was cancelled back in 2011. So much for digital.
Another great thing about film is that the huge majority of less serious shooters abandoned it for digital some years ago, so today we all have our pick of the best professional cameras at give-away prices. For instance, the top professional Canon 35mm SLR of all time, the Canon EOS-1V, sold for about $2,000 new a few years ago, and today can be bought used for $400 if you know How to Win at eBay!
I've been shooting film since I was 5 years old, and with almost 200 years of history behind it I have a lot more detail than you need to get started. Skip ahead as you like; film is easy.
Film is so easy you might want to try a disposable camera and just snap away! They all use film, too. You'll learn the basics shooting and developing, and always can get a fancy camera or read the details later.
Shooting Film Digitally top
Film is easy to shoot and then store, process, print, publish and share on a computer exactly like photos from digital cameras.
I always have my photo lab scan my photos to a DVD or CD at the same time they are developed.
I simply drag the files from the CD or DVD into my computer and I'm done — and I now have two backups in the form of both the original film and the scans on DVD or CD in case my computer dies.
See also How to Shoot Film Digitally.
Shooting film gives us the convenience, economy, simplicity and quality of film, with all the benefits of digital, too.
What is Film? top
Film is a light-sensitive coating applied to a piece of clear flexible plastic.
Film is a chemical product made from mostly natural materials, like silver salts and gelatine. It's not electronic; it never needs batteries or downloading or a computer — just look at it.
It becomes sensitive to light when chemicals are first mixed to make it in a dark factory, and remains sensitive to light at all times until it is processed (developed).
Film needs no batteries and has no on/off switch; it is always capturing any light that hits it. That's why we keep it in a canister or in a dark camera, and it's only exposed to light for the moment the camera shutter opens.
If any light leaks into the camera or onto the film before it's processed, we get "light leaks" or "fogging," which are brighter sections of leaked light on our images. This is rare.
Once exposed, the undeveloped film doesn't look any different (don't look at it or you'll fog it), but the magic of film is that our photo is in the film and can wait even for years before being developed. Heck, people have found undeveloped film decades old, and when developed, the photos were fine if the film was kept cool.
Handing Film top
Not only is unprocessed film always sensitive to light, unprocessed film is a natural and perishable product, like cheese. It has expiration dates printed on the box. It lasts for a couple of years undeveloped at room temperature. It goes bad much more quickly if it gets hot, like being left in a locked car in the summer. Just like cheese, it lasts much, much longer in the refrigerator, and forever in the freezer. I've shot film that had been in the freezer for ten years, and it worked perfectly. On the other hand, film that is too old or left locked in a hot car for the summer becomes fogged; the shadows become too light, which is easy to correct digitally.
Process your film as soon as you finish the roll. Waiting a month is OK, but the latent (undeveloped) image will start to fade if left for years before developing. Freeze it, and it ought to keep for decades before needing to be developed.
After being exposed, we develop (process) the film, which lets us see our images and makes the film permanent. Once developed, the film is no longer sensitive to light and we can look at it without fogging.
Developed film rarely fades unless it's left out in the light. Processed film lasts longest when kept cool and dry, but even stored in a hot attic, today's processed color film retains great color for decades. Processed B&W film won't ever fade.
Kinds of film top
Film Speed Color or B&W Prints Slides Formats
We use different kinds of film for different kinds of pictures. When shooting film, it's important to choose the right kind of film for the photo at hand.
With digital cameras we have to mess with a zillion menus to create the "look" we want, while with film we simply choose one film or another for the way it looks. Every kind of film will look different than another. Feel free to try different kinds until you get the look you want, but don't get too distracted.
All films have a "film speed." Films also come in black-and-white or color, and comes for prints or for slides. Here are the details, or feel free to skip ahead to Recommended Films and just start shooting.
Film Speed kinds of film top
Different film has different sensitivity to light, or "speed," expressed as an ISO number. "ASA," used before the 1980s, means the same thing.
Each roll has only one speed; you can't change the setting from photo to photo unless you change your roll of film.
Ideally we'd all want the most sensitive film possible, but there's a catch: the faster it is, the grainier (noisier) it gets. Slower film requires more light or more exposure, but also gives cleaner, clearer pictures. Therefore we try to shoot the slowest film that is still sensitive enough to let us get a picture with a short enough exposure so that the subject doesn't blur.
This is where we get the word "speed." Faster film lets us use shorter exposures. The shorter exposures of faster film let us stop faster motion and get sharper pictures without blur.
ISO 50 film is slow. I use it for nature and landscape shots of things that don't move, or for action only in bright light. If I'm photographing places or things, I'm shooting Fuji Velvia 50 for the sharpest, cleanest and most colorful results.
ISO 100 film is about normal. It's best for really good light, but bad for people photos without flash indoors because the longer exposure times required result in blurred photos.
ISO 200 film is faster. ISO 200 film is great for people who want a good compromise for shooting many different things — all on the same roll of film. Pros rarely shoot ISO 200 film because they shoot so much that they shoot different rolls of film for each subject, and thus usually use slower film outdoors and faster film indoors without flash.
ISO 400 film is perfect for low light, or if you just don't know what sort of light you'll have. ISO 400 film is great for shooting indoors without flash, and it still has a clean, clear image for use in daylight. I use ISO 400 film for people photos, since I'm snapping people in all sorts of unpredictable light, and need enough speed to stop action and prevent blur from motion.
ISO 800 film is even faster, but not quite as clear as ISO 400. I use it if I know I'll be shooting in very low light.
ISO 1,600 film is too fast, and usually looks grainy. I've only used it when I needed to shoot hand-held under moonlight.
Black-and-White or Color? kinds of film top
This is obvious: film comes in B&W or color.
B&W film uses real silver in the processed film, and processed B&W negatives last forever. It has proven this for over a hundred years.
Color film uses colored dyes in the processed film, which may or may not fade over the years.
It's harder to find processing for real B&W film at local one-hour labs, so there is also B&W film made with color-film technology that lets it be processed anywhere. This is convenient, but if you want your negative to last hundreds of years, the dyes in these negatives may fade over time, which traditional silver-based B&W negatives won't. As an advantage, this "CN" (color negative) B&W film usually has much less grain than real B&W film has at the same ISO speed.
Negative (Print) Film kinds of film top
Negative films are most popular. The film is called "negative" because after processing it gets darker where it was hit by the light. To see the pictures properly, we project light through the processed film onto print paper, which also gets darker where exposed to light. Thus we see a "positive," or normal image.
Today, we usually just scan our film and print with a computer.
Because negatives have to be printed or scanned to be seen, they will look different every time and look different depending on who is printing or scanning them. Because of this, print film is much more difficult to control and get exactly what you want every time. With print film, you have to be very picky about who prints or scans your film, or you have to do it yourself because the colors and everything will look very different at every lab. With negatives, there is no "absolute" way to see what's on your film; every print or scan is merely an interpretation of what's there.
Because the image on a negative isn't really complete until printed or scanned, if you don't have good technique, exposure and color can be corrected in scanning or printing. The problem for pros who know how to get good exposure and color is that these just as often get messed up in printing or scanning.
Print film comes in color and B&W. Color print film is also called "C-41" by pros, which is the name of the chemical process used to develop it.
Color print film is what most consumers think of when they think of film, and is the only kind of film usually found at grocery and other retail stores. Pros order their film online, which lets them get any kind of film they need. Even back in the days of local retail stores, no store other than Adorama and B&H in NYC had exactly what I needed in stock.
Exposure Latitude
A huge advantage of print film for learners is called "exposure latitude." With most color print film, you can underexpose by one stop, or overexpose by three stops or more, and still get perfect scans or prints. With slides there isn't really any latitude, but since negatives always have to be scanned or printed, they have enough latitude that exposure and color problems can be corrected as scanned or printed.
Consumer color print films usually have four or more stops of exposure latitude, while professional color negative films usually don't look good if overexposed by more then three stops. Pro films are not expecting wild overexposure, while consumer films do their best for great pictures regardless of exposure. This is how disposable cameras work: they always use the same exposure regardless of how light or dark is the lighting, and exposure latitude lets the lab make all the pictures look fine!
Black-and-white negative films have nearly unlimited overexposure latitude, but all negative films will start to have gray shadows and lower-contrast images if you give them more than one stop of underexposure. At two or three stops underexposure, your print film pictures as corrected by your lab will probably look their normal lightness, except that the shadows will be more gray and murky. As underexposed more, more shadow detail goes away. After correction, shadows become lighter and lighter gray with more and more underexposure.
Positive (Slide or Transparency) Film kinds of film top
For color, most pros shoot positive film (slides). This is because you can see the photo on slide film simply by looking at it: it's a positive image that doesn't need to be printed or scanned to be seen. Unlike with negatives, positive film gives us an absolute reference of our picture: just look at it.
What you see is what you've got, and color consistency is critical in pro photography.
Slide film gives us the same colors every time. Slide film leaves nothing to interpretation when printed, projected or scanned, which is why pros who shoot color shoot slides. We get the color we want on-film, and every other stage in the production process will preserve and reproduce these colors.
Wedding and news photographers were the only pros who usually shot color negative film, and a lot of that was so they could have the freedom to botch a shot and have the lab correct it later. Careful pros in advertising and magazines always shoot slide film precisely because the colors they imagine while shooting can be reproduced exactly from the slides.
Making prints directly from slides always required special printing paper, and today we usually scan our film and print using a computer. To print in magazines and catalogs, film was scanned and separated to plates in the old days, and today is scanned electronically and enters the same workflow as everything else.
The other fantastic thing about slides is that we can project them directly form the slide! Load them in a slide projector, and bingo!, you can fill your screen with the exact colors and full resolution and brightness range directly from the film itself, with no need for scanning or computers. Popping my slides in a projector is so simple that digital shooters are astounded because there is no time wasted trying to get a projector to work with a computer, and when they see the full color and dynamic range projected at full resolution on-screen, they are floored.
Slide film is almost always color. There was a B&W slide film, Agfa Scala, which is no longer made. If you want B&W slides today, you can have regular B&W negative film "reversal" processed into slides, which works great.
Film Sizes and Formats top
35mm Medium Format 4x5" and Large Format Obsolete Formats
Film comes in all sizes. If you're reading this, you want regular 35mm.
See also Film Formats Compared.
A 35mm frame of Fuji Velvia: Your 175 MP raw file.
35mm film is the most popular. It is named for the width of the strip of film. It's a strip of film with a set of sprocket holes (perforations) running along each side.
35mm film was standardized back in the 1800s and has never changed for over 100 years.
35mm film has always been a movie film. It's been used for shooting motion pictures decades before Hollywood was invented. Today, 35mm is still the format on which the best movies are shot. Lower budget productions may shoot electronically on the Alexa or Red or Genesis cameras, but guess what: regardless of how a Hollywood movie is shot, they are always archived to three strips of B&W film (one strip for each primary color) because we know that decades in the future we'll still be able to print and scan from the archived film and reconstruct our color images, and we know that B&W film won't fade. When you invest $100,000,000 to produce a film, you don't want it to fade, and you know that in just ten years we won't be able to read any of the digital media or file formats used today to make a DI (Digital Intermediate). Therefore film is always used to archive Hollywood movies, regardless of how they are shot.
When this 35mm film is spooled into little canisters, it's easy to load into our cameras.
I'll be talking mostly about 35mm, since it's what most of you are going to shoot.
With 35mm film, we load it in the camera, shoot it, and then rewind it back into its metal canister to protect it from light. We take the canister out of the camera and take it to be developed. We load a new canister in the camera, and keep shooting the next roll.
The metal canisters are thrown away after the film is removed in the dark for developing. Some people who shoot a lot of film and develop it themselves will buy film in 100 foot (30 meter) rolls and use a bulk loader to roll shorter strips of film into reloadable canisters. For about $60 in 2013 you get enough B&W film for about 19 rolls of 36-exposure film. If you load yourself, you can put any random number of exposures you like into a roll.
Medium Format (120 and 220) formats top
"Medium Format" is simply bigger film. Bigger film means even sharper pictures with much less grain (noise). A roll of 120 isn't much bigger than a roll of 35mm; it has no perforations so you get to use much more of the film area.
Usually called "120," for the name used for the rolls of film, or called by the name of the size of the image (6 x 6 cm, 2-1/4", 6x7, 6 x 4.5, 645, 6 x 9 cm etc.), medium format cameras tend to be bigger than 35mm cameras.
A roll of 120 gives twelve 6 x 6cm pictures. Different sized images will fit different numbers of pictures on a roll. 645 usually fits 15 or 16 pictures, 6x7 gives ten, 6x9 fits eight and 6 x 12 cm panoramic fits six frames per roll of 120.
220 is a roll twice as long as a 120 roll. Not all medium format cameras can use 220 film, and they usually require turning a pressure plate. See your instructions.
When shooting medium format, you don't rewind after each roll. The film winds from one spool to the other, so when it's done, you tape-down the loose end and bring the roll in for developing. You then take the now-empty supply spool and move it to the take-up position, and load a fresh roll.
Never throw away an empty spool; you'll need it for the next roll. If you need an empty spool, just ask any pro lab; they throw away the spool after each roll is processed.
I have more pages devoted to Medium Format; see:
Introduction to Medium Format Photography
Large Format (4x5" and larger sheet film) formats top
Large Format uses even bigger film, and there are even more benefits in addition to even more sharpness and even cleaner grain-free images.
Large Format uses sheets of film, not rolls of film. Because each sheet is loaded and shot individually, you can shoot a different kind of film for each shot! You can shoot color, and then drop in a sheet of B&W. You also can shoot several different sheets of the same film as backups, in-camera-duplicates, or to let you develop one sheet, see if you like the exposure, and if not, develop the next sheet differently.
Large Format cameras usually allow every lens to work as a tilt-shift lens to allow both perspective correction and to allow one to tilt the lens or film to allow you to tilt the plane of best focus.
Yes, you don't have to stop down for depth-of-field on large format. On large format, you can just tip the lens forward, and bring everything from near to far into perfect focus. Cool, eh?
You have to load each sheet of film into a film holder one-by-one in a darkroom. You can drop your exposed holders at a lab, and they unload in their darkroom and return them with your processed film.
See also:
Perfect Exposures with Large Format Cameras
If you look around as many dusty places as I do, you'll find many old cameras that don't use today's film formats (35mm, 120 or 4x5").
Some of these older formats are:
620 (1950s)
This was a popular amateur format in the 1950s. These cameras are usually Brownies.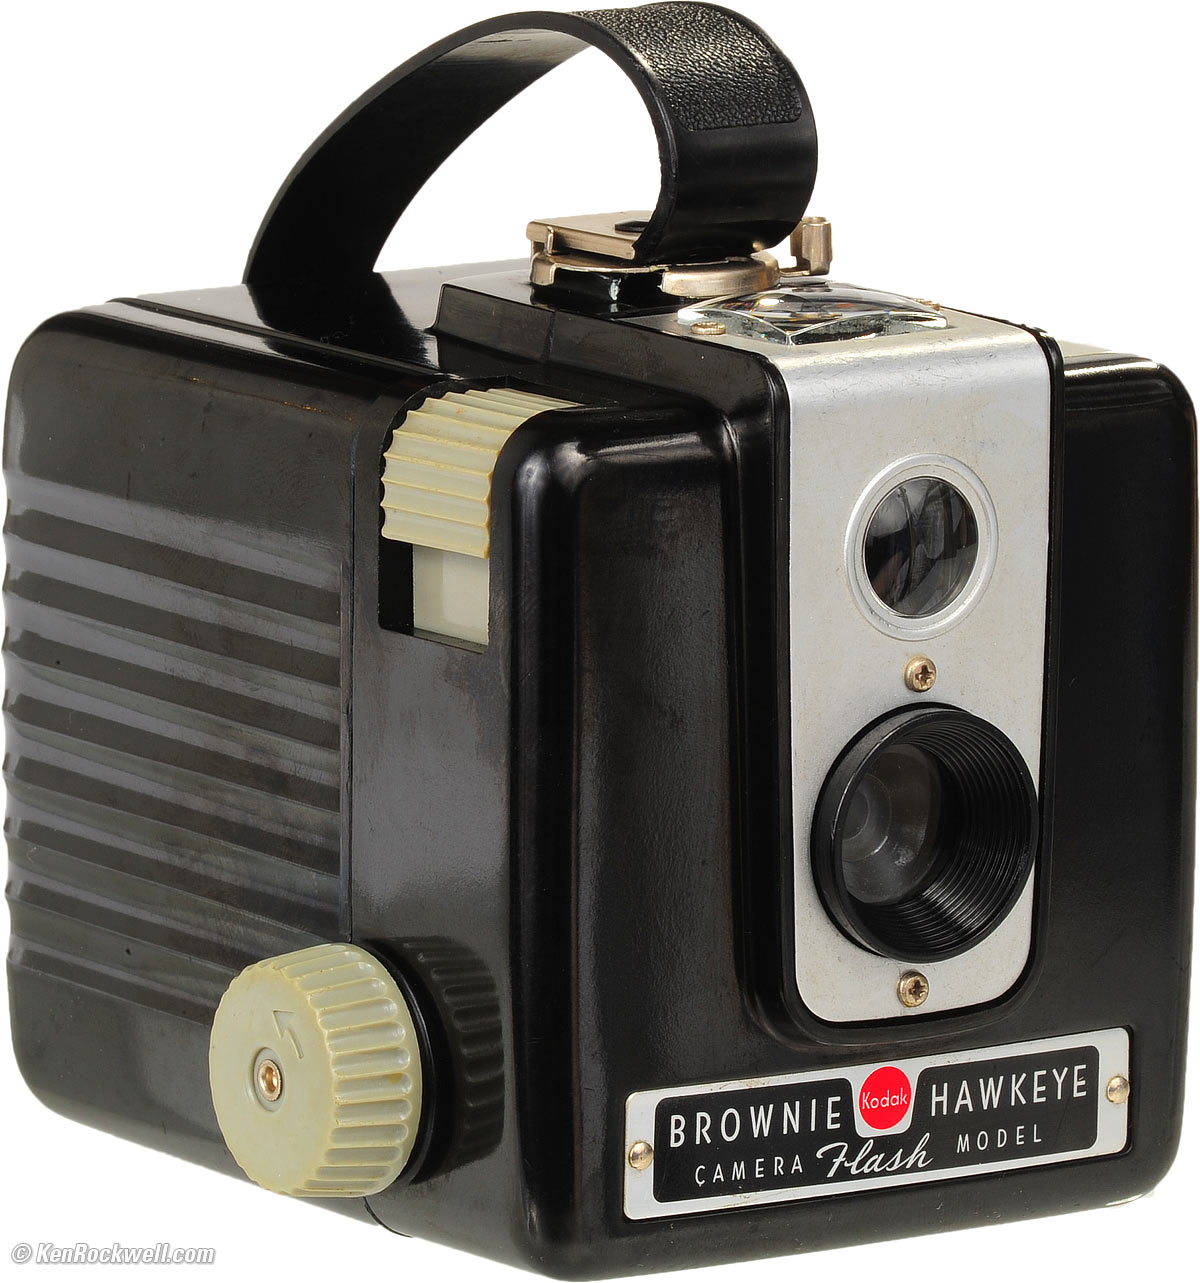
It's exactly the same film and backing as today's professional 120 medium format, but rolled onto a thinner-diameter spool.
The bad news is that 620-spooled film is no longer made and 120 spools won't fit in cameras that need 620 film, but skilled people can reload 120 film the hard way in a darkroom by hand onto a 620 spool.
B&H sells 620 film made this way.
Always be sure your lab returns your precious 620 spool to you when they process your film. Normally labs throw away medium format film spools, but 620 spools aren't made anymore.
126 Instamatic (1960s)
This was a fantastically popular format in the 1960s.
Instamatic cameras were the standard for amateur photos.
They take 12 square photos on a drop-in 126 Instamatic cartridge, sometimes 24.
I still can process and scan my 126 color print film at Swan Photo in California.
NCPS can process any kind of 126 film, but it's a pain for them to scan.
Disc (1970s)
The Kodak Disc was a round piece of film in a black plastic holder.
Just like the magazine of a revolver, the disc rotated after each shot to bring a new section of film behind the lens for the next shot.
Each Disc gave 15 shot.
110 (1970s)
110 was a smaller version of 126 Instamatic. It was bad in the 1970s, and near dead today.
110 is also a drop-in cartridge of 12 or 24 exposures.
I still can process and scan my 110 color print film at Swan Photo in California.
NCPS can process any kind of 110 film, but it's a pain for them to scan.
APS: Amateur Photo System (1997-2002)
APS was a scheme to sell more photo processing equipment to photo labs.
You can still buy the film, and my local Costco still processes and scans it.
It was a bad idea when new (less film for more money), and an even worse idea today.
Recommended Films top
Quick answer
I use Fuji Velvia 50 for photos of places and things, and Fuji 400H Professional for photos of people and family. If 400H is too expensive, use Fuji Superia 400. You probably want the 35mm (135) size.
Discussion
Our choice of film has a huge effect on the look of our photos. Colors and contrasts are different with every film. With digital our choice of camera brand and how we adjust it sets the look of our photos, while in serious photography we define the overall look by our choice of film.
Some people shoot a zillion kinds of film and never get to know any of them well. They get a lot of different looks, but never really know what to expect every time they shoot.
I prefer to shoot just one kind of film and learn it so well that I always know how my photos will look before I take them, This way I can optimize my shooting conditions to get fantastic photos.
I always shot Fuji Velvia 50 before I had kids and rarely photographed people. Now that I have kids and make plenty of people photos, I also shoot print film or Velvia 100.
People and Family: Print Film for all conditions
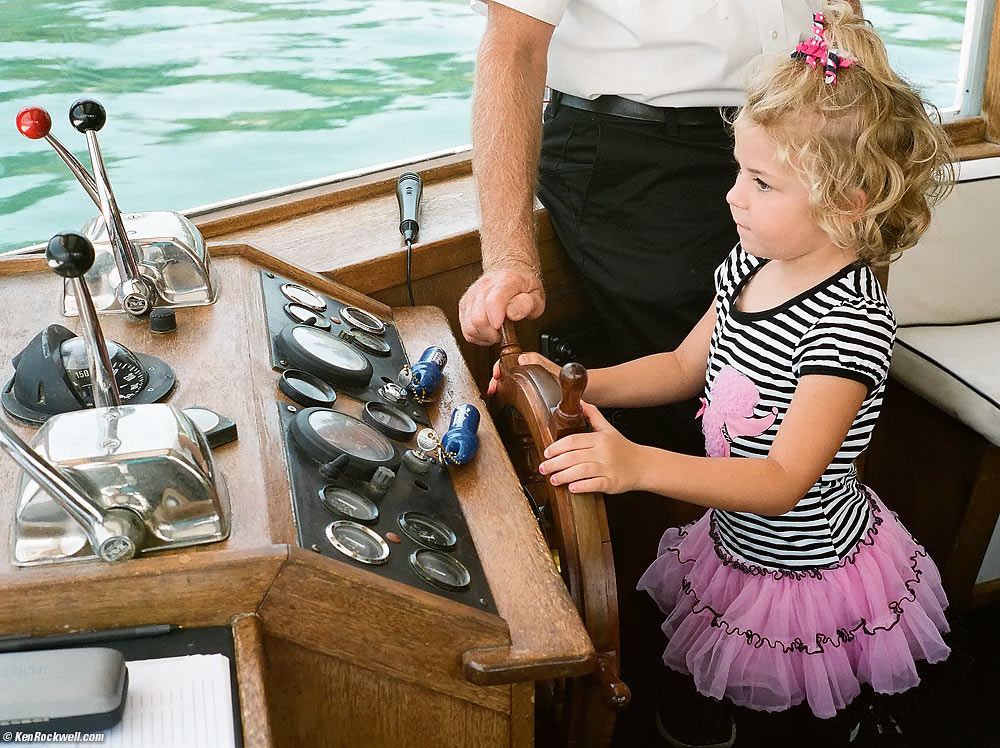
Katie Pilots the Lake Arrowhead Queen, 23 July 2013. (Olympus 35 SP, Fuji Pro 400H, NCPS process and scan, Athentech Perfectly Clear plug-in.) bigger.
For people and family photos, I love ISO 400 color print film. It's fast enough to let me shoot without flash in any light, and good enough to look good even if I have plenty of light.
Any ISO 400 film will work, and you can get it anywhere that sells film. Fuji Superia 400 is my favorite low-cost ISO 400 film. It sells for about $3 a roll.
Fuji 400H Professional is my favorite — but costs about $8 a roll. I order it online as I always have; good film always has to be ordered.
If you're expecting to be shooting in very dim light, ISO 800 print film doesn't have much more gain than ISO 400, and you'll be much better able to stop motion. It has slightly less vivid colors and a little more grain, but that's much better then a blurry picture if the light is very dim.
ISO 100 Print Film
ISO 100 print film is even better if you're outdoors and don't expect to be indoors during the same roll of film, except that ISO 100 print film is usually optimized for nature and landscape photos more than for people photos.
Kodak Ektar 100 (in 35mm size) is great film, but better for photos of things instead of people. It's sharp, colorful crisp and clear, and tends to emphasize reds and yellows. It has high contrast.
Kodak Portra 160 (in 35mm size) ought to be great for portraits, but I've never tried it.
Places and Things: Slides for brilliant colors
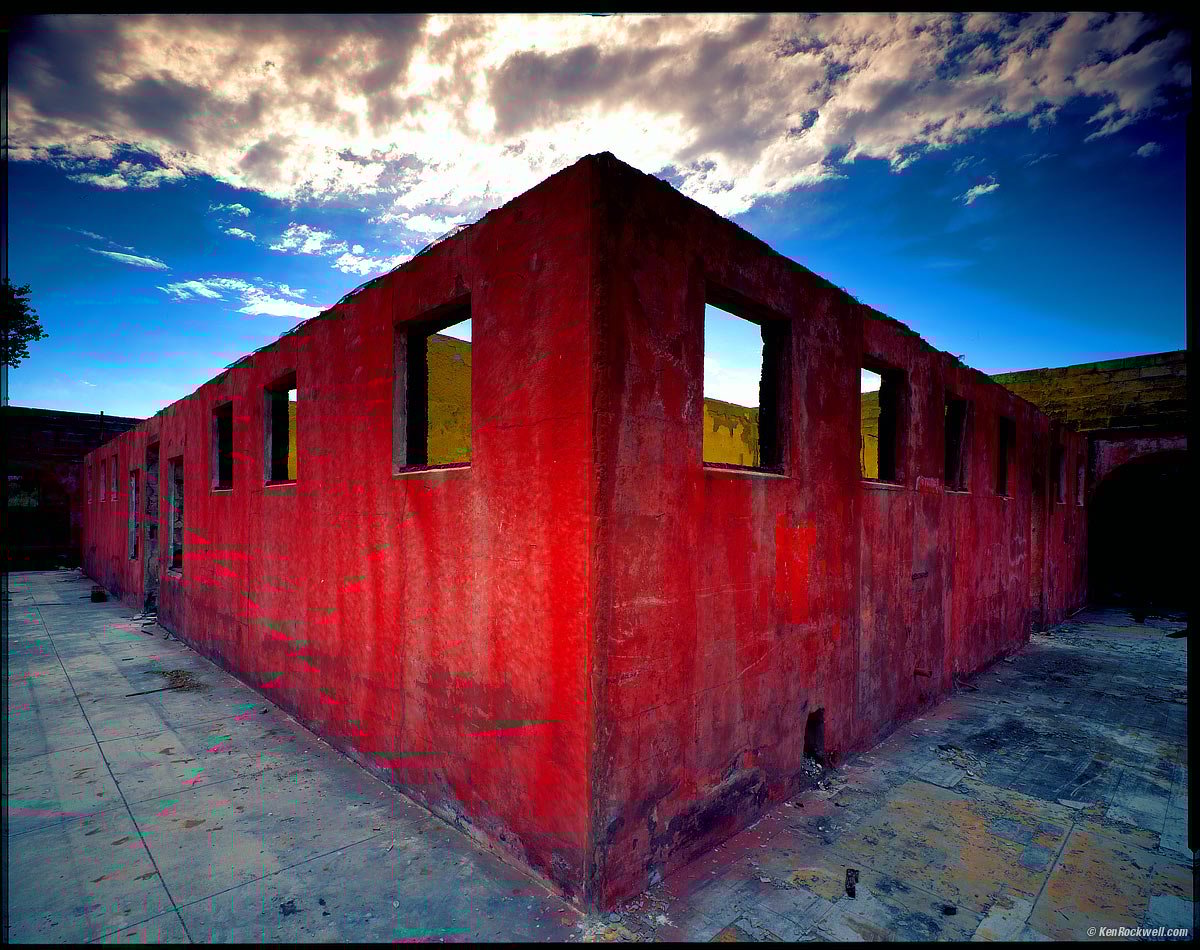
Ruin, San Diego County, 28 July, 1996 shot on 4x5" Fuji Velvia 50. bigger. tech details.
For nature, landscape, places and things, I've been shooting Fuji Velvia 50 ever since 1990. I LOVE it! Velvia is a slide film; I have it scanned as it's developed and print from these files.
Velvia 50 has been the professional standard for landscape and nature photography ever since its introduction in 1990. It's that good; nothing else looks as good for getting vivid colors and super-sharp pictures.
Velvia 50 is poor for people photos since it turns faces red, and it's so slow that it can't stop action indoors without a flash. It renders yellows very warmly, which is why it looks so awesome for landscape photos.
If you also want people in your nature photos and still want brilliant colors, Fuji Velvia 100 is fantastic. It doesn't make yellows warmer so it's not as great for nature and landscape, but it renders skin tones far better than Velvia 50 does and renders the rest of the colors just as boldly.
Velvia 100 actually has slightly less grain than Velvia 50, but isn't quite as sharp — and Velvia 100's yellows are optimized for skin, not for landscapes and things.
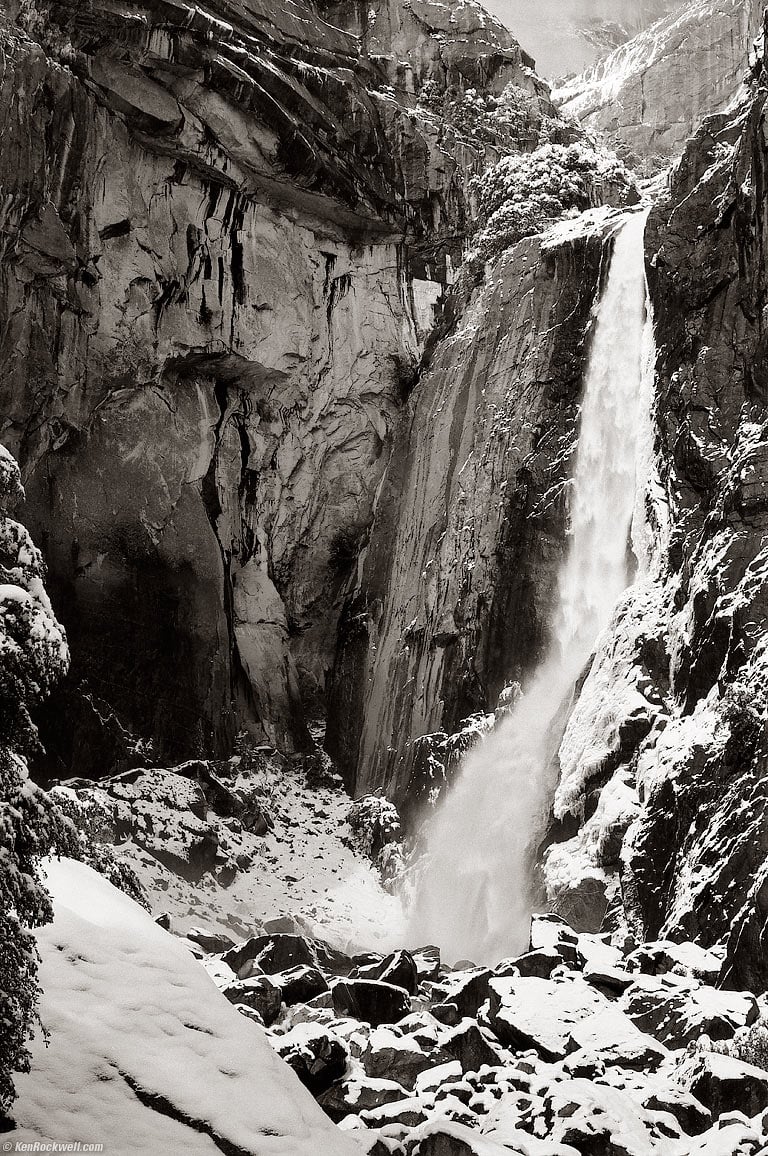
Yosemite, 26 February 2011. (1963 LEICA M3, LEICAMETER MR-4, 1957 LEICA SUMMICRON 50mm f/2 with close-focusing range, f/5.6 at 1/60, 39mm LEITZ Or orange filter, no tripod, frame 31 of roll 1 of Kodak T-Max 100.) bigger.
I prefer Kodak T-MAX 100. It's ultra-sharp and has fine grain.
Ilford Pan-F 50 is just slower. It doesn't seem to have finer grain and isn't any sharper.
In 35mm, Kodak T-MAX 400 is fast for indoor shots and sports, but I find it very grainy. Many people shooting ISO 400 B&W film love the grain. Heck, many people buy software just to try to add this grain to their digital shots!
Color film for B&W?
You can shoot color film and then convert it to B&W later in Photoshop (Layers Pallet > Click the Half and half black and white circle > Black and White, then move the sliders to taste).
An advantage to this is not needing any colored contrast filters because you can use the color sliders in Photoshop's convert-to-B&W adjustment layer to simulate a contrast filter, but this doesn't work as well as you'd think. It turns out that scanned color film lacks the dynamic range needed for this trick to work well, especially when trying to increase contrast — which is usually the point.
You can see some samples of color converted to B&W at my 2014 Route 66 gallery. The problem is phantom bright lines at the edges of sky areas I'm trying to darken with a simulated red filter.
I prefer the look of real B&W film shot with contrast filters over shooting color print film and simulating those filters later. The color to B&W conversion doesn't work as well in Photoshop compared to shooting B&W film directly with filters.
See also Shooting Black and White.
Filters top
See also Filters.
Filters are important in real photography. On film, we adjust color balance with colored filters in front of the lens, not with menu settings.
For color print film, you need no filters. Even if you use them for a special effect, often the lab will "correct" the effect back to nothing!
On color slides, you need colored filters for great results in weird lighting. In shade, I prefer an amber 85C filter to prevent it from being too blue. Heck, if fall colors aren't doing it for me, the 85C usually fixes the problem, too!
Often I'll use a mild amber 81A filter in many conditions with slide film, except with people.
For B&W film, use an orange filter outdoors to make the clouds look strong. A yellow filter is weaker, and a red filter is much stronger. Also consider a green filter to lighten greenery and make the sky less washed-out. If you don't use a filter outdoors, the sky will be a washed-out light gray with no clouds because B&W film is much more sensitive to blue light than our eyes are. B&W film sees blue sky, and makes it white unless we use at least a yellow filter.
Don't use any filter indoors or at night with B&W or color print film. You might want to give color print film an extra stop of exposure to give the lab more leeway in correcting your colors shot in artificial light.
Shooting slides under artificial light is very difficult. Even if you use the correct filters (FLW under warm-white fluorescent, 80A under tungsten, etc.), the results are usually weird colors. Use no filters for outdoor at night shots, and forget people shots indoors where you want the colors to look reasonably natural.
I rarely use a polarizing filter. We needed them with old film like Kodachrome to try to add some Bang! to outdoor shots, but Velvia 50 looks so brilliant as-in that a polarizer usually makes it way too contrasty.
Exposure Compensation
You don't need exposure compensation with filters, unless:
Most cameras with through-the-lens meters (SLRs) need you to add an extra stop when shooting with a red filter and B&W film. This is because B&W film isn't very sensitive to red light. With an SLR, set the meter to half the rated ISO speed with a red filter and B&W film.
If you use an external light meter (or one that doesn't look through the lens filter), add a stop for yellow, two for orange and three for a red filter. (Set one-half, one-quarter or one-eighth the rated ISO). Add 1/3 stop for an 81A, 2/3 for an 85C and 2 stops for an 80A. A polarizer usually needs two extra stops, but all of this is only in the rare case that your meter isn't inside your camera.
More Information top
Large Format Photography Getting Perfect Exposure on Large Format
Medium Format and Panoramic Photography
Recommended Scanners Scanner Technology How to Choose a Scanner
How to Scan and Print Panoramic Film
How to buy a 35mm camera (2004)
Film Rescue: A place that claims to develop any kind of old film as of 2014.
Another place that's been around forever is Rocky Mountain Film Lab.
I haven't used any of them; they specialize in ancient formats like Kodak Disc and 110.
How to develop color slide film at home.
Even my local Costco is still APS certified, and I process all my film as I shoot it at NCPS. I rarely shoot 110 or come across random rolls of film in the back of a drawer — but when your Mom gives you the old family camera and there's a half-shot roll of film in it from 1986, these could be your guys.
© Ken Rockwell. All rights reserved. Tous droits réservés. Alle Rechte vorbehalten. Alla rättigheter förbehållna. Toate drepturile rezervate. Niciun vampir nu a fost implicat în crearea acestei lucrări. Doe! Omnia jura reservata. Ken Rockwell® is a registered trademark.
Help me help you top
I support my growing family through this website, as crazy as it might seem.
The biggest help is when you use any of these links when you get anything, regardless of the country in which you live. It costs you nothing, and is this site's, and thus my family's, biggest source of support. These places have the best prices and service, which is why I've used them since before this website existed. I recommend them all personally.
If you find this page as helpful as a book you might have had to buy or a workshop you may have had to take, feel free to help me continue helping everyone.
If you've gotten your gear through one of my links or helped otherwise, you're family. It's great people like you who allow me to keep adding to this site full-time. Thanks!
If you haven't helped yet, please do, and consider helping me with a gift of $5.00.
As this page is copyrighted and formally registered, it is unlawful to make copies, especially in the form of printouts for personal use. If you wish to make a printout for personal use, you are granted one-time permission only if you PayPal me $5.00 per printout or part thereof. Thank you!
Thanks for reading!
Home Donate New Search Gallery Reviews How-To Books Links Workshops About Contact