Home Donate New Search Gallery How-To Books Links Workshops About Contact
The Flashlight Test
© 2009 KenRockwell.com. All rights reserved.

Front element scratches. enlarge.
This all-content, junk-free website's biggest source of support is when you use any of these links to approved sources when you get anything, regardless of the country in which you live. Thanks for helping me help you! Ken.
December 2009 Leica Reviews Canon Reviews Nikon Reviews
WARNING

I buy only from these approved sources. I can't vouch for ads below. |


This describes an easy test which lets anyone see everything inside any lens. The test is easy to do and I'll show you how.
The problem is that it takes an experienced eye to interpret the results properly.
You need years of doing this test to hundreds of lenses in order to interpret the results meaningfully.
Otherwise as I just said, everyone using this test will see everything inside every lens, and start returning perfectly good lenses.
I've avoided writing this article for 10 years because I know that once I do, everyone will start sending back lenses, just as people who know nothing about wine drive restaurateurs up the wall sending back perfectly good bottles of wine.
This test is very handy when buying old used lenses, since the older they get, the more crud might be inside them.
It is not needed with new lenses.
Only once in over 40 years of shooting have I ever seen anything wrong with a new lens. When I saw it in 1999 I told you all about it: Nikon's best 80-200mm lens, the AF-S, had some initial manufacturing problems with polishing, and even then, they didn't affect the pictures at all. Today, that lens is worth more used than it cost new, even with the polishing marks. Even if your sample has polish marks, it still functions flawlessly.
The test is easy to do, but even easier to misinterpret.
I'm going to show you the test and then try to explain how to interpret what you see.
Only experience will give you the perspective in which to interpret what you see. These artifacts are three-dimensional, which I can't show here.
Method top
Take a bright light and shine it through the lens.
Don't look at the light. Shine it so that it goes through the lens, but that it doesn't hit you in the eye.
The bright light shines through the lens, and highlights anything that's inside.
Look into the lens from the side, and the light makes even the smallest imperfections visible.
The brighter the light and the darker the room, the more obvious defects become.
The handiest light is a bright LED keychain flashlight. It's very bright, and comes from a small point so all the light goes into the lens instead of around it.
You can see dust in a projector beam in a dark room. This test does exactly the same thing. If you can see dust in perfectly clear air, you will certainly see things in even perfectly good lenses.
The Luxor in Las Vegas shines a bright light in the air, and just the dust in the air is lit so brightly that you can see it from 40 miles away.
This is why you need experience to make sense of what you'll see in a lens.
Analysis top
Warning: this is only a guide to the kinds of things you'll see. Only real experience will give you the perspective to be able to make absolute judgments of good and bad.
A perfectly good lens
Meaningless dust on the front element of a perfectly good NIKKOR.
There are always a lot of internal reflections, as you see in this perfectly good lens. They will be all sorts of colors depending on the lens' coating.
Dust will almost always be visible on the outside elements. It's easy to remove with a fuzzy microfiber towel.
If you can shine a bright light through a lens and still see through it to the black edges of the rearmost internal elements, you've got a perfectly good lens.
Dust
Dust scares a lot of people, but it is meaningless.
Unless there is so much dust that you can't see through it clearly, it is invisible.
Take some pictures and you'll see.
See the three tiny specks inside the 50-year old lens below? They are irrelevant, and in this case they are actually tiny air bubbles!
Nikon NIKKOR 5cm f/1.4 (1950s).
Amateurs worry too much about lens cleanliness. Look at the front of a real pro's lens in regular light, and half the time you'll see so much junk he hasn't cleaned off that you'd be amazed.
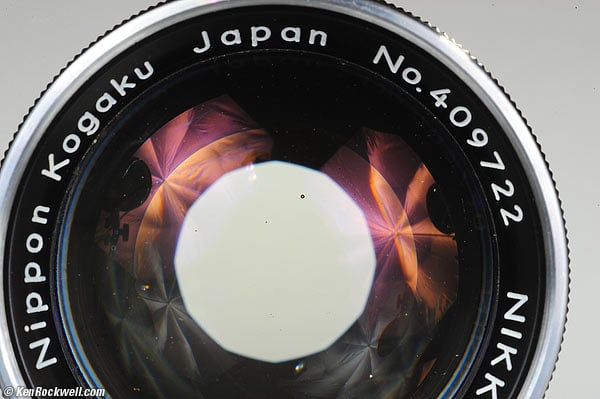
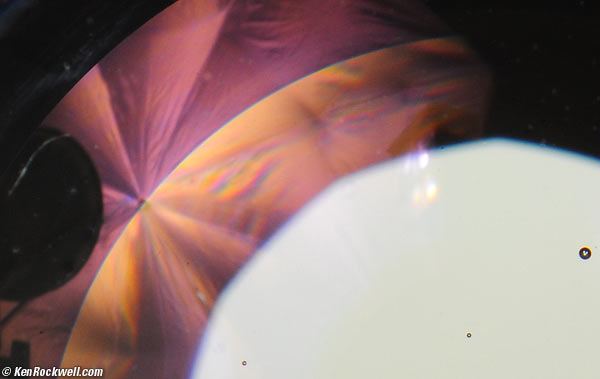
Bubbles
Up though the 1960s, optical glass manufacturing often left a few pin-prick sized air bubbles inside the glass.
They look like tiny dust specks when you look with your naked eye, but if you magnify them, they are honest-to-goodness bubbles.
The tiny specks in the Nikon NIKKOR 5cm f/1.4 above are actually bubbles!
Air bubbles in the glass of a Nikon NIKKOR 5cm f/1.4.
This was the world's fastest lens for 35mm photography in its day, and the special glass required special manufacturing techniques that led to these bubbles.
I've never seen bubbles in newer lenses, and even if they are there, they are irrelevant.
Scratches
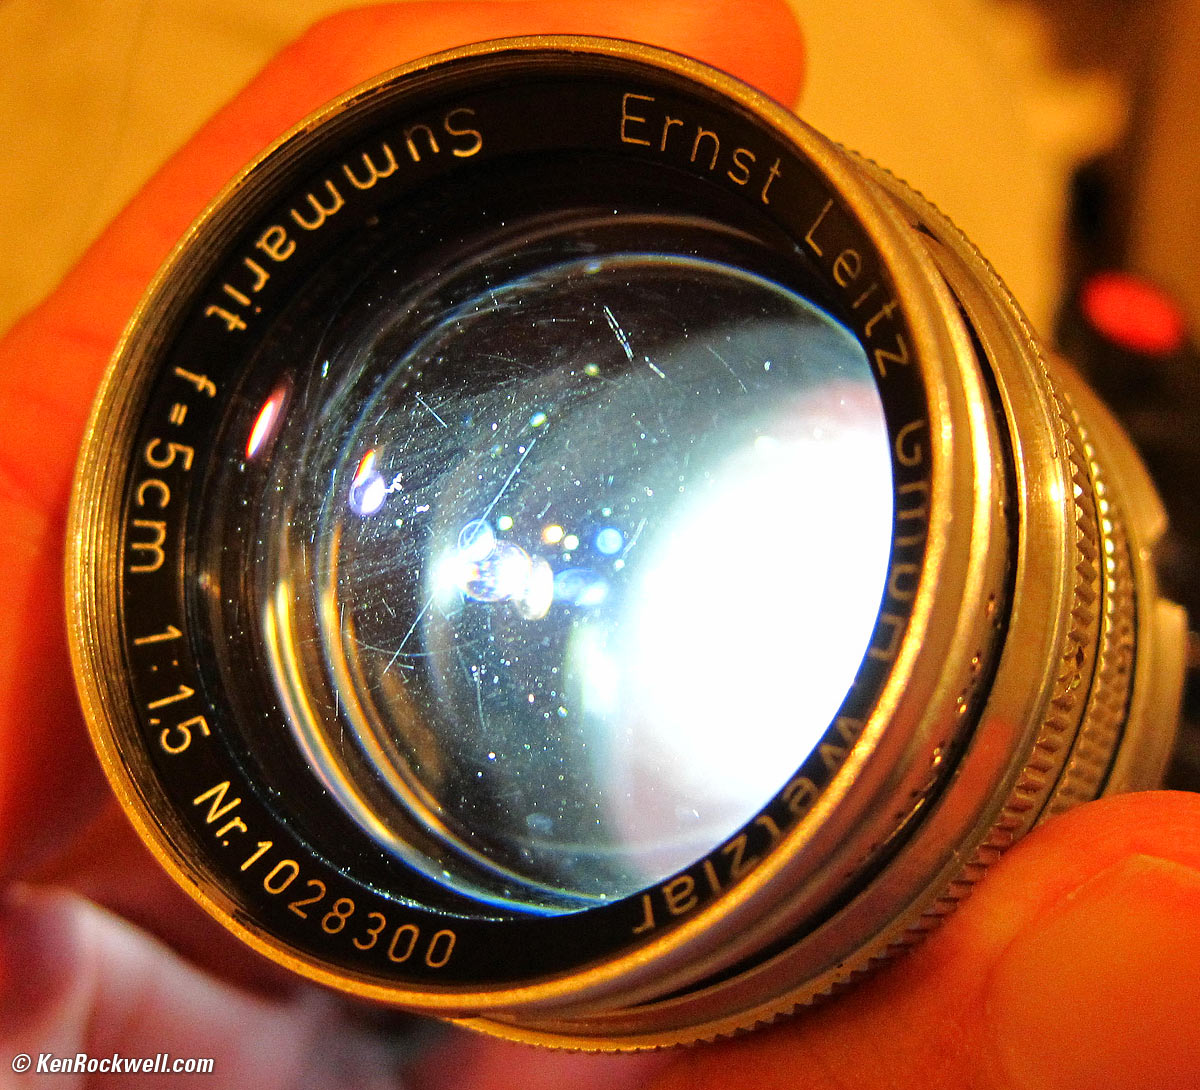
Front element scratches (1952 LEICA Summarit). enlarge.
Scratches light up as bright lines.
They rarely cause any problems unless they are so bad that you can see them in normal light. At worst, they might make dim star lines that radiate from very bright points of light in an image, but still cause no problem unless you have bright light sources in your image.
They can be found in any lens that was not handled properly.
Dealers use the euphemism "cleaning marks" to describe scratches. Lenses do not scratch when cleaned properly. People do scratch lenses when they try to clean lenses improperly.
Some older lenses, like the 1950's LEICA 50mm SUMMICRON, used very soft glass, and most samples you'll see have a front element that is obviously worn dull from over-cleaning. That wear is significant and makes photos foggy, and it's usually so bad that you don't need the flashlight test to see it.
This is why it's a good idea to leave a UV filter on all the time, so you don't ever have to clean the lens itself.
Worn, dull glass is unusual, and bad.
Don't be afraid of clean scratches, except on ultrawide lenses whose huge depth-of-field might see the scratches themselves.
Especially on long lenses, pros simply paint over deep scratches or pits with black paint, and never see them again in their images.
I have a 135mm f/4.7 Wollensak lens for my view camera with an obvious scratch. It works fine! I shot this with it, and it still shows no effects.
Haze
Internal haze.
Haze gets worse with age.
You won't see it in new lenses, but you will often see it inside 50-year-old lenses.
Internal lubricants vaporize slowly, and collect back on the glass.
It gets worse with age, and worse when stored at higher temperatures and humidities.
This is why lenses say "store in a cool, dry place."
Haze comes both smoky and oily.
You'll usually see smoky haze. If you look closely enough, you can see what looks like haze even in new lenses. Remember the Luxor.
Haze is no problem unless it makes hazy images.
Smoky haze usually looks much worse in the lens than it ever looks in the image.
If you look through the lens, using it as a magnifying glass, the effect on text simulates the haze's effect on pictures. If you shoot into the light, the effect is many times worse.
Oily haze is less common, but sneaky. I once had a lens with what looked like a negligible amount of haze. Oddly, it made very hazy images that had more of a diffused glow about them than an overall haze.
Smoky haze diffuses light equally over all the image. If a bright light is in your image, smoky haze, caused by zillions of particles much smaller then the wavelengths of light, smears the light over all areas equally, simply making blacks gray and reducing the overall contrast.
Oily haze condenses inside the lens as zillions of tiny droplets, each too small to see, but bigger than the wavelengths of light. Because of this, oily haze diffuses the light to look like haloes over the bright parts of an image. Because oily haze diverts the light less than smoky haze, the haloes are much stronger and closer to the bright parts of the image, thus more visible and annoying.
Since oily haze doesn't divert light to all angles as everything else for which we're looking does with the flashlight test, this is another reason serious oily haze doesn't look that bad in the flashlight test.
Smoky haze can look bad in this test, and not cause any problem at all.
To test this, take pictures.
To learn how to interpret this during a flashlight test, look at lots of lenses, and take lots of pictures.
Fungus
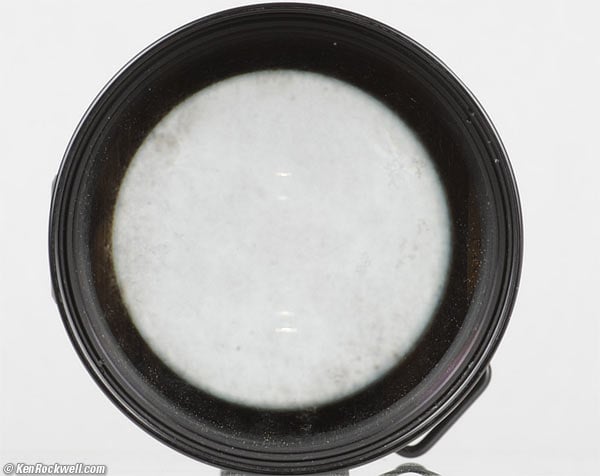
Fungus, Nikon 50-300mm f/4.5.
Fungus shows up like wildfire in a flashlight test.
Fungus looks like little soft dots, usually white, sometimes fluffy, when you look into a lens in normal light.
Use a magnifier and you'll see that they aren't just fluff, but look like hairy little wads of fuzz.
These are living things actually growing inside your lens. They like warmth and humidity, again why we store our lenses in cool and dry environments.
Fungus grows, but grows slowly. The lens shown here must have spent years sitting in a damp, dark place.
Fungus supposedly can be stopped by leaving the lens in daylight, hoping the ultraviolet makes the fungus unhappy.
Mild fungus can be cleaned by a real service facility. More serious cases, like the one shown here in ordinary light, etched the glass so deeply that Nikon returned the lens as "beyond repair."
One tiny dot of fungus won't cause any harm, especially if it's on a piece of glass where the light won't hit it.
A dot of fungus in an ultra-wide or fisheye lens might turn up as a dar spot at small apertures, since more is in focus. I had this happen to me once, and after not finding anything on my sensor, it turned out to be a fungus dot inside the huge front element of an 8mm fisheye lens.
Too much fungus will lower contrast, and way too much will give darker, fuzzier images as it blocks light.
Fungus is always bad news. Store your lenses properly, not in the steam room or basement.
Repair
For exterior dust or fingerprints, I'll breathe some fog on the front or rear element and lightly wipe it with a fuzzy microfiber towel. (see cleaning.)
Other than that, never, ever try to get inside and do any of your own work.
Much of the internal damage I find is from people who didn't know everything about what they were doing, but tried it anyway. Knowing something, or most of what you're doing is the most dangerous thing, because you go in there anyway, and the little bit you don't know is what damages your lens.
If I have anything that needs cleaning or repair, I send it to the most skilled technician I have ever met, Gus Lazzari in North Carolina. Gus gets in, gets the dirt or whatever's wrong, and puts even the most exotic old LEICA lenses back together without leaving any tracks.
Gus has done amazing work for me, taking useless lenses and making them clear again.
Gus cleaned an improperly serviced 1996 LEICA SUMMICRON 50mm for me. It made foggy images due to oil having condensed on the inside. Gus got it so clean that I nearly went blind as I performed the flashlight test on its return. It was so clean that I couldn't see anything, and thought maybe my light beam was misaligned and not getting into the lens. I moved my eye around looking for the beam. Nope, it was shining through the lens, just that the new, clean LEICA lens was so clean that I couldn't see anything inside. I hit myself in the eye with the fully concentrated beam and couldn't see for a half hour. Be careful doing this test on new, high-quality lenses.
Anything new never needs internal cleaning unless there have been unauthorized repairs. The one time in 1999 I found Nikon lenses with defective polishing, those lenses I exchanged for other new ones that were good. You can't fix a factory's bad polish job.
Recommendations top
Do the flashlight test early and often so you can learn how good lenses look.
Do it enough and you'll learn how to spot the occasional real problem with older lenses.
You can skip this test with new lenses. You always need to do this when looking at lenses decades old.
Help me help you top
I support my growing family through this website, as crazy as it might seem.
If you find this as helpful as a book you might have had to buy or a workshop you may have had to take, feel free to help me continue helping everyone.
If you've gotten your gear through one of my links or helped otherwise, you're family. It's great people like you who allow me to keep adding to this site full-time. Thanks!
If you haven't helped yet, please do, and consider helping me with a gift of $5.00.
The biggest help is when you use any of these links when you get anything. It costs you nothing, and is this site's, and thus my family's, biggest source of support. These places always have the best prices and service, which is why I've used them since before this website existed. I recommend them all personally.
Thanks for reading!
Ken
Home Donate New Search Gallery How-To Books Links Workshops About Contact