Home Donate New Search Gallery Reviews How-To Books Links Workshops About Contact
Elekit TU-8200 Amplifier
8 WPC Tube Amp from Japan (2014-)
Intro Specifications Assembly Measurements
Performance Usage Recommendations More
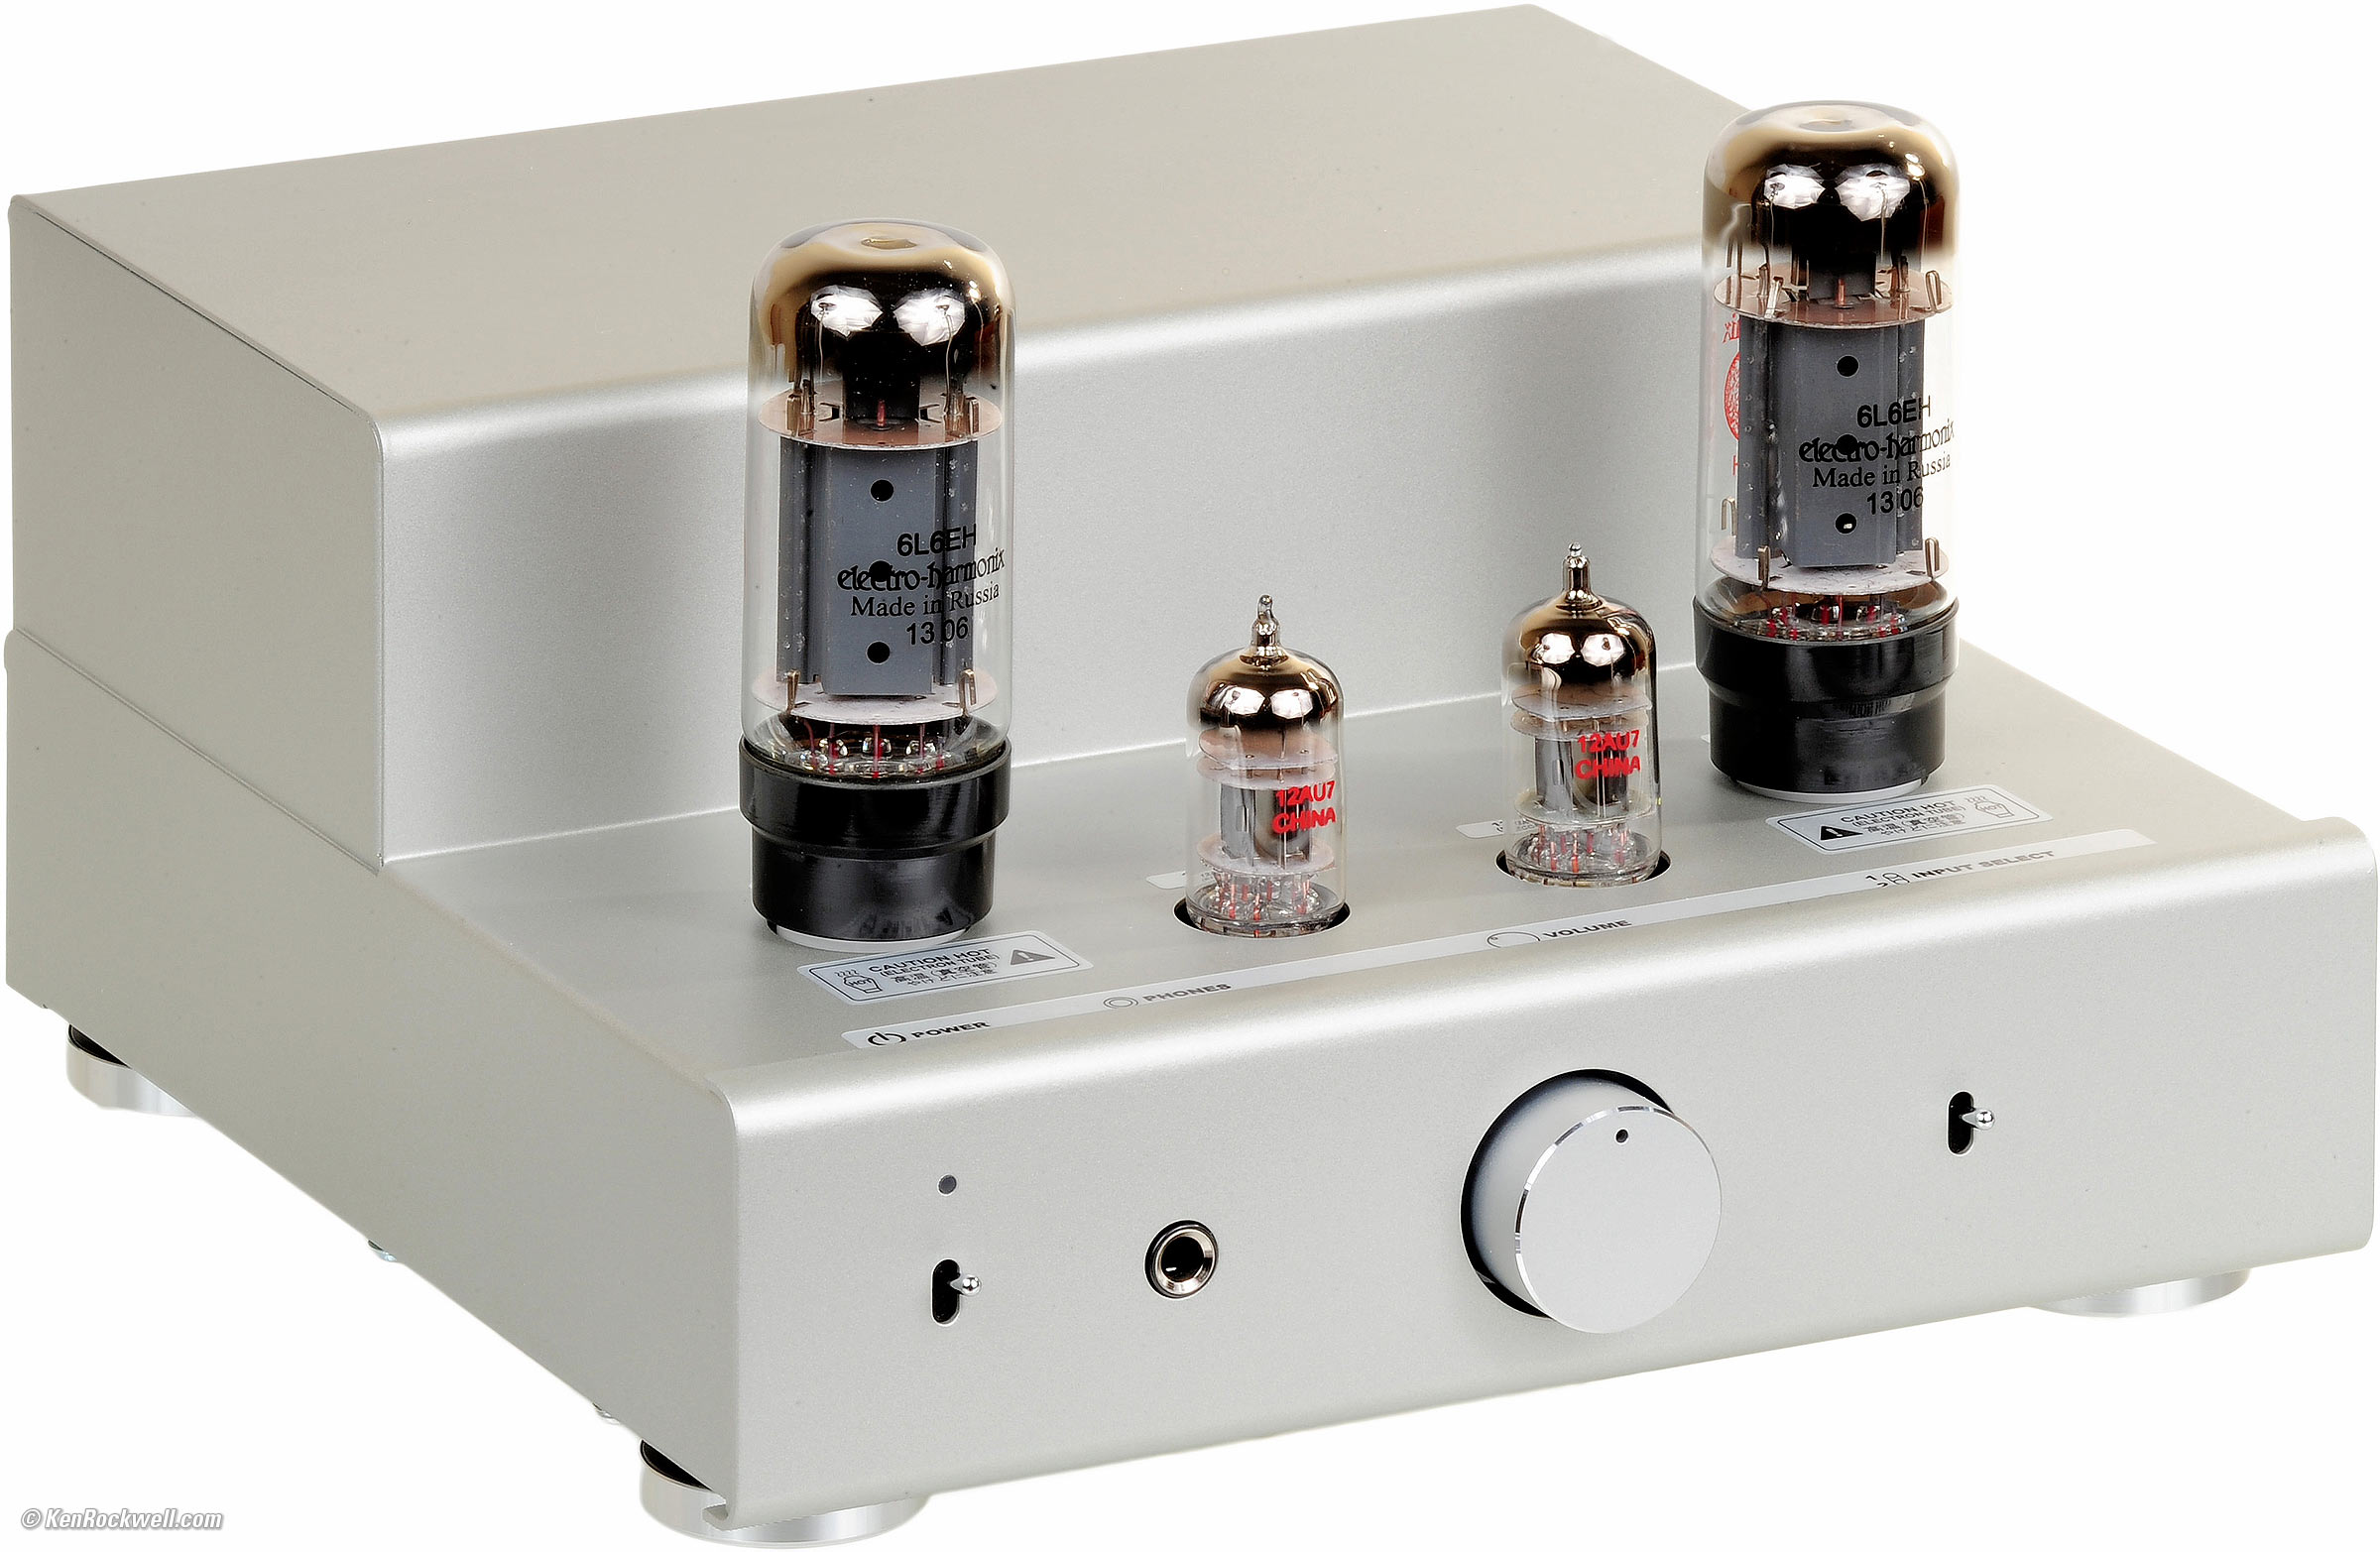
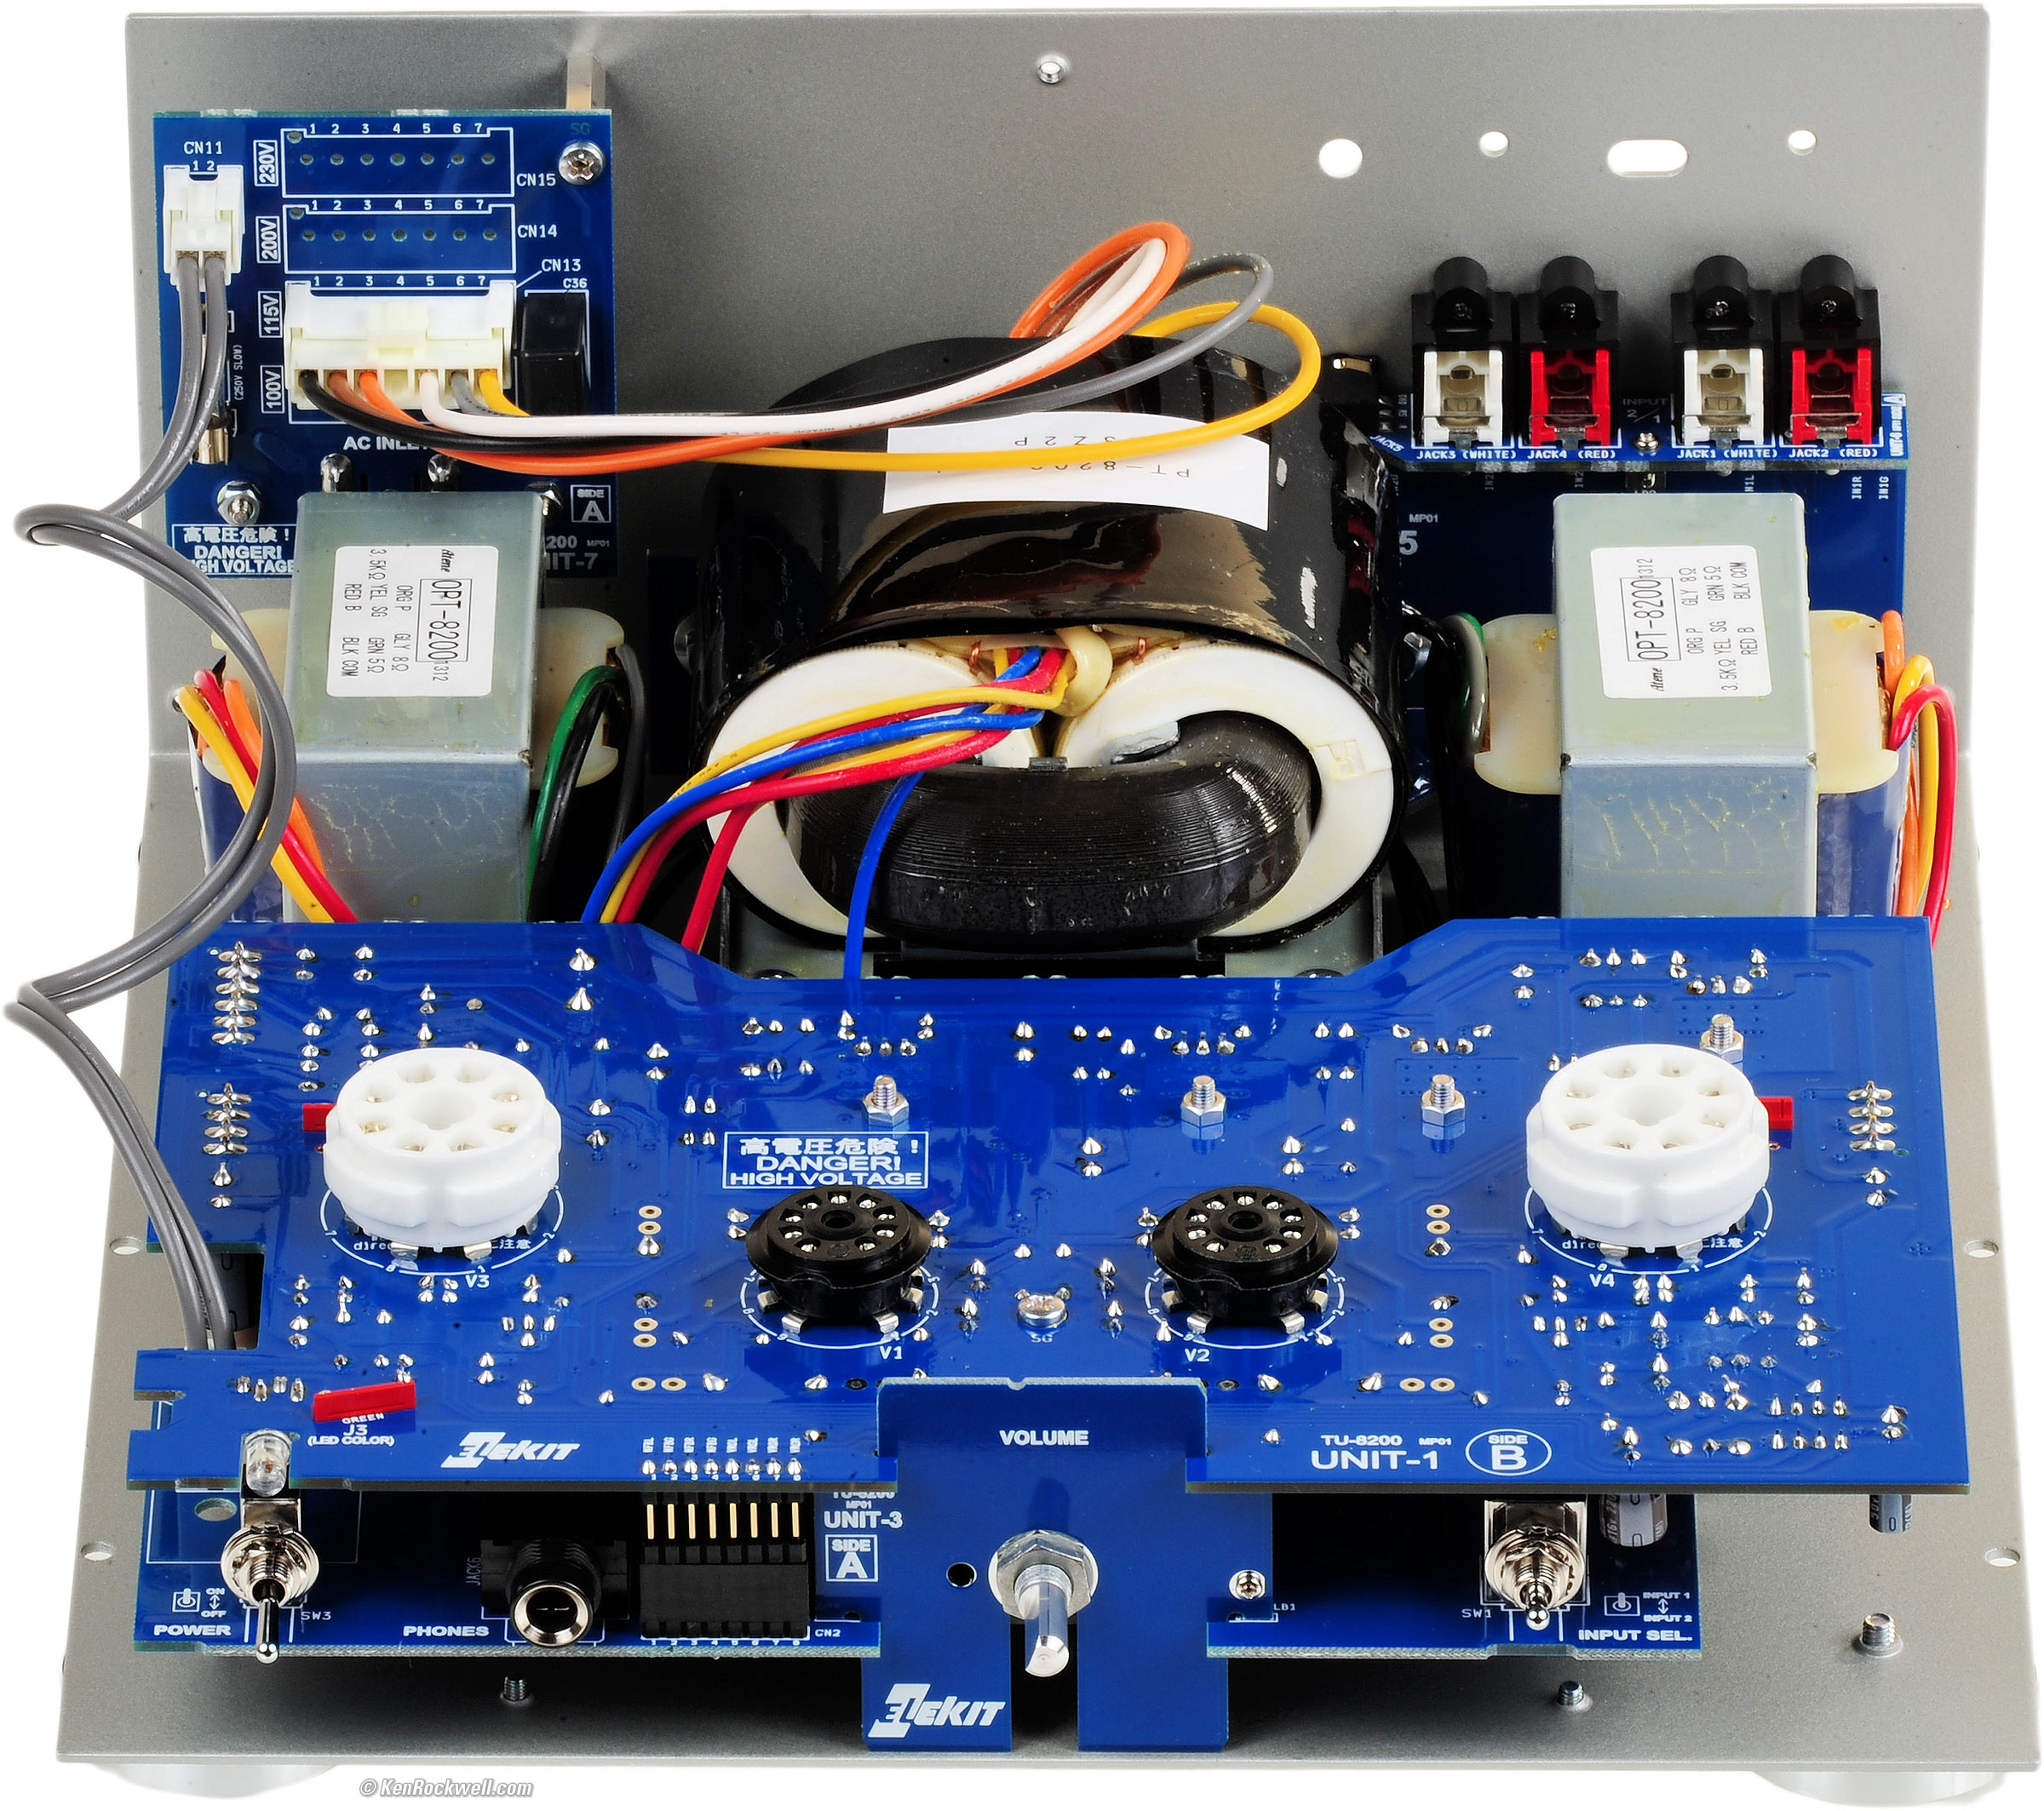
Elekit TU-8200 (8 watts per channel, 14.55 lbs./6.6 kg, 65 watts idle power draw, $895 complete with tubes in kit form from Tube Depot). enlarge.
This all-content, junk-free website's biggest source of support is when you use any of these links to my approved sources when you get anything, regardless of the country in which you live. Buy only from the approved sources I use myself for the best prices, service, return policies and selection. Thanks for your support! Ken.
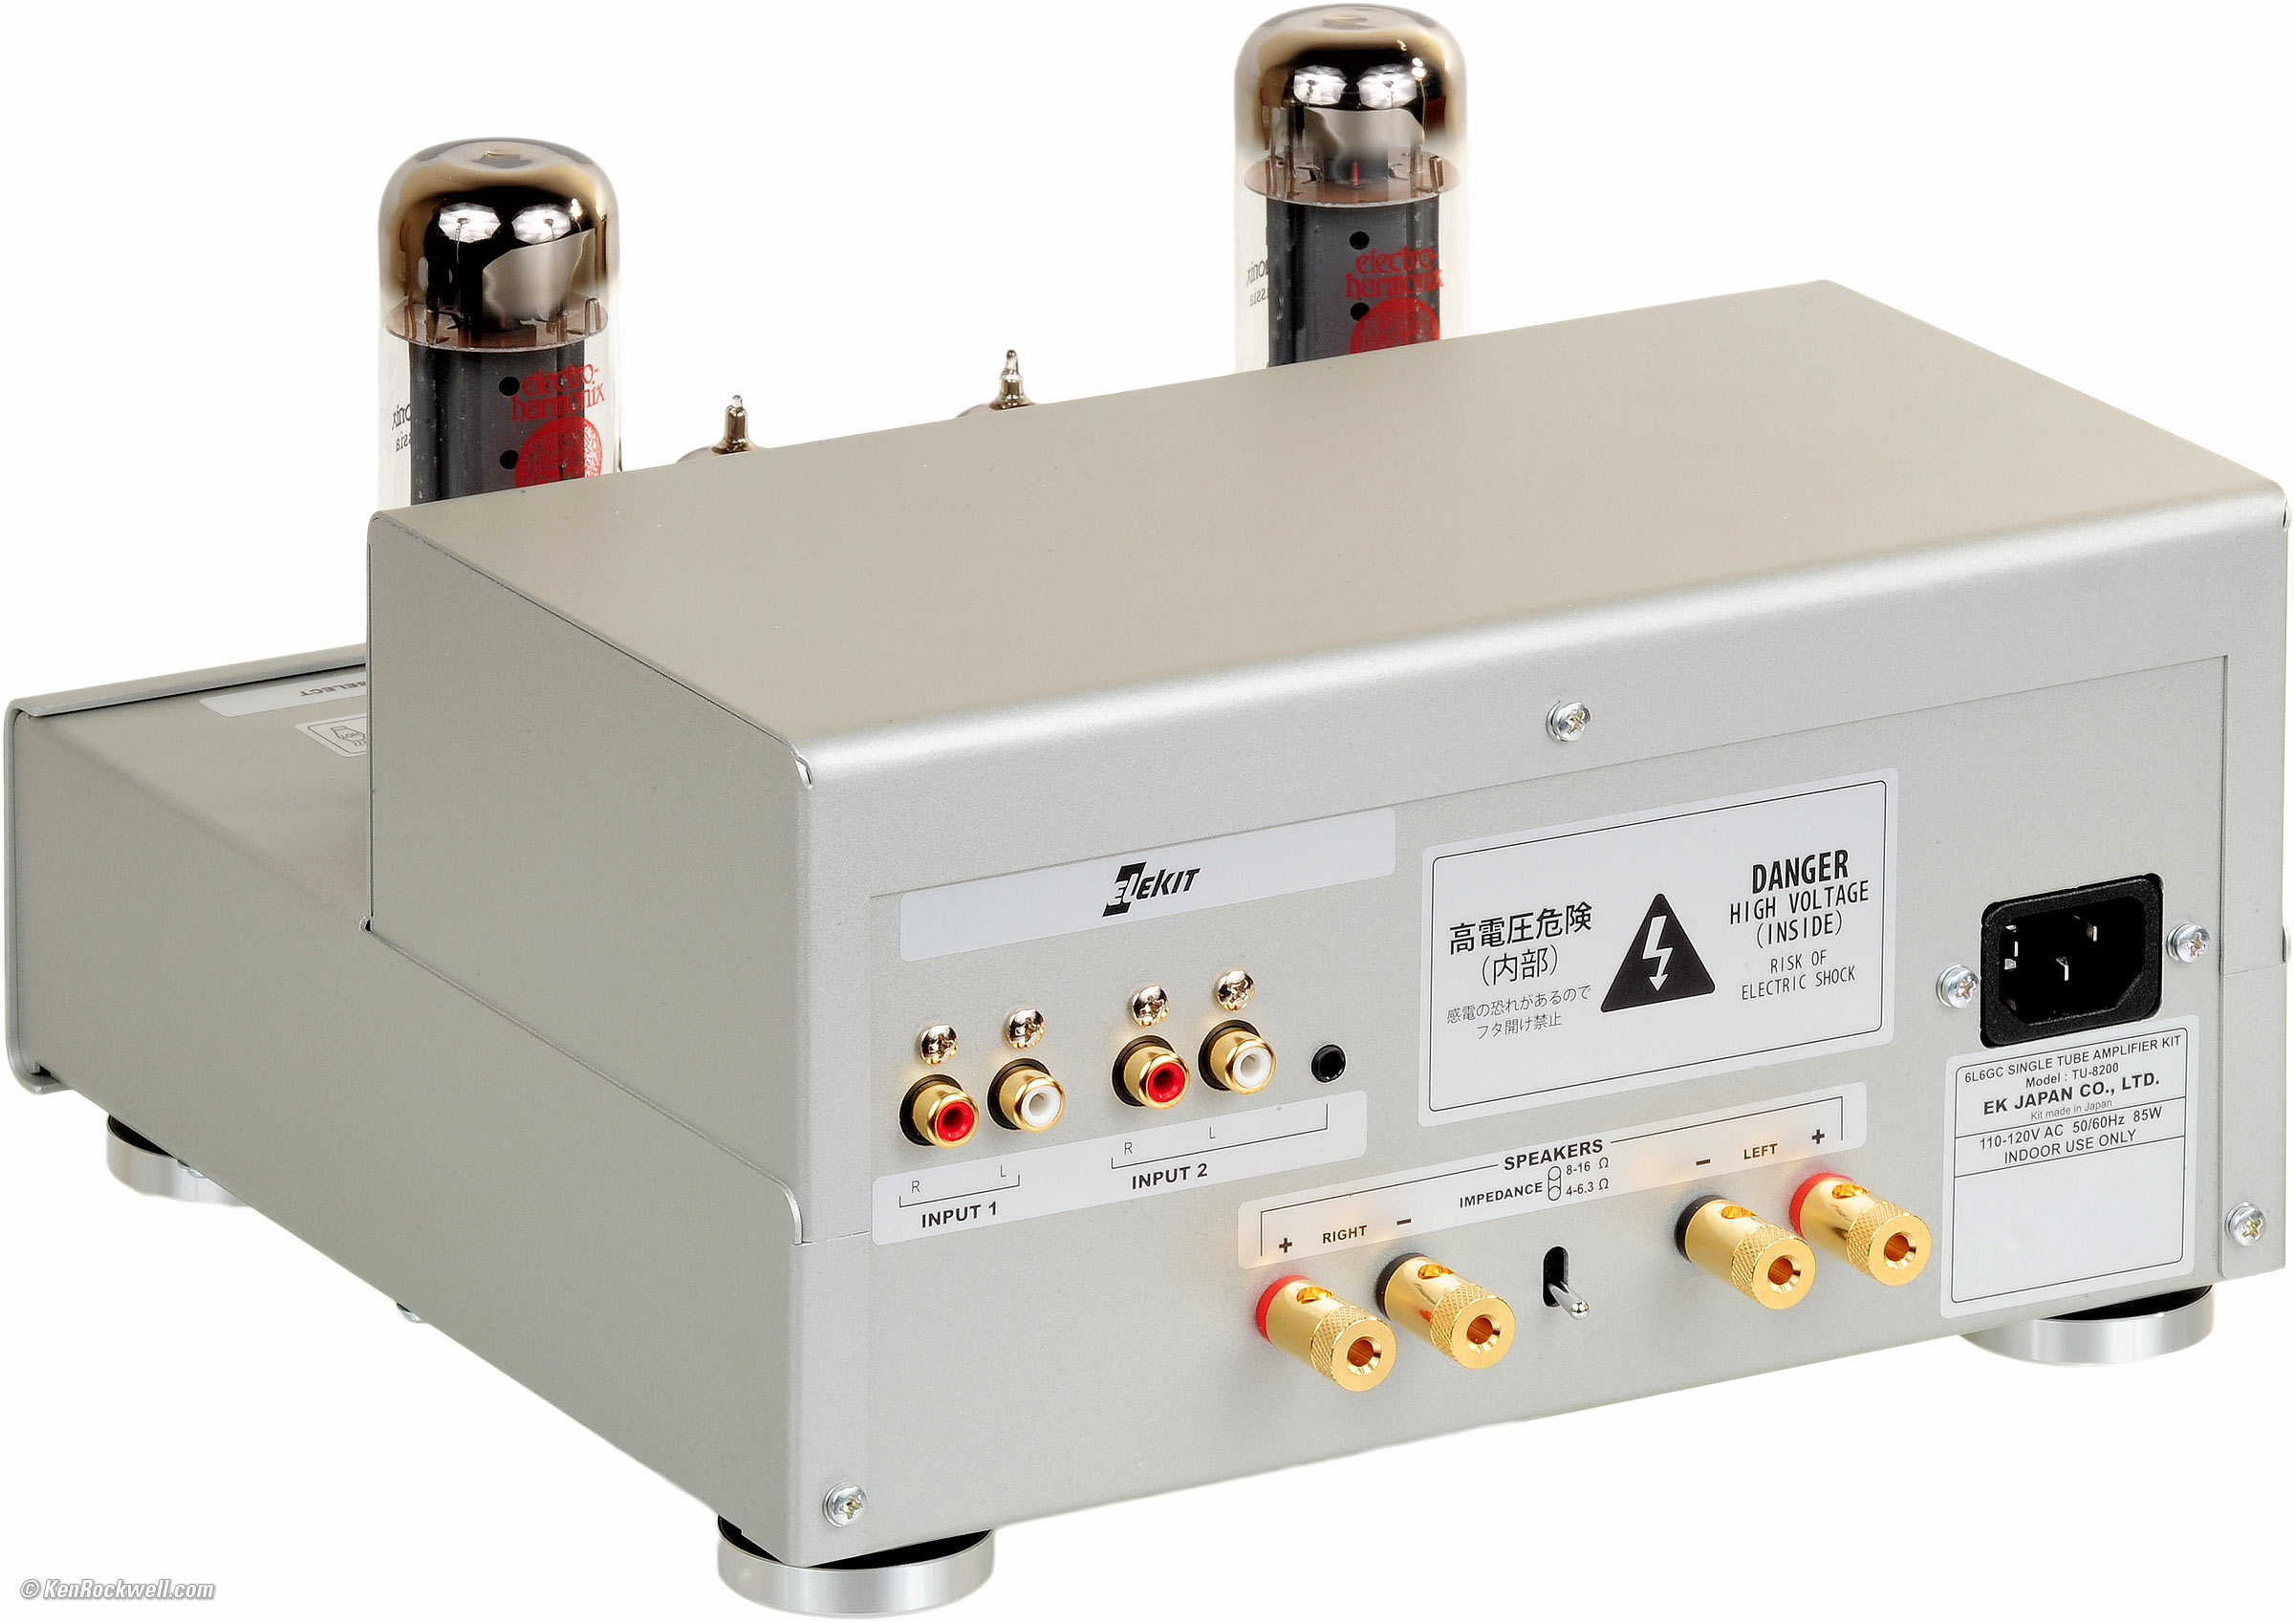
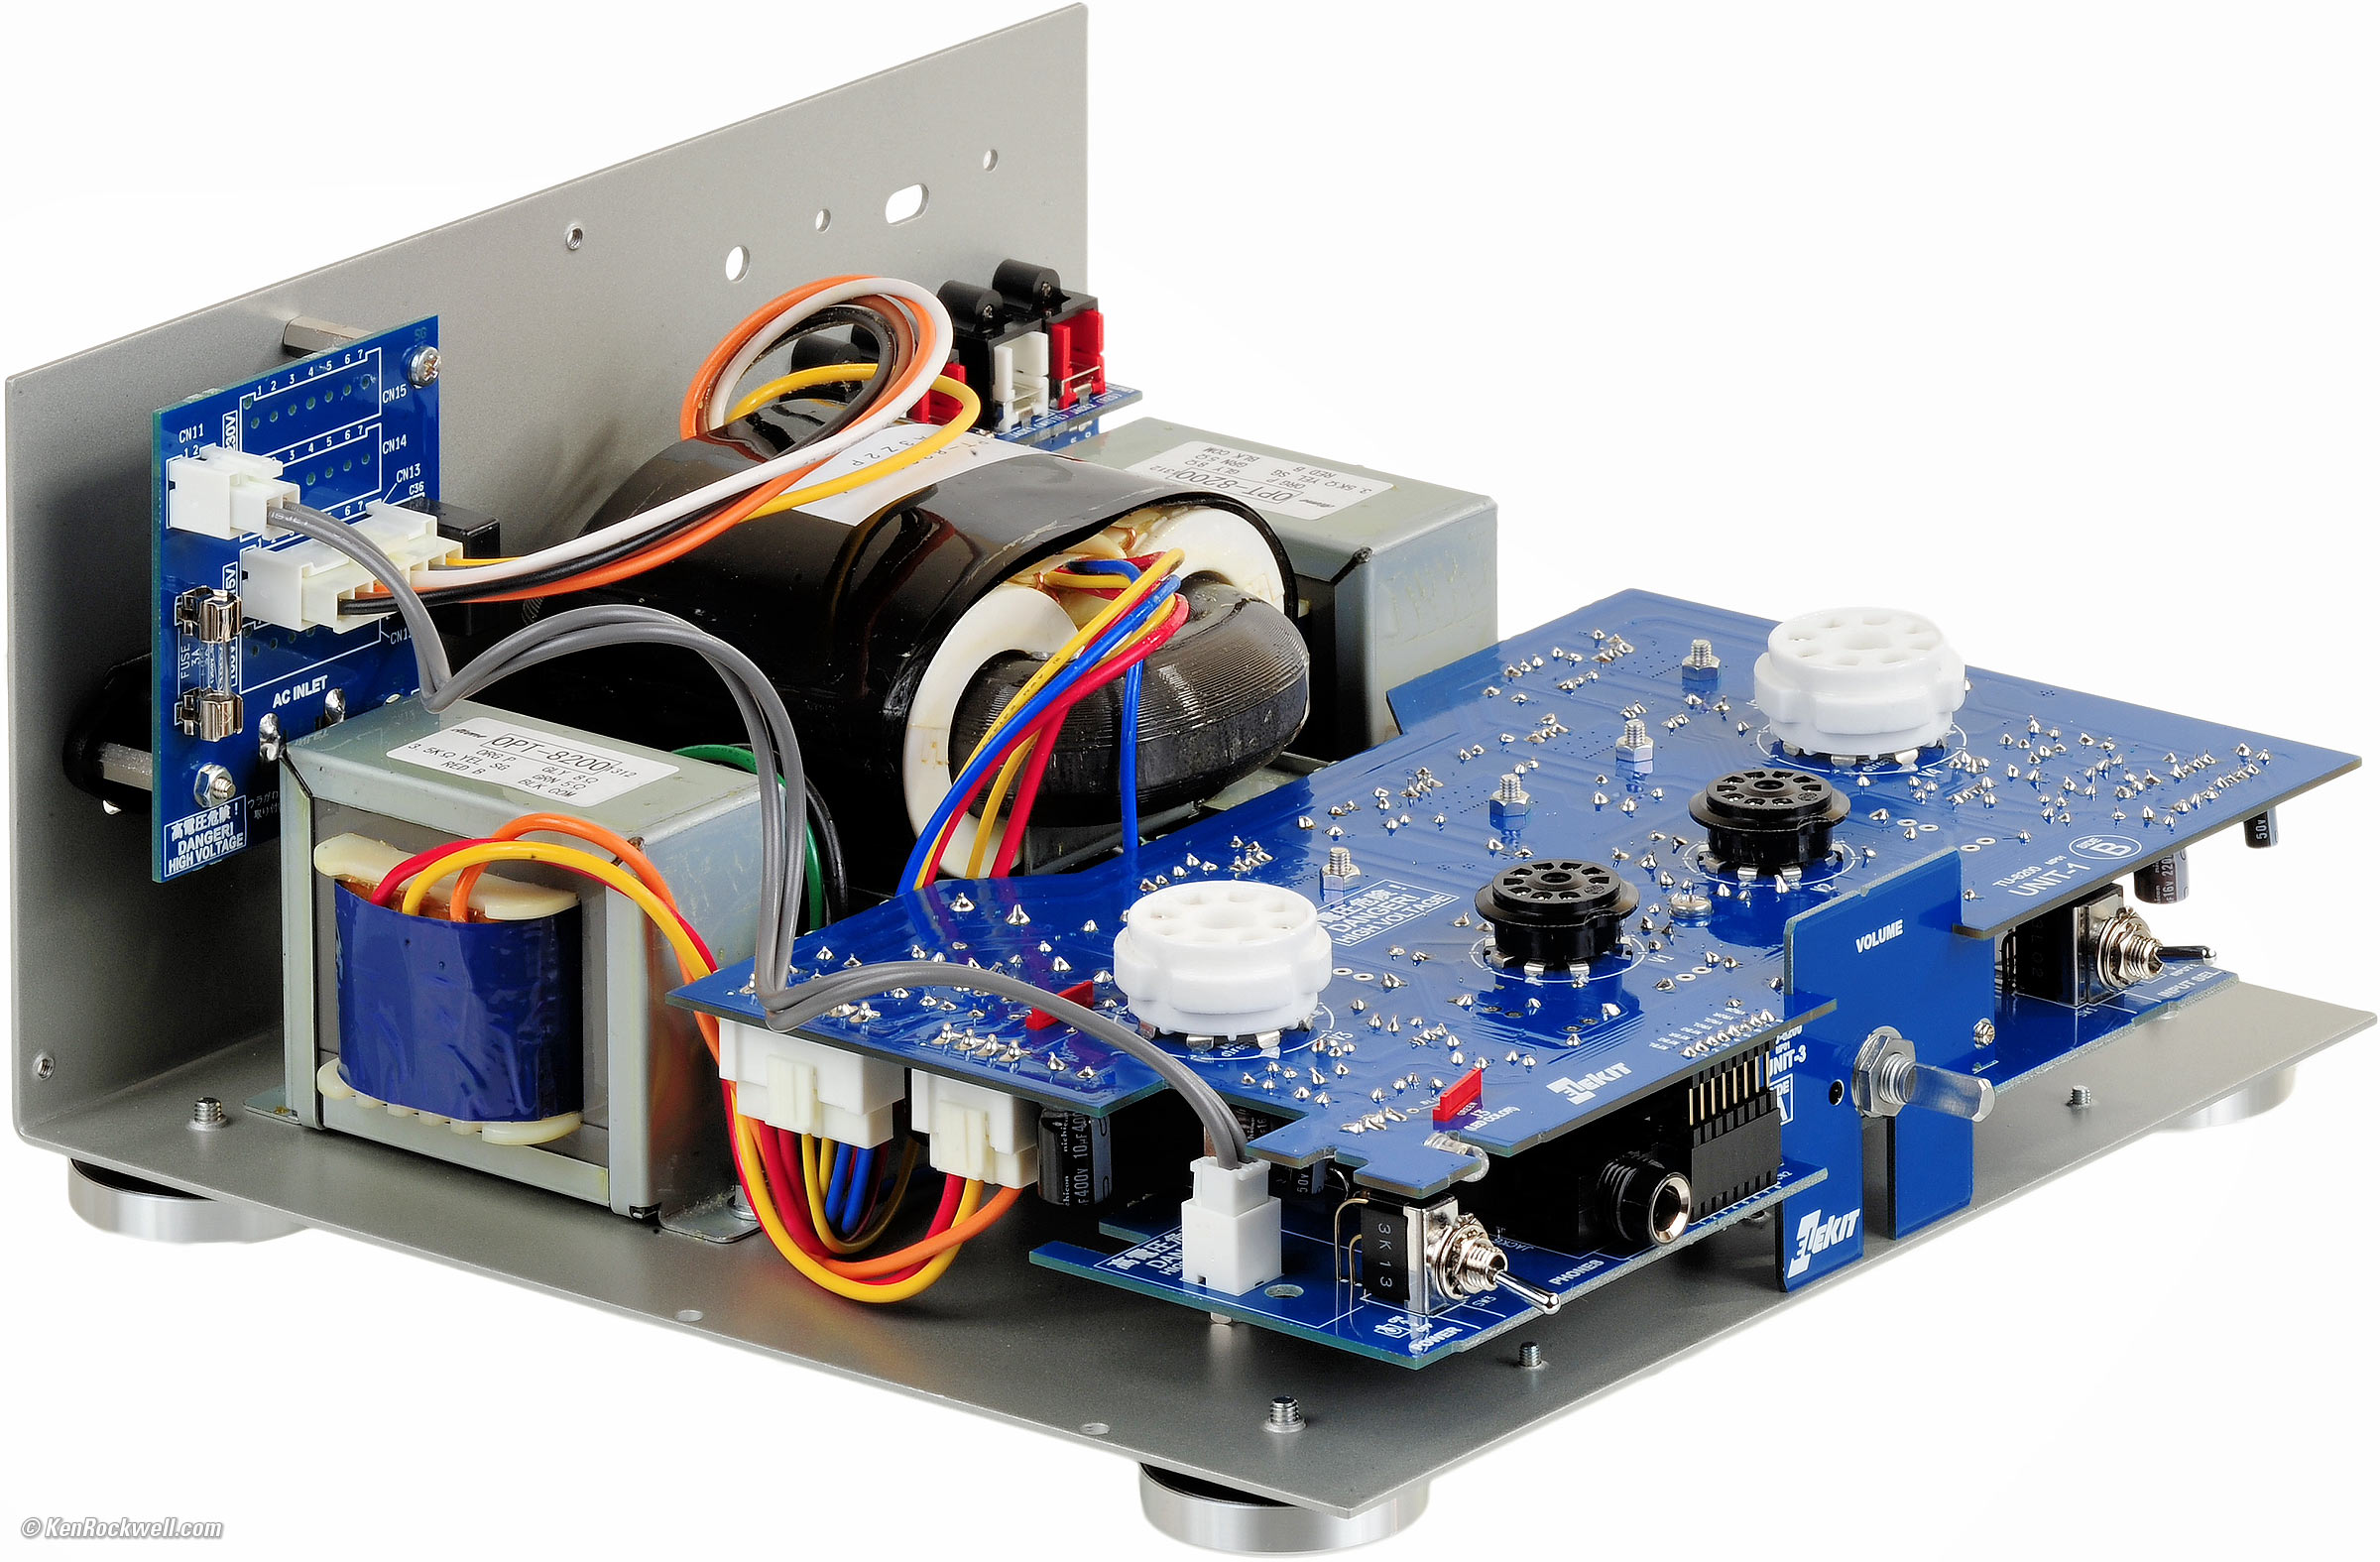
Rear, Elekit TU-8200. enlarge.
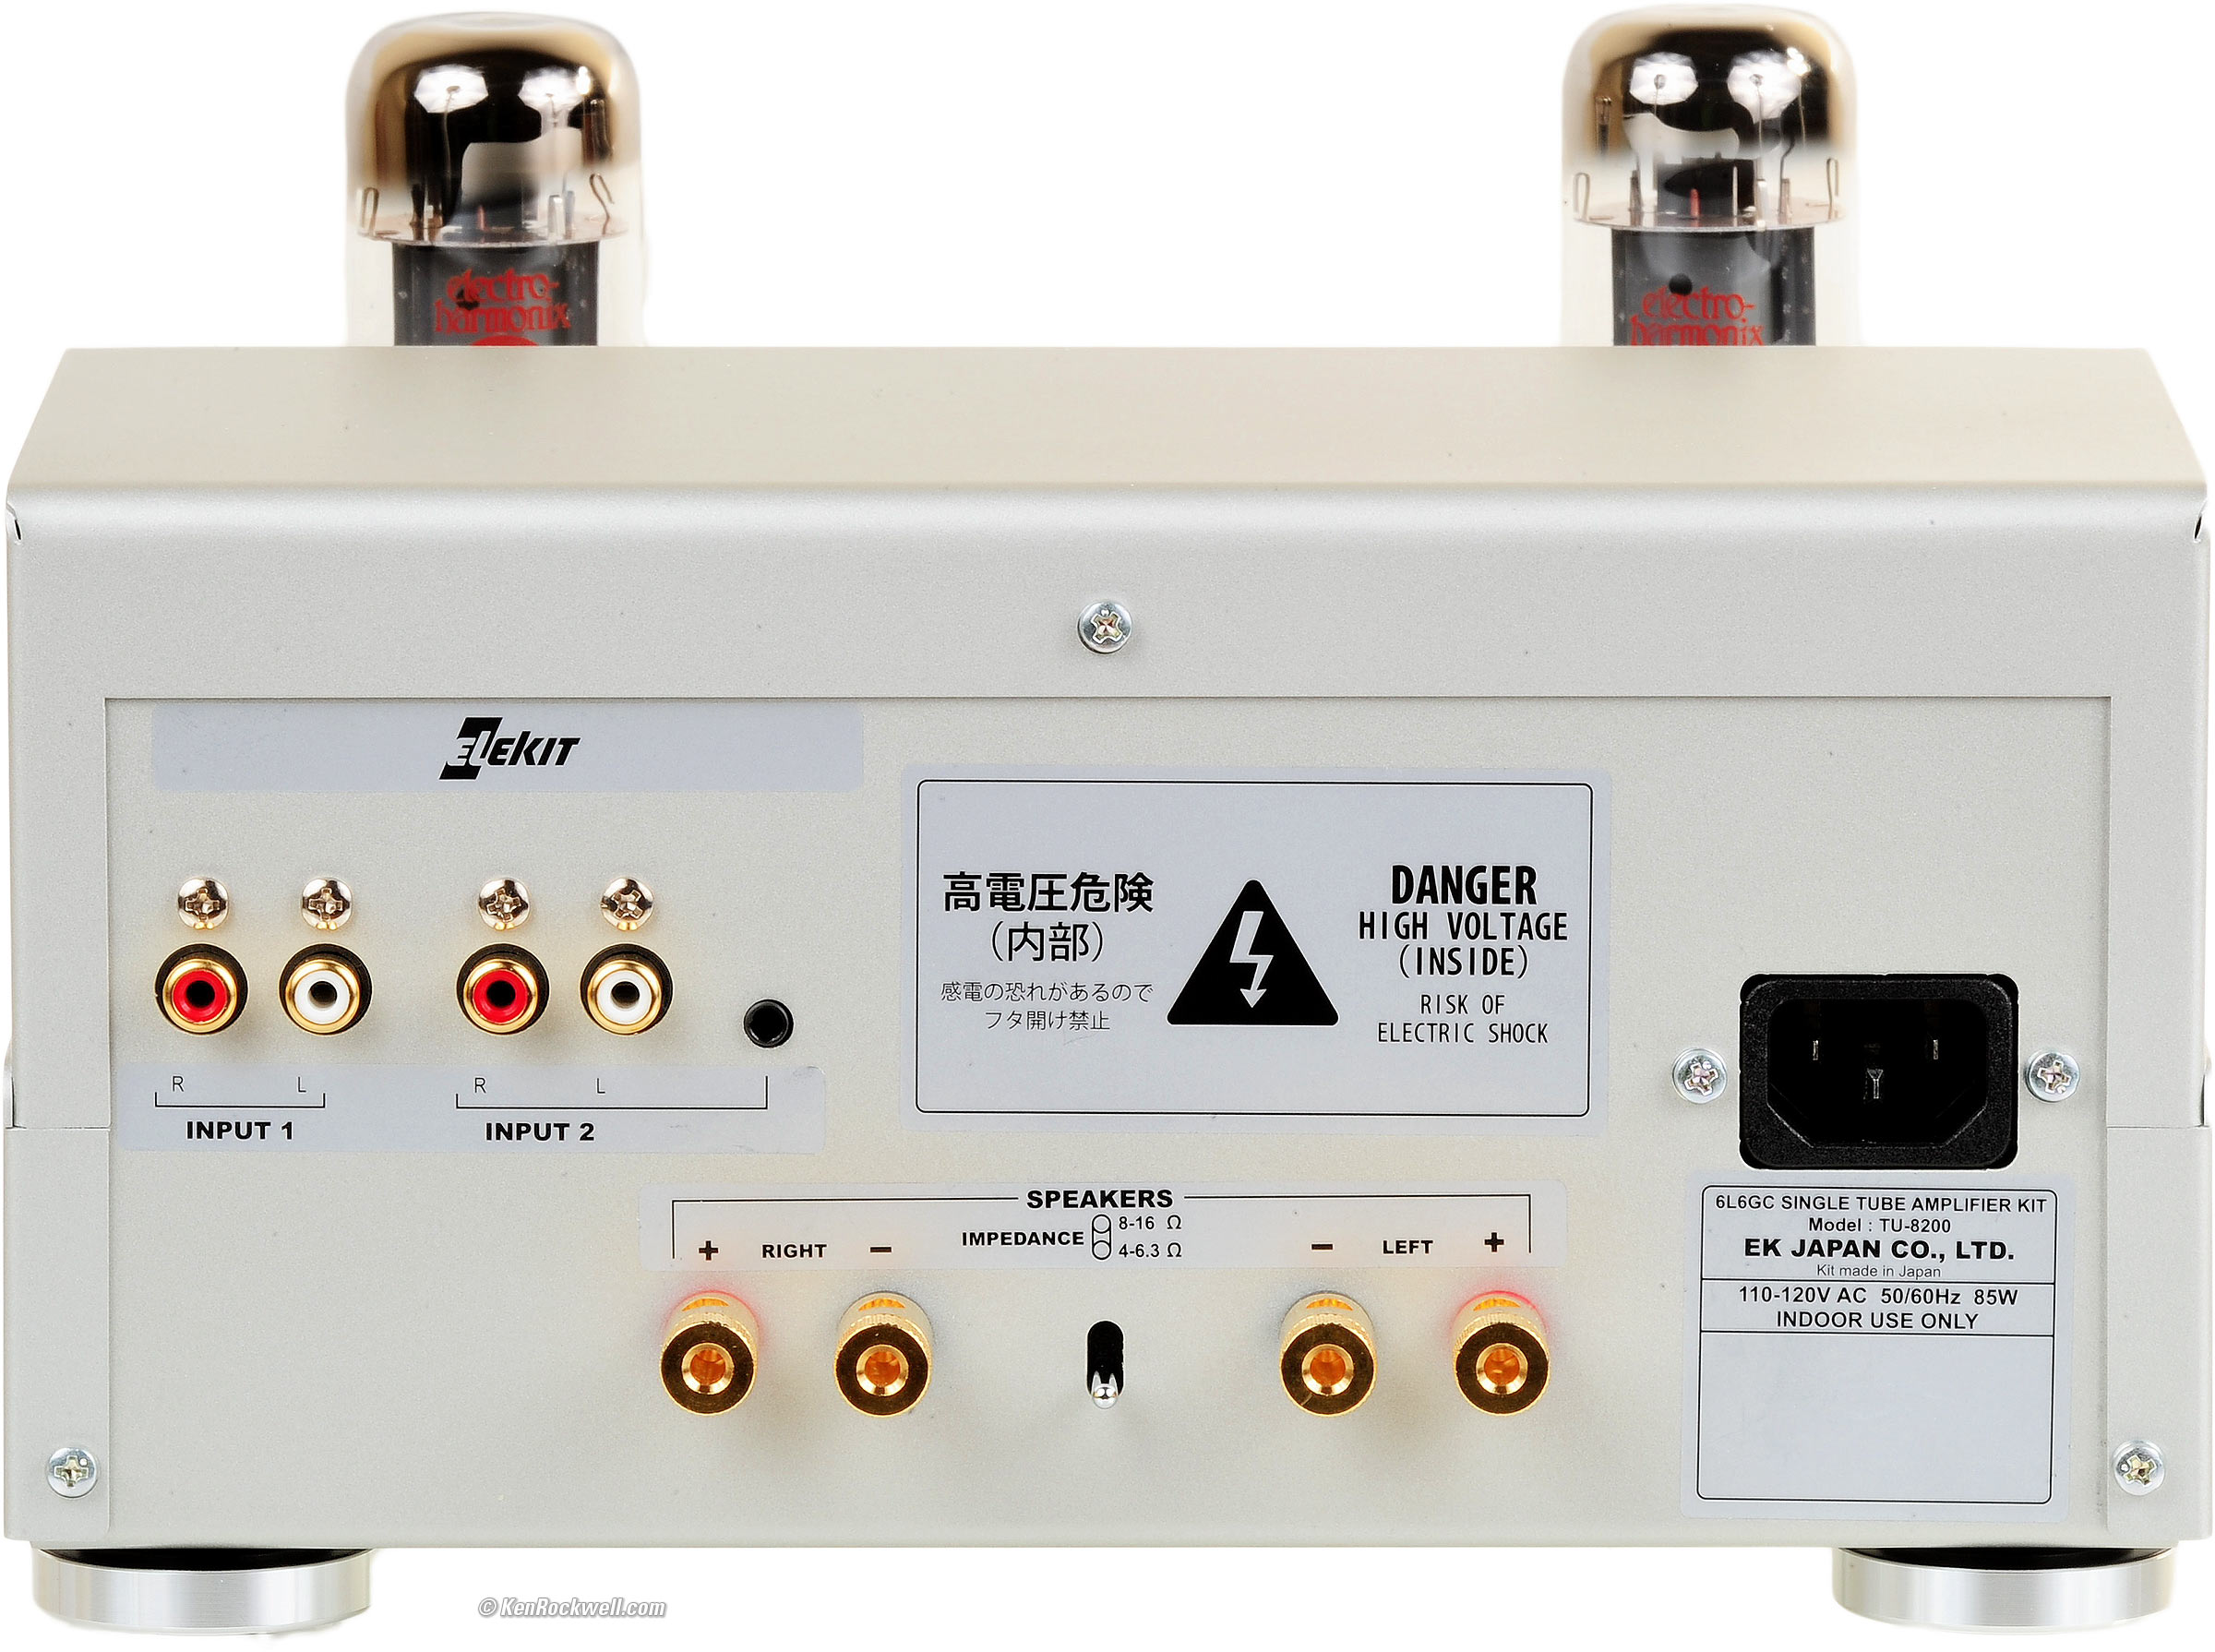
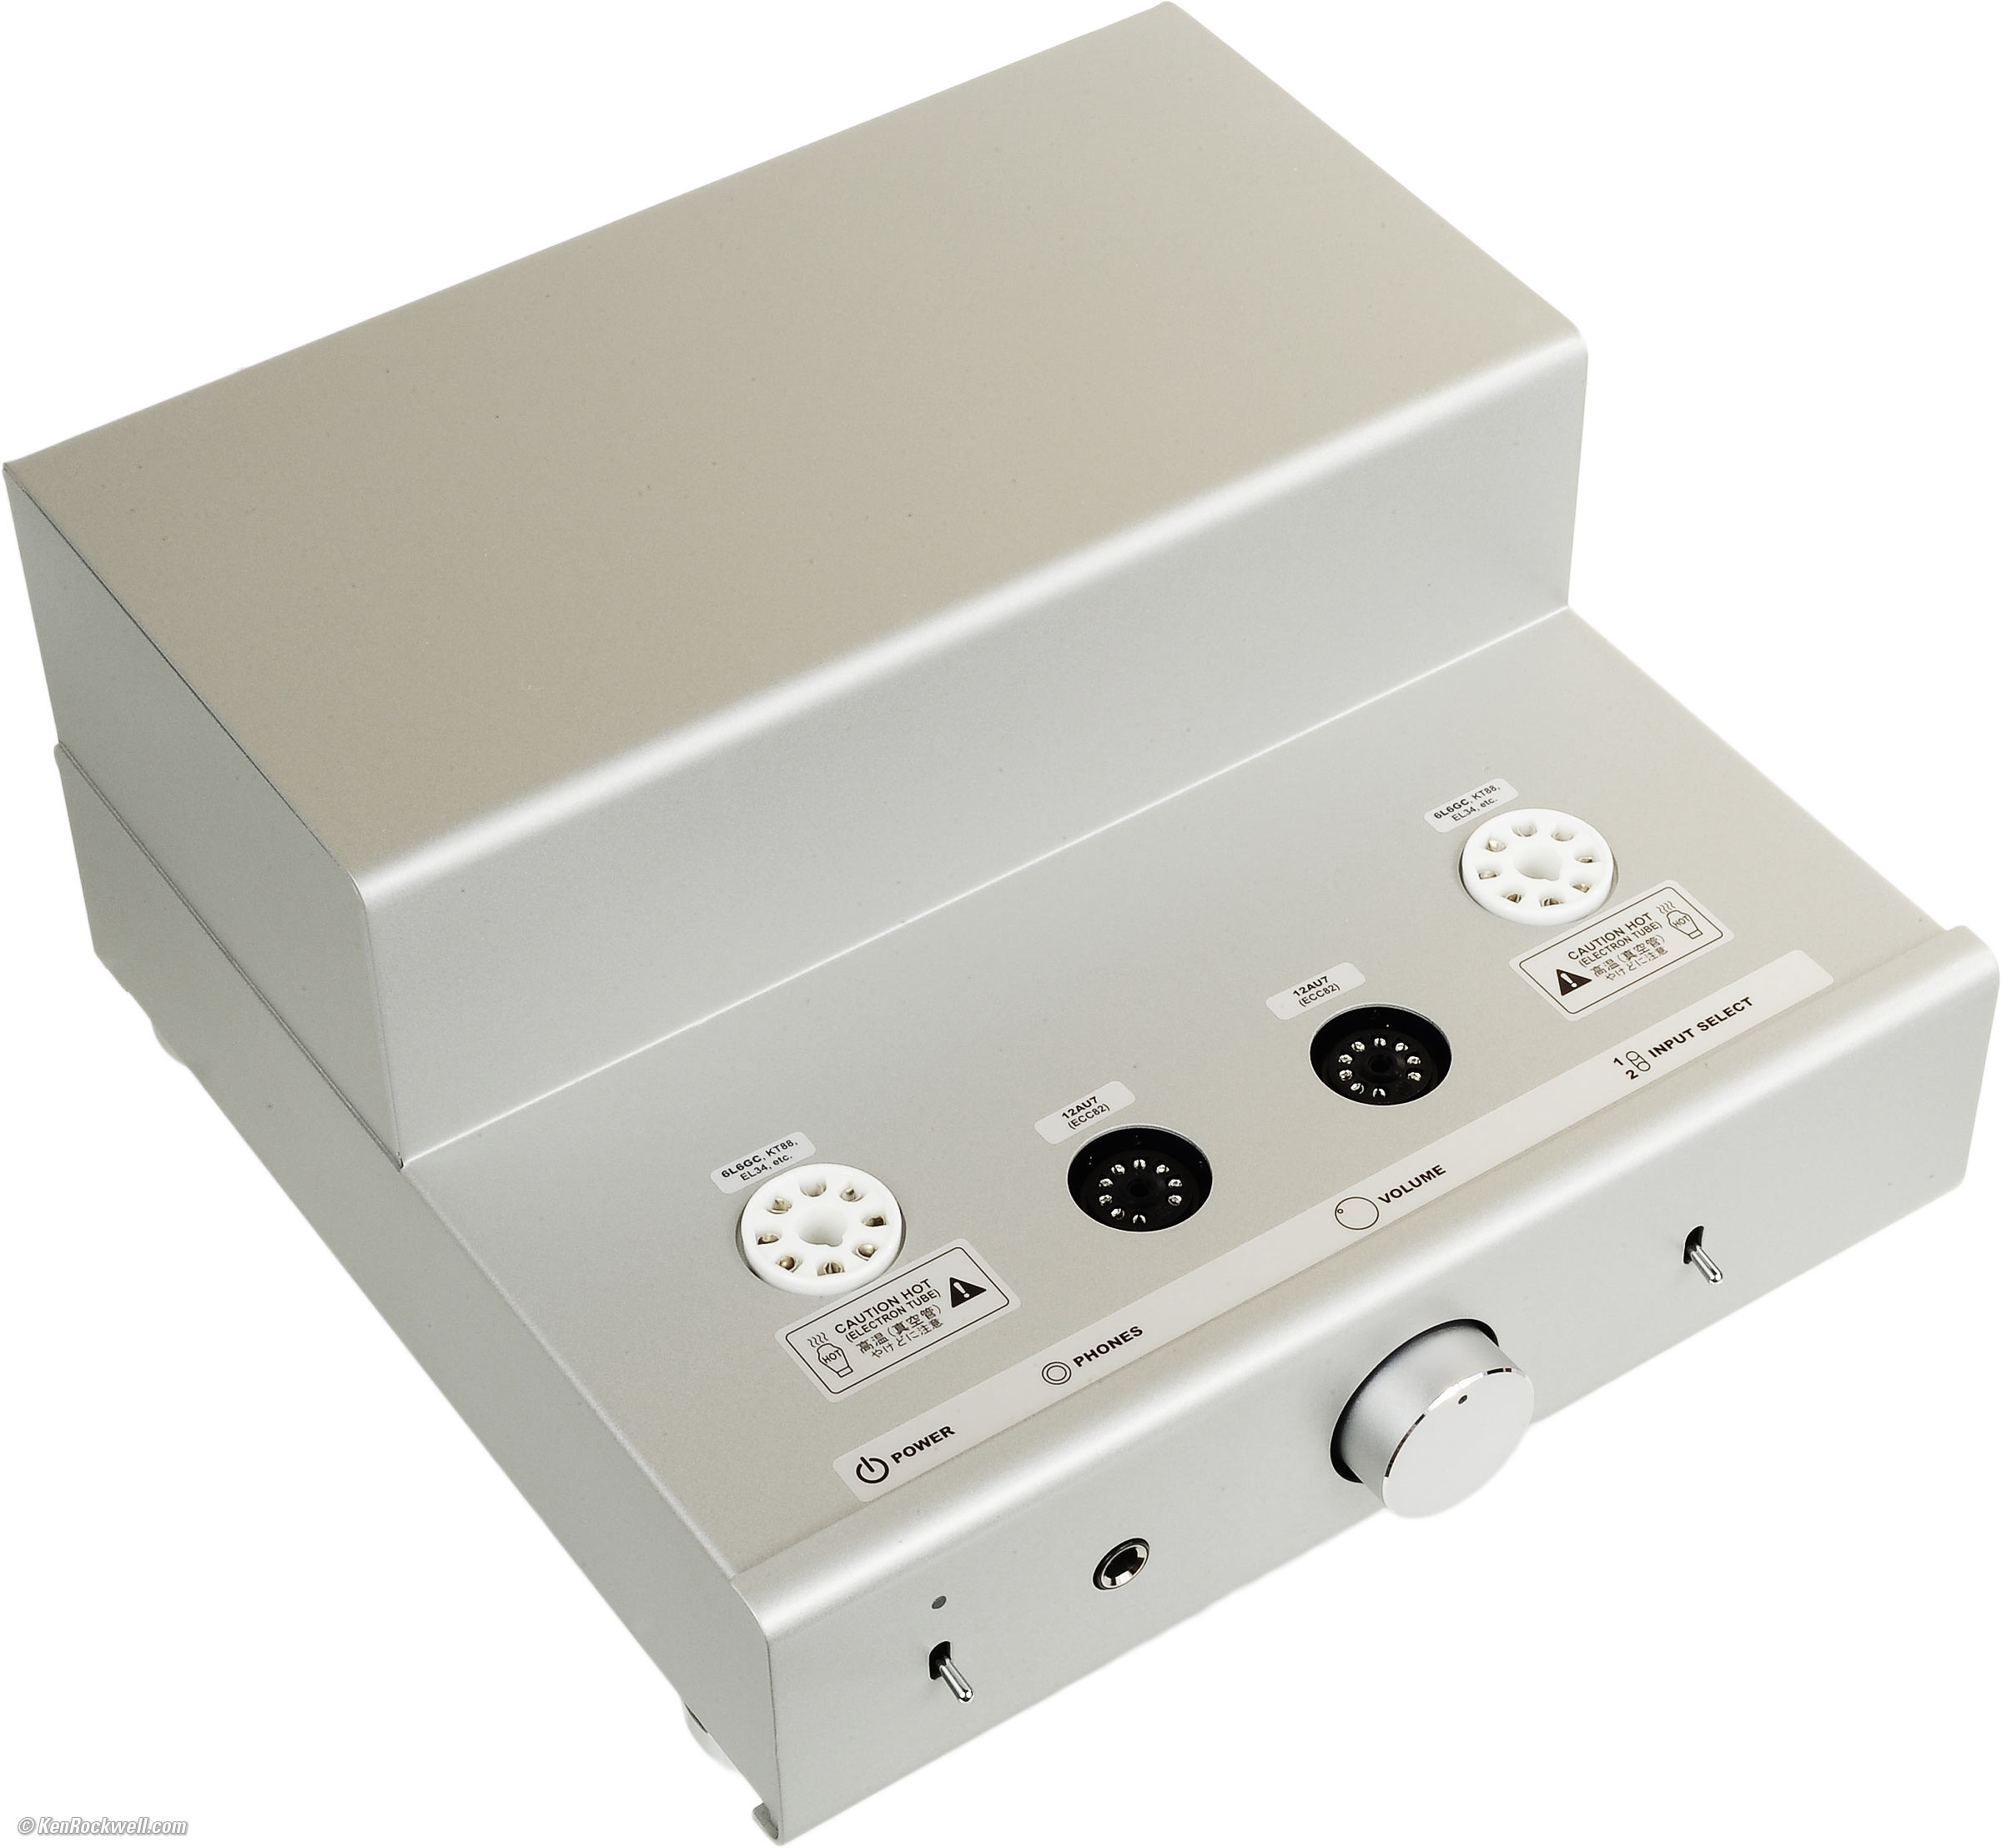
Back panel. bigger.
April 2015 audio reviews tube reviews headphone reviews all reviews
NEW: Why Tubes Sound Better 27 May 2015

Introduction top
Intro Specifications Assembly Measurements
Performance Usage Recommendations More

Adorama pays top dollar for your used gear.
|
The Elekit TU-8200 from TubeDepot is a classic single-ended class-A vacuum tube power amplifier kit. This is a semi-integrated amplifier with two or three line-level inputs, an input selector and a volume control with loads of gain; you don't need a separate control amplifier or preamplifier unless you need more inputs (use a selector) or are stuck in the 1950s and need tape head or raw phono pickup inputs.
The TU-8200 is the best-sounding amplifier I've heard short of a McIntosh MC240, but most amplifiers have no sound of their own to hear. When a solid-state amp alters the sound, it's always for the worse, while the whole point of a tube amp is the euphonic distortions it adds.
Tube amps and electronic kits were huge 50 years ago because you assemble it yourself, which is fun and saves a lot of money in the process.
While this modern kit has a solid glass-epoxy circuit board, solid-state power supply and automatic tube biasing circuits, the audio path is 100% classic vacuum tube. The three transformers (power and two output) are inside the steel case, and the driver tube heaters run on DC. There is over-current protection for the power tubes, and even they have individually FET-filtered B+ supplies.
It's a great kit. The instructions are super clear and everything is packed logically to make finding everything super simple and fast.
This is a very high quality amplifier from Japan, loaded with very high quality domestic Japanese parts. This is a real kit from a first-world country; not offshored junk from God-knows-where. The only things that seemed not to be direct from Japan are the tubes: two from China and two Electro-Harmonix power tubes from Russia. The parts are much nicer than those included with the Heathkits and Hafler kits I built 35 years ago.
Since it's single-ended and the bias is automatically calibrated for each output tube in real time, there is no need for matched tubes. In fact, feel free to swap the 6L6GC with KT88, 6550C, 6CA7 or EL34 and it automatically adjusts the bias for perfect operation.
It sounds great, with plenty of smooth, liquid sound against an utterly silent background. It certainly sounds like a tube amp, much cleaner and with much less tube fog than the TubeCube | 7. While the TubeCube | 7 is an inexpensive Chinese amp loaded with the classic distortions that make tubes sound like tubes and music sound great, this TU-8200 is a much higher quality product with much cleaner sound.
You could spend thousands of dollars for any of the "designed by ear" amps from random "enthusiastic audiophiles" with little to no background in electronics, but they won't work as well over as large a variety of conditions and setups as this amplifier will. Boutique amps often do one or two things very well, but since they are designed by tweakers by chance, they very quickly fall apart if your system varies from the one used by the guy in Jerkwater who threw it together. This TU-8200 is a solid and well designed amplifier, and you're not paying for advertising as you are with boutique amplifiers.
With 8 watts per channel it has more than enough power for desktop use. It sounds great with my B&W Matrix 805 at arms length on my desk and is silent — quieter than my professional Neumann KH 120 A monitors, for instance.
It also has plenty of power to drive my 4Ω B&W 802 Matrix Series III, especially because I biamplify them with a 150 cycle crossover to a pair of B&W ASW 850 subwoofers, and keep them close to my ears.
Tubes are microphonic and transformers sing. You'll hear the innards of the tubes rattling as you plug in headphones, and when tested into dummy loads the transformers make some sound. This is normal for tube amps.
The circuit boards are very thick glass epoxy with very precisely drilled small holes and 70µm copper traces. The resist is thick blue. The boards are heavy because they are so thick; I'm impressed, since I've worked with military electronics that weren't this thick.
The volume control is a glorious, smooth and great-tracking Japanese Alps potentiometer, and the volume knob is solid billet aluminum with a hole drilled all the way through for the index dot. This knob weighs 32.2 g (1.135 oz.).
The amplifier isn't that heavy and has standard IEC/HP power, RCA input and 3/4" banana output connections, so it's easy to commute it between locations in your home. I carry mine back and forth between my desktop during the day and living room at night; it's easy to plug it in at each location.
The speaker impedance selector is a switch, which I prefer to multiple posts because it means that my standard 3/4" MDP banana plugs work regardless of the setting. With other amps, I'm always on the wrong tap so I can't use standard connectors as I always can with this amp.
The whole point of this amplifier is musical enjoyment, and it does this in spades. I plug it in, and I can't tear myself away from its mellifluous sound for hours and hours and hours. Its clean, liquid sound just won't let me turn it off. In stark contrast to the dry, boring sound from professional monitoring equipment, the euphonic colorations added by tube power amps make everything sound smooth, sweet and spectacular. The whole point of tube amps is making music sound even better than it was recorded, which this gem does very well.
Specifications top
Intro Specifications Assembly Measurements
Performance Usage Recommendations More
Unless otherwise noted, all specifications are with 6L6GC at 8Ω in Ultra Linear mode.
Rated Output Power, 8Ω with 6L6GC
8W + 8W in Ultra Linear mode. I use and measured this mode.
8.2W + 8.2W in Pentode mode.
4W + 4W in triode mode.
Frequency Response
12 cycles - 50 kilocycles (-3dB).
Noise
90 µV (IEC).
Tube Complement
Two 6L6GC output tubes.
KT88, 6550C, 6CA7, or EL34 also work just fine.
My kit came with 6L6EH, which is Electro-Harmonix version of the 6L6GC.
Auto biasing.
Two 12AU7 (a.k.a. ECC 82).
Inputs
Two position input selector.
Two stereo pairs of RCA jacks.
There's also a 3.5mm jack which overrides the second pair of RCA for INPUT 2 if you prefer.
Rated Input
340 mV.
Output Topology
Ultra-linear, Pentode or Triode.
Selected with internal jumpers.
Output Taps
Two switch positions marked 4 ~ 6.3 Ω and 8 ~ 16 Ω.
Transformer taps internally marked 5 Ω and 8 Ω.
Output Connectors
Speakers
Gold-colored binding posts, which have banana jacks and are at standard 3/4" spacing for use with standard MDP dual banana plugs.
I have to giggle; these look like they're rated for 50 amperes, and this is an 8 watt amplifier. This kit certainly includes high quality parts.
Headphone Jack
Standard ¼".
Disconnects speakers and connects a 15 Ω load resistor when a plug is inserted.
Headphones fed from a 90 Ω series resistance from the amplifier output.
Power Input
Standard HP (IEC320) connector.
Internally wired as you build the kit for 100V, 115 (110-120V), 200V (Japanese domestic appliance wiring) or 230V (220-240V) from 50~60 cycles.
If you move, you should be able to desolder the the connector and move it to another voltage.
Rated Power Consumption
60W with 6L6GC.
85W with KT88.
3A internal fuse.
See also Actual Power Consumption.
Size
157 x 252 x 285 millimeters HWD.
6.18 x 9.92 x 11.22 inches HWD.
Weight
14.55 lbs. (6.6 kg.), assembled.
Quality
Kit made in Japan.
Parts all appear to be first-quality Japanese parts. The volume control is a Japanese Alps.
12AU7 are from China.
6L6GC are Electro-Harmonix 6L6 EH, made in Russia.
I assembled mine in the USA, thus my amplifier is Made in USA.
Kit made by
EK JAPAN CO., LTD.
Tofuro-minami 2-19-30
Dazaifu-shi, Fukuoka, 818-0105
Japan
Phone: +81-92-923-8235
Fax: +81-92-923-8237
E-mail: [email protected]
Website: http://www.elekit.co.jp
Announced
12 February 2014.
Sold by
Price, USA
July 2022: $895 in kit form.
April 2015: $699 in kit form.
Assembly top
Intro Specifications Assembly Measurements
Performance Usage Recommendations More
Remember when people had hobbies, like photography, working in a darkroom, building model planes and building electronic kits for when we had rainy and snowy days?
I sure do, and I loved assembling this kit.
The kit presumes you know how to solder well and work with tools.
What struck me as super fun is that for the past 30 years I've been having to design and build all my own gear from scratch. A kit is fun because the work's already done. With a kit, you've got a box of everything you need, so you just steam ahead without having to design and source everything.
Much different from 35 years ago is that the parts are much nicer what was included with American Heathkits and Hafler kits, and that the instructions expect that you already know how to solder. Another huge difference is that there's no chassis wiring. All the power and chassis wiring is done by soldering edge connectors to the boards, and then plugging-in pre-assembled cables. This way it's nearly impossible to wire it incorrectly.
Compared to the Hafler DH-200 kit I built in 1980, this kit is sort of inside out. The Hafler included completely assembled, calibrated and tested circuit boards and amplifier modules; you merely assembled the modules to the chassis and wired the power supplies and audio connections. In this kit, you assemble the circuit boards but the input/output and power wiring is all done for you with the supplied plug-in wiring harnesses.
Except for the electrolytic capacitors, the LED and bridge rectifiers, it seems everything that needs to go in only one way only goes in one way. Everything is clearly called out, so it will be difficult to make any big mistakes if you pay attention. Luckily all the electrolytic capacitors are oriented the same way on the board, so it's easy to inspect your work and avoid any surprises later (electrolytics usually explode when put in backwards).
Everything, even the tubes, is included, so all you need is a hot soldering iron, basic tools and solder for an evening or afternoon spent actually making something.
I was amused that one surface-mount part was included, the 3.5mm jack, and it was trivial to solder it to the board.
It uses solder bridges to connect between some boards. This struck me as weird, since I'm used to building battleships for the US Navy that need to take explosive blasts and still come up fighting, but considering how well all the boards are braced and presuming you use the correct 60/40 lead alloy solder, should last forever in home use.
It seems that very few lock washers are used. I'll presume that this amplifier is designed correctly not to fall apart after years of use, but if I designed it, I'd use more lock washers. I'd also use some fish paper behind the power inlet; it seems to have closer clearance than I'd like between its solder connections and other part of the amplifier.
It uses solid metal spacers to hold the boards to the chassis.
The big rubber feet are very nice, and should be just fine for use on fine wood furniture.
The instructions are perfect: everything is extremely clear and well explained. Presuming you already know the basics, the instructions call out everything specific you need to know, and especially call out some items that need special attention to assemble correctly. I realized later something unusual: it was actually much clearer and easier to assemble this amplifier than to assemble most of my kids' toys, since the instructions for my kids toys are usually much less clear and much less well written.
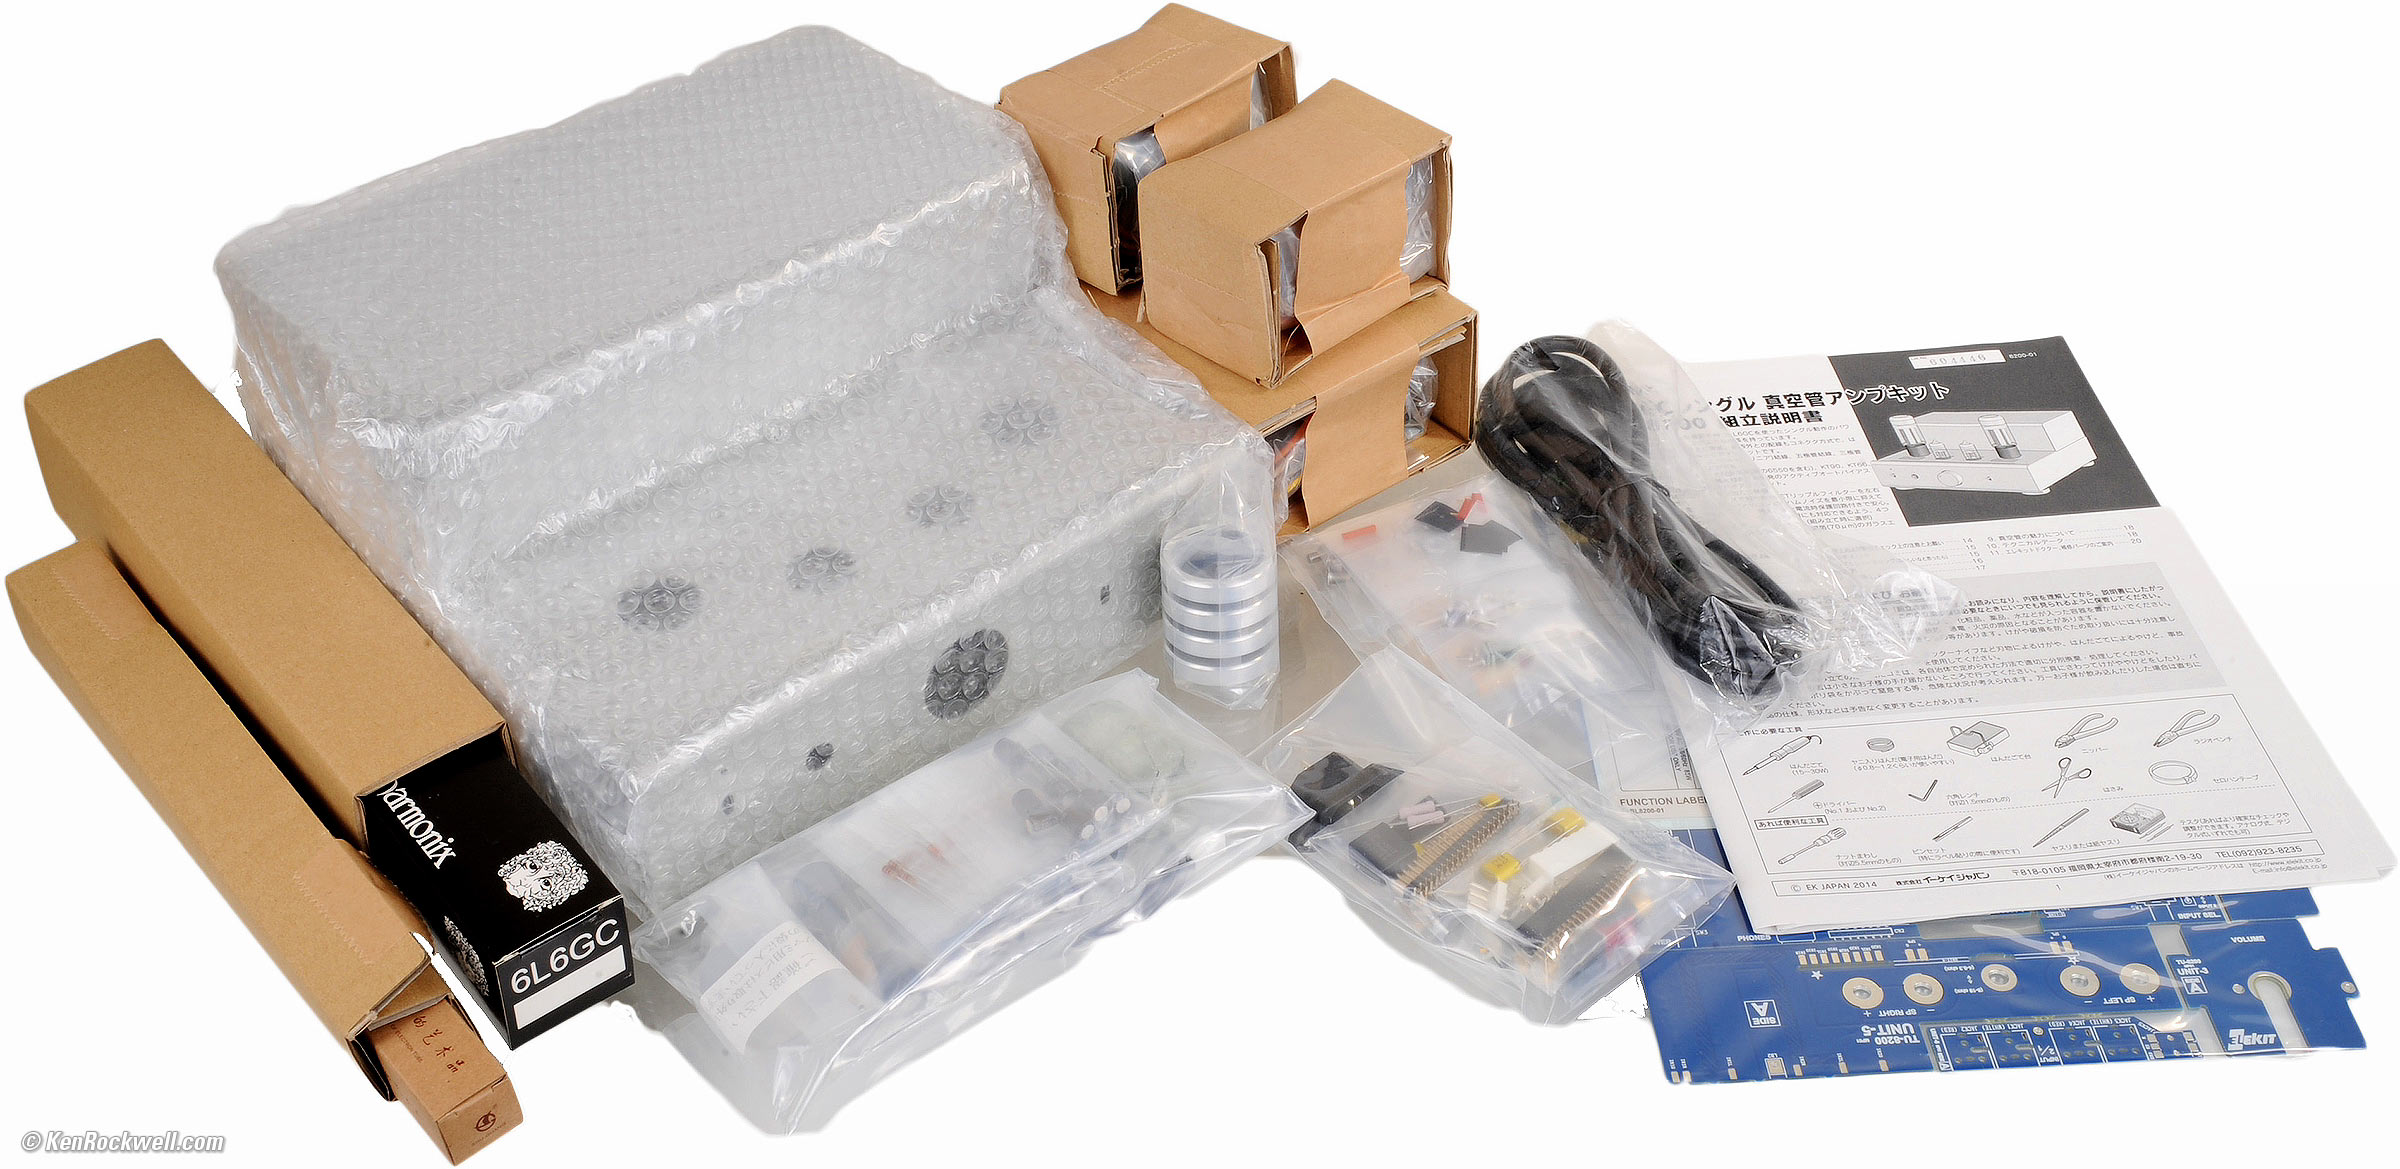
The parts are very well organized in their little clear plastic bags. Assembly proceeds very logically and it's easy to find everything as you go — much easier than looking in the brown paper lunch bags used by Heathkit.
HINT: Use a Sharpie to write the size of hardware on each bag, like M3 x 6, which will save you from having to look up their sizes each time.
This kit presumes you've built things before; I've been building kits for over 40 years and I appreciate that the instructions call out everything specific to assembling this amplifier correctly the first time. Unlike other assembly projects, it's written clearly enough so that it's unlikely that you'll accidentally put something in the wrong place or miss something subtle and not realize your mistake until later.
Since you're providing the solder (every electronics man has a roll at home), you can use real 60/40 tin/lead solder so this amplifier lasts for many, many decades. Don't use RoHS (lead-free) solder, since that's only for products designed to be sold worldwide into Socialist and Communist countries with deliberately restrictive regulations. Lead-free "junk" solder is brittle and develops tin whiskers, greatly shortening the life of products in which it's used.
You'll need:
Soldering Iron. I used one like this.
60/40 Rosin-Core Solder. I used Kester 44, but only needed a little of my huge spool.
Diagonal Cutting Pliers. (I bought this Italian pair and love them!)
Phillips-head screwdriver, #1 and #2 (standard large and small sizes).
Small pliers for tightening small nuts. I used these, but a dedicated 5.5mm nut driver would have been nicer.
Scissors.
Scotch Magic Tape to hold the lens for the power LED to the inside of the metal case. Any permanent, high quality tape works; I use Magic Tape that lasts forever.
1.5mm Allen wrench to tighten the set screw on the volume control knob. You probably have one lying around from other things that included them as tools. I used one of my genuine Allen brand wrenches my Dad gave me, but you also can get these in sets at the 99¢ store.
I do precision work, and used a set of magnifying goggles. I used these from Bausch & Lomb, but you don't really need these unless you're as fanatical as I am about good solder joints.
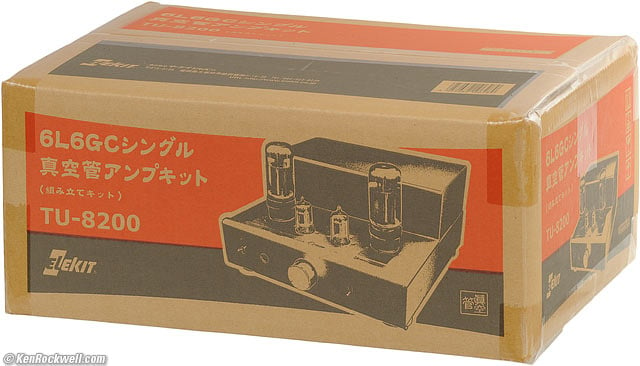
Elekit TU-8200 box.

As I open it. bigger.
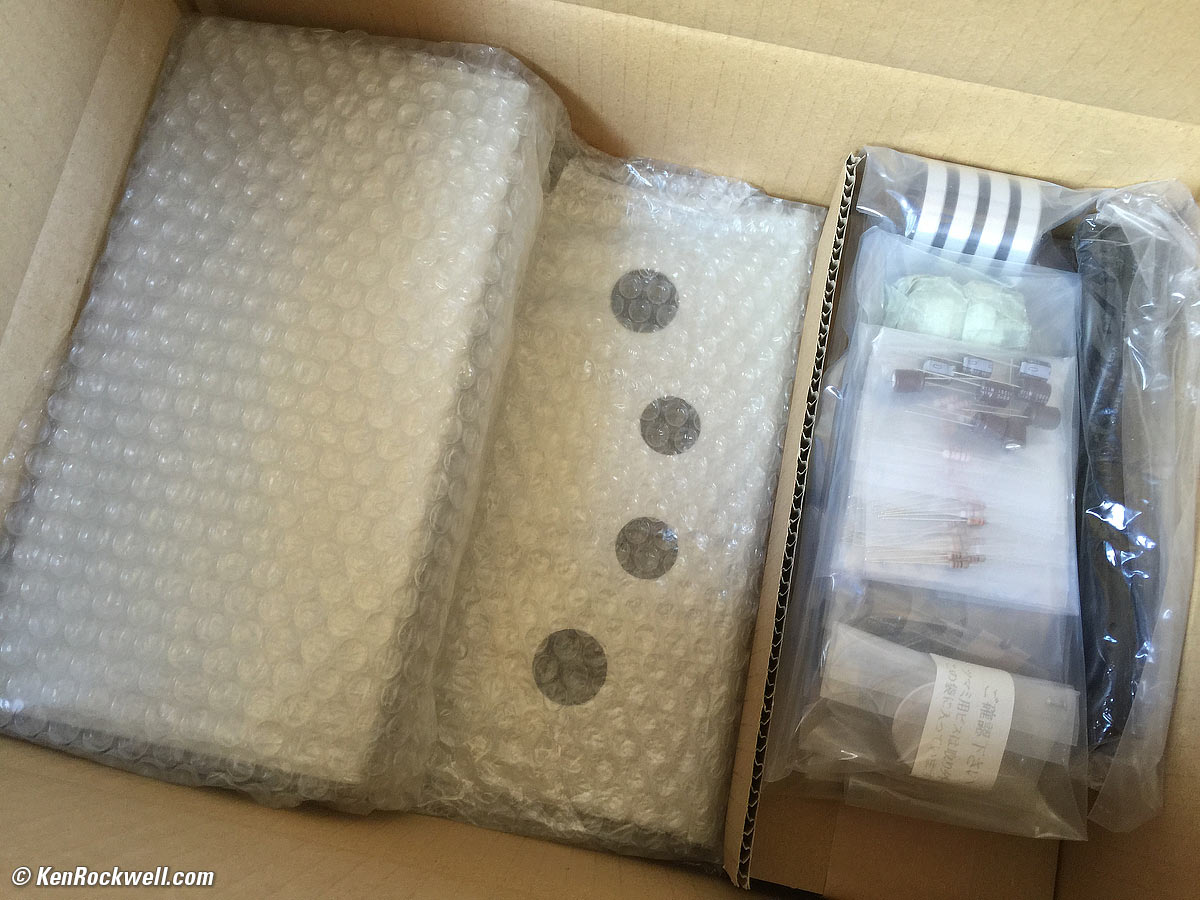
What's under the instructions and circuit board. bigger.
What's inside. bigger.
As shipped, it's a collection of parts in clear plastic bags. While the instructions in the box are only in Japanese, my TU-8200 ordered from Tube Depot was shipped in a larger box with a printed copy of these English instructions.
It took me less than seven hours to build this entire kit and take pictures as I went. It worked perfectly the very first time I turned it on; in fact, the measurements were made after only a half hour of initial warm-up after I finished it!
I'm an expert electronics assembler, but have never seen this kit before. Most people will probably take much longer; I think 15 hours is about right for most people.
I started assembling my Elekit TU-8200 tube amplifier kit on a Saturday afternoon.
Thank goodness I remembered to take photos! I was having so much fun I almost forgot:
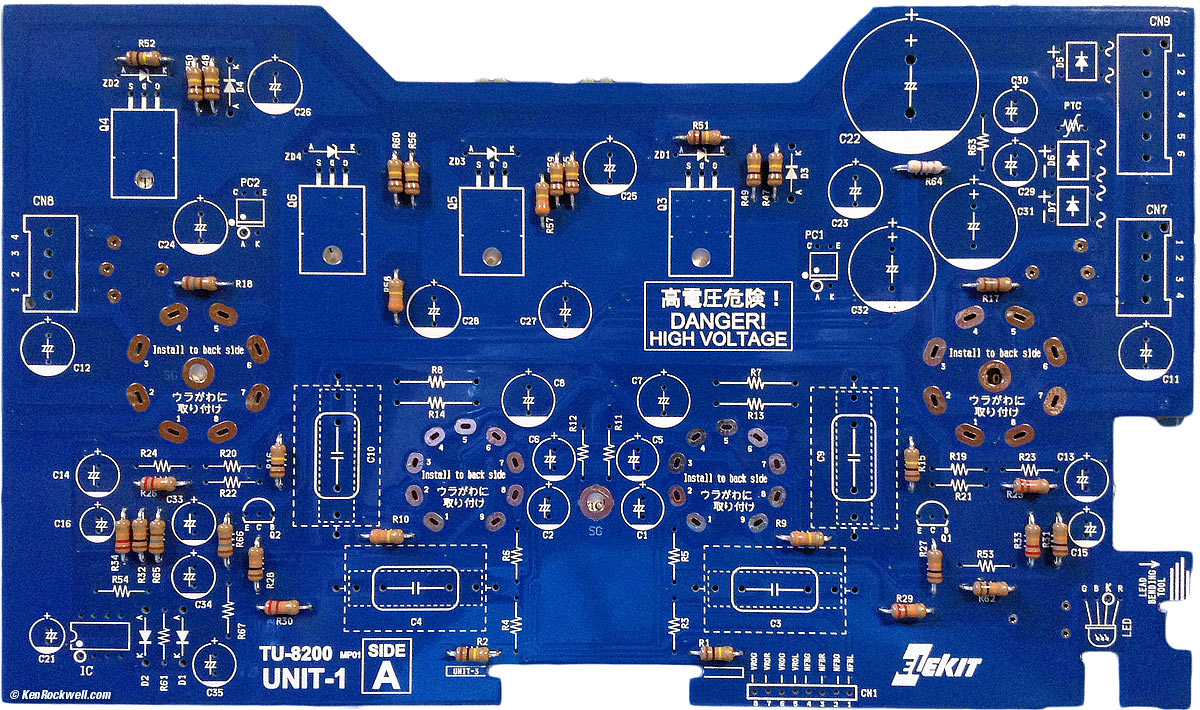
Partially assembled main board. bigger.
And I had all the circuit boards assembled Saturday evening. Here's just the the main board: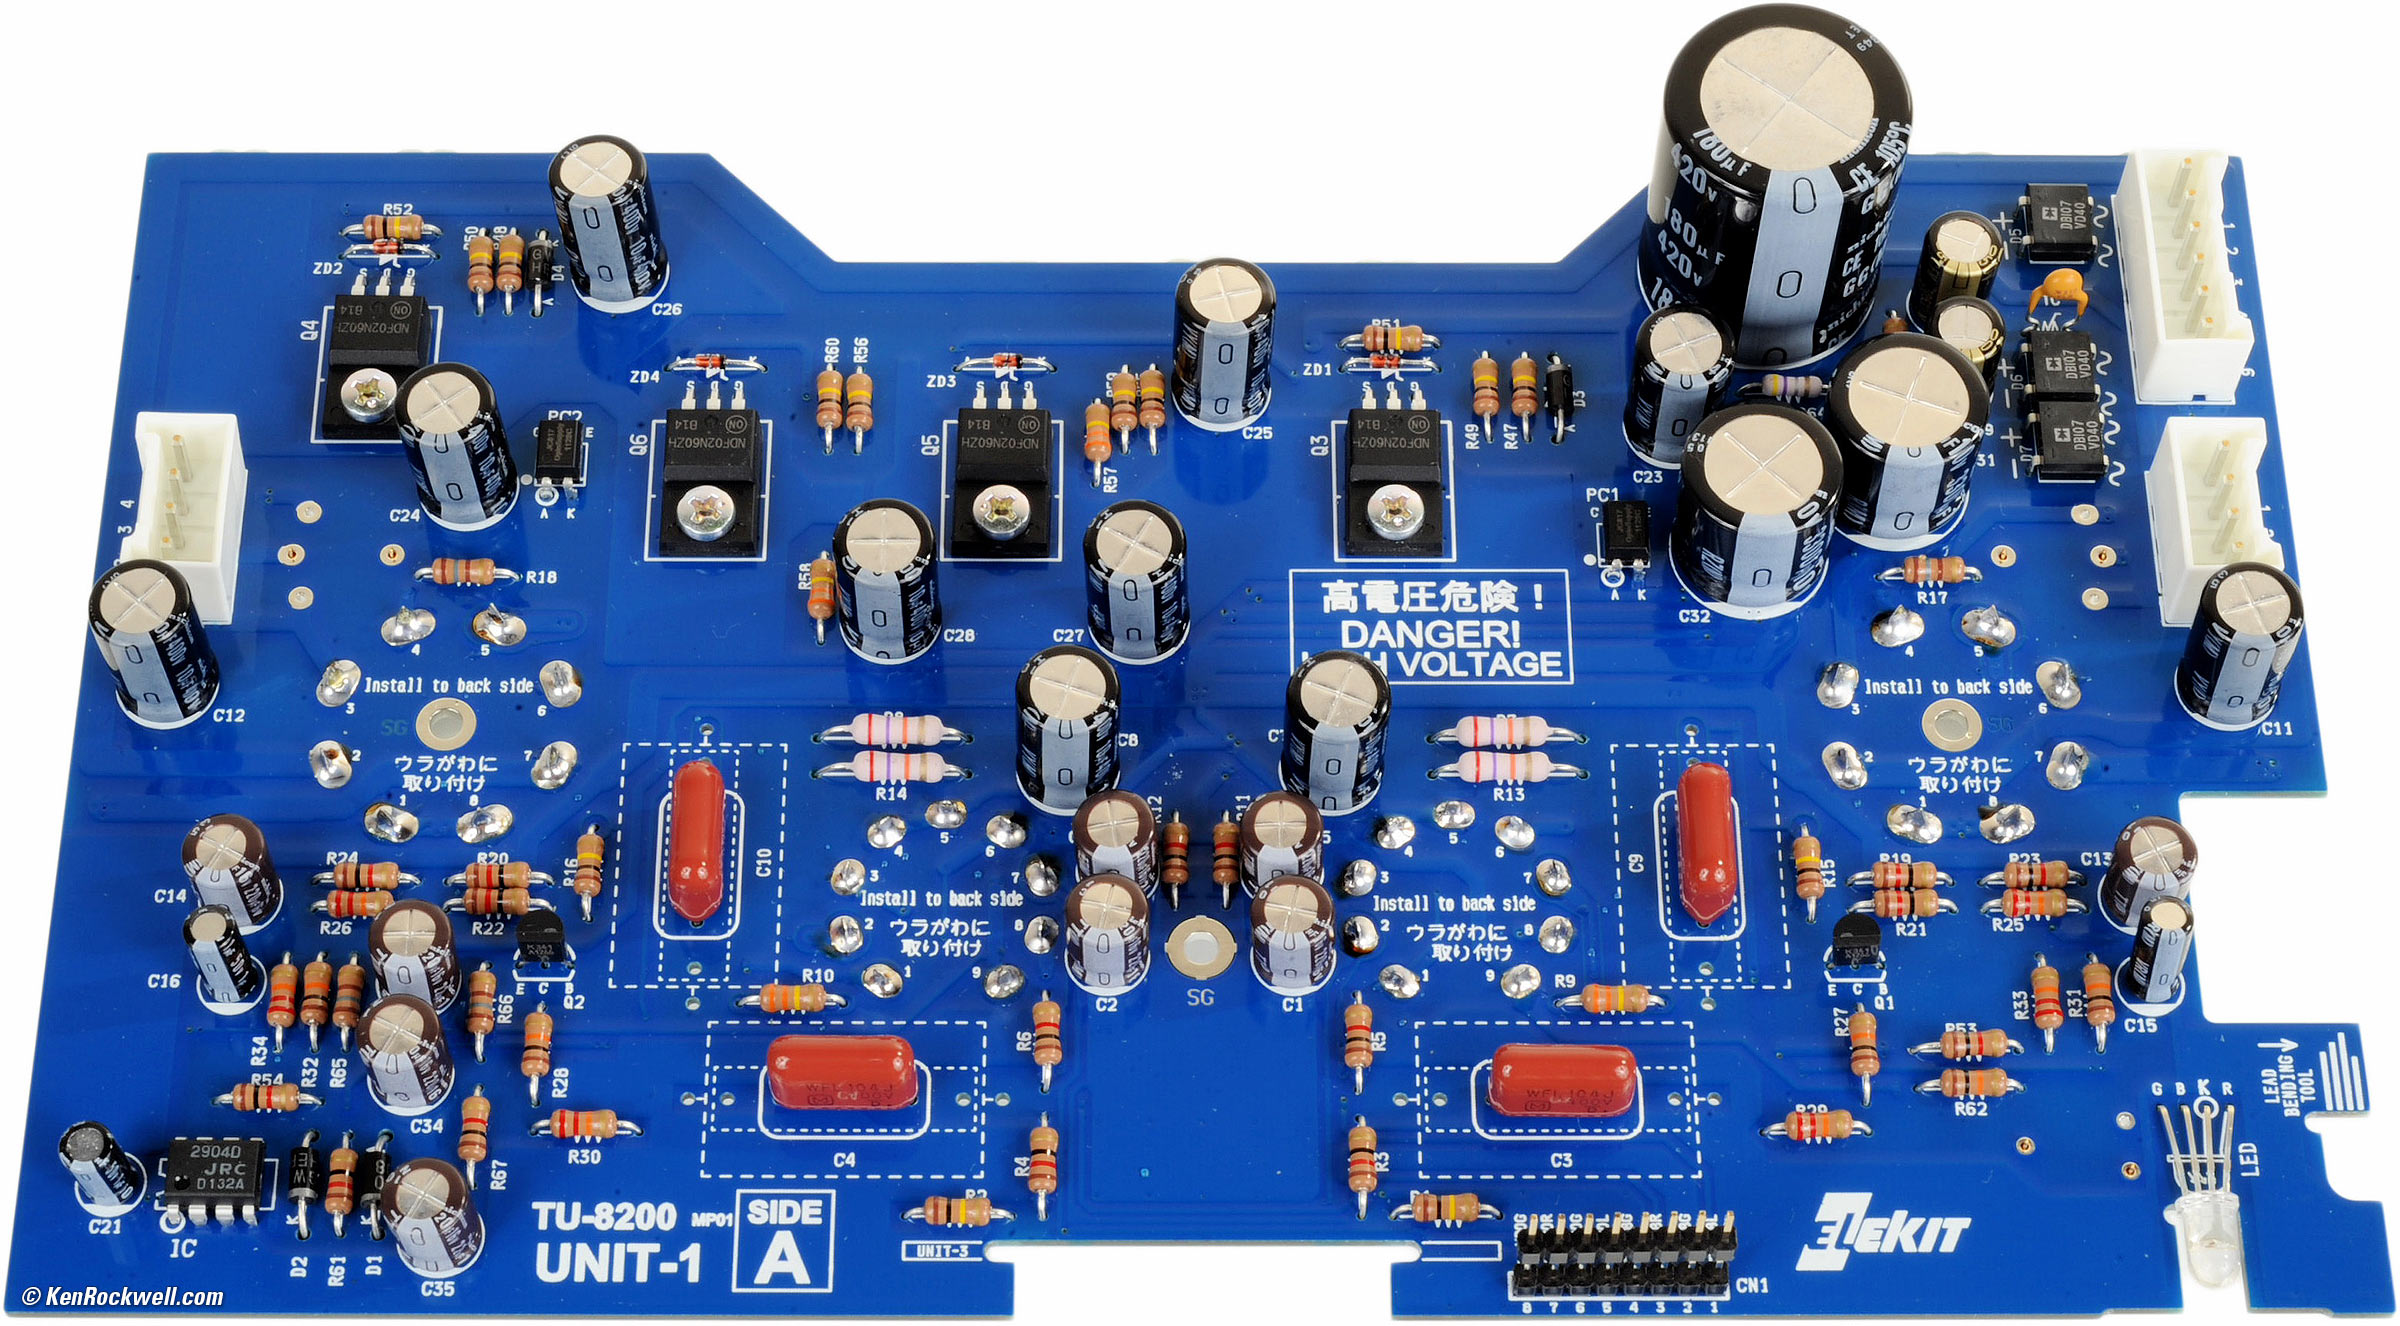
Main board completed. bigger.
While the instructions say it doesn't matter, I prefer to install resistors so that their color codes all read the same way as the printing on the board.
This makes it easier for you or others to decipher and service the board 50 years from now, and puts a secret mark of quality on it today.
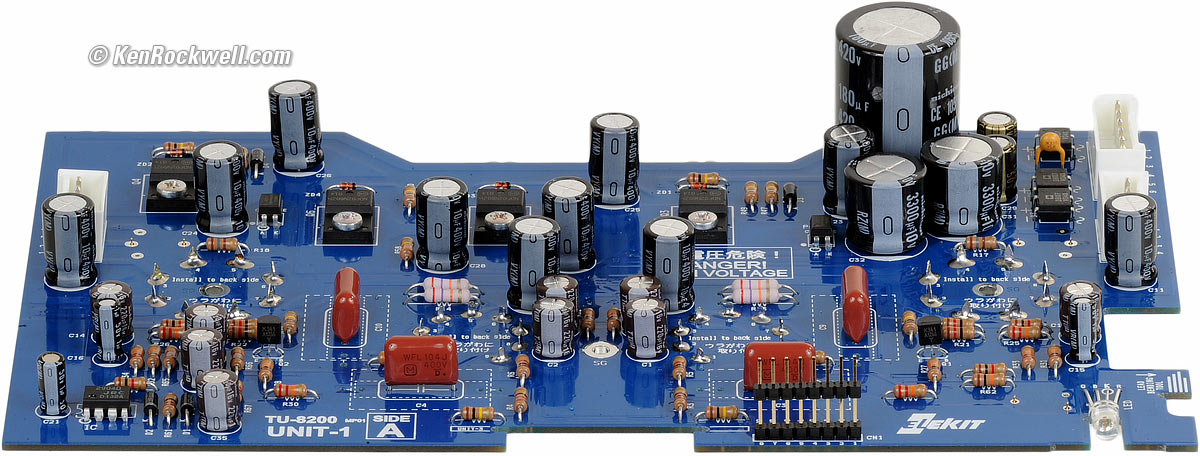
Main board completed. bigger.
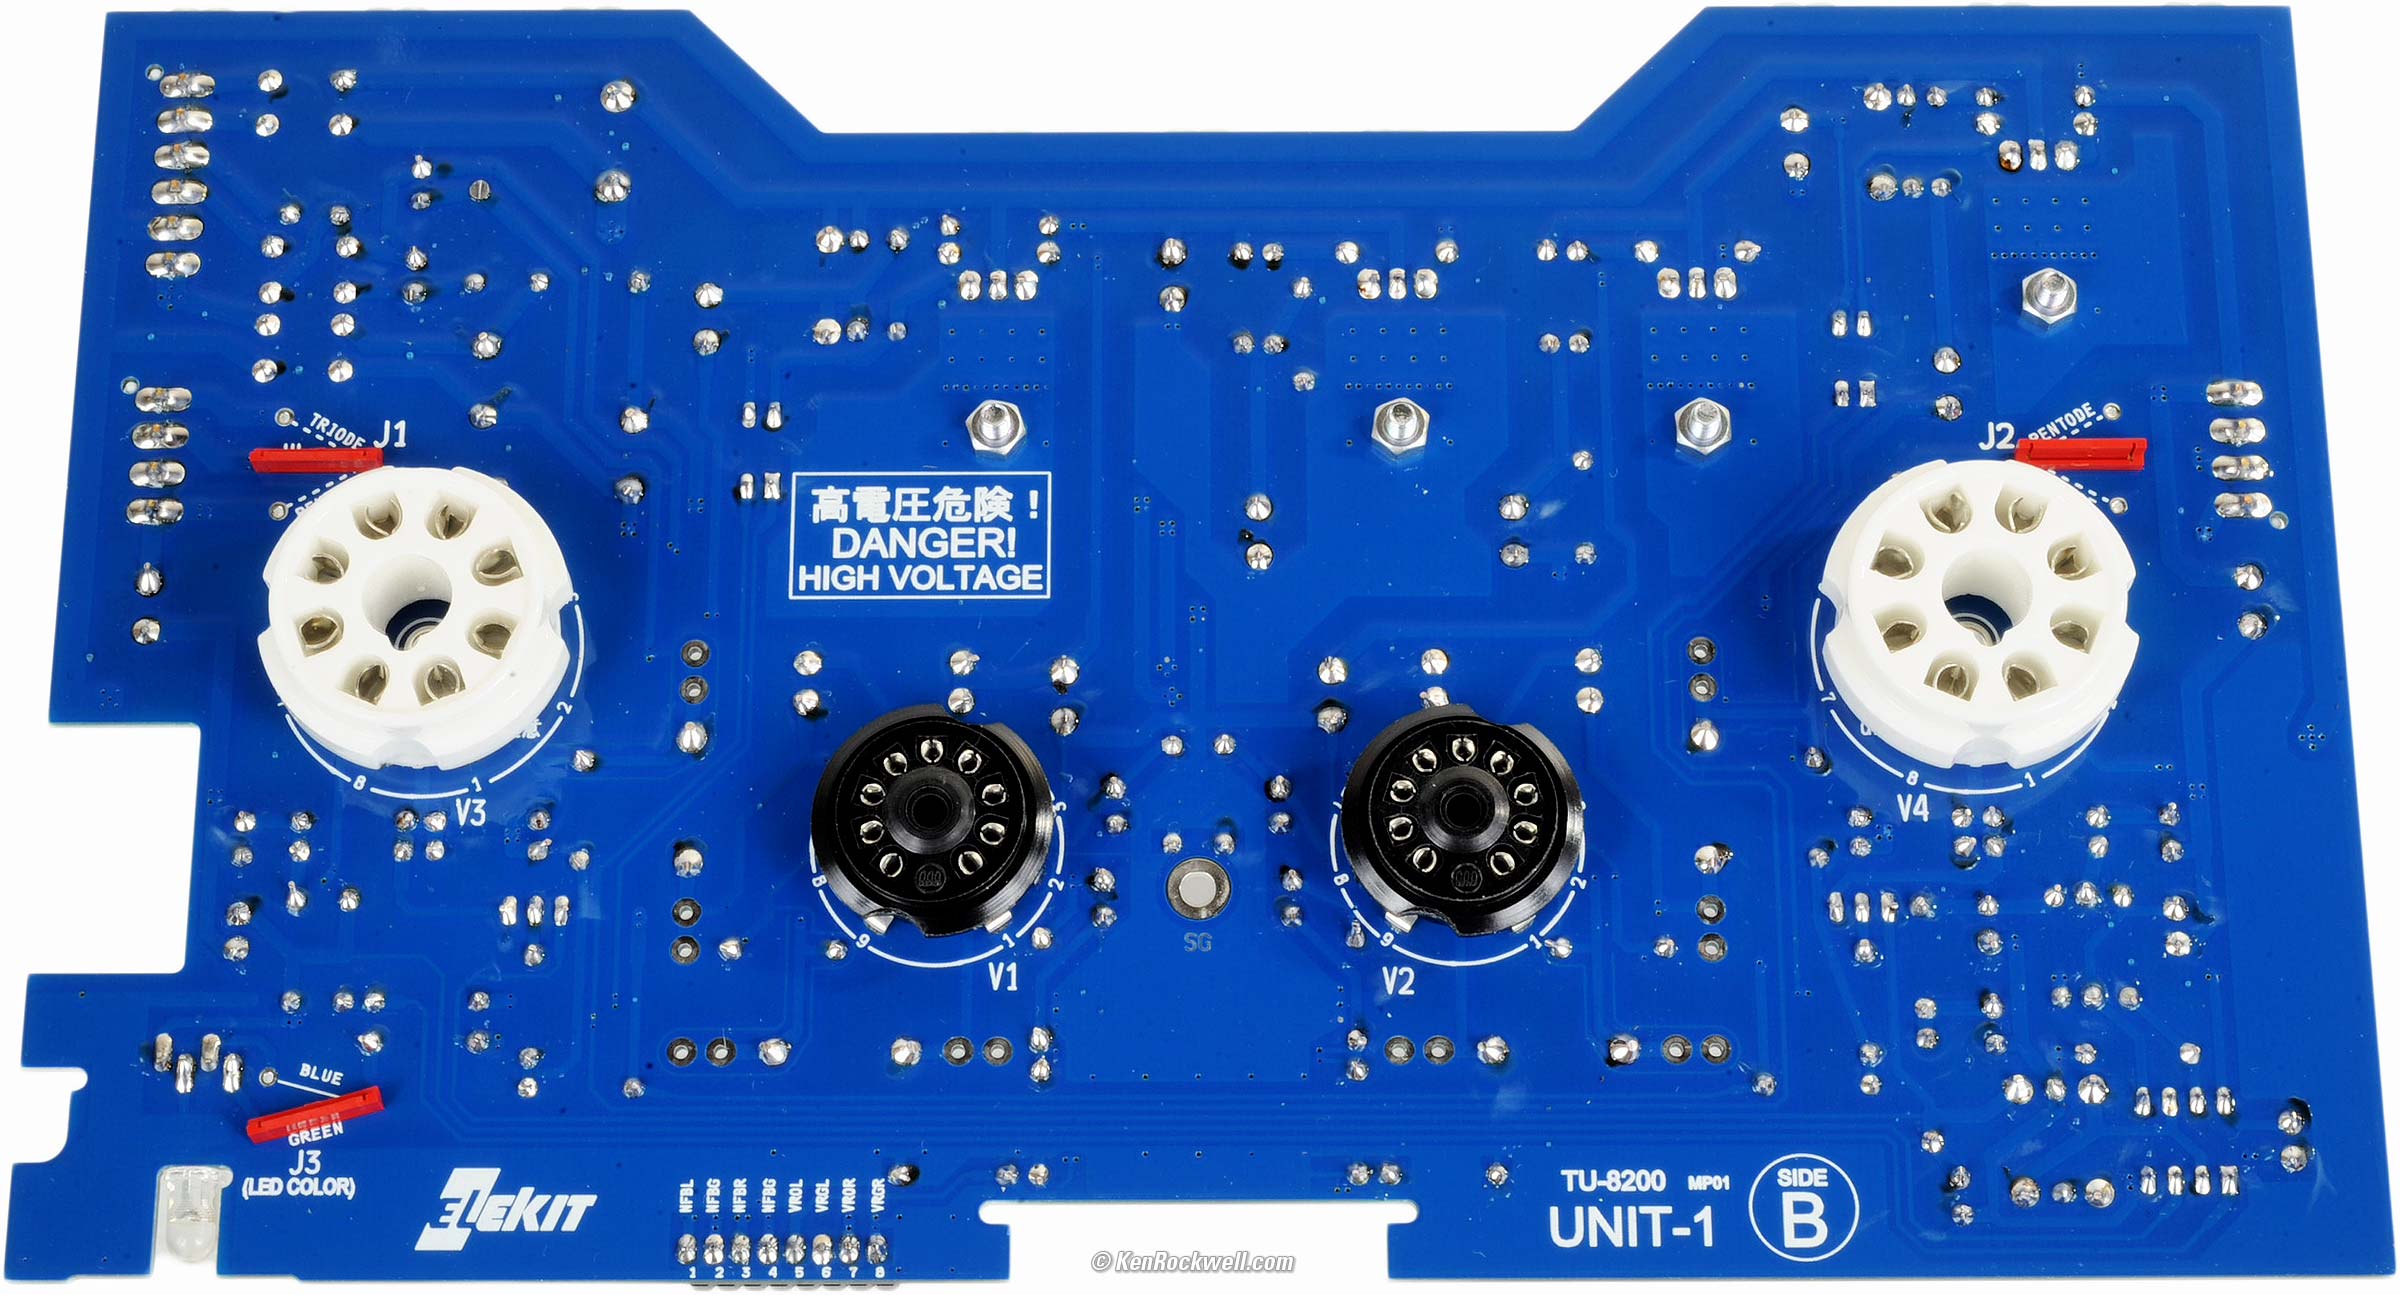
Other side of completed main board. bigger.
When assembled to the chassis, there is a screw inside each of the white porcelain octal sockets that holds this main board to the chassis. There is a third obvious screw between the two black driver tube sockets.
Input/output circuit boards assembled to back of chassis. bigger.
I even started assembling the chassis on Saturday night, but quit early.
Watch the chassis corners as you move it around for assembly, they are pointy before the case is completely assembled and could scratch fine furniture if you haven't put down a pad.
I couldn't resist, and started back up Sunday morning:
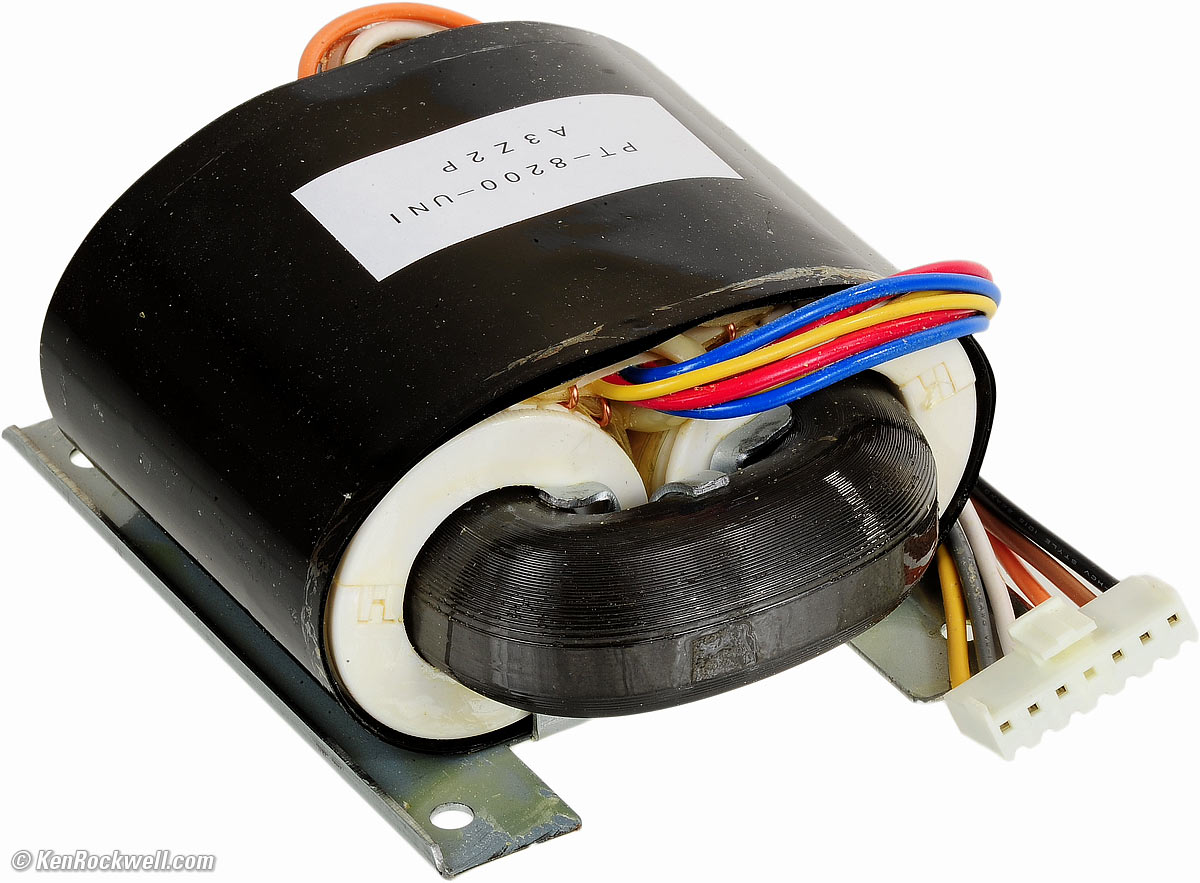
Power transformer. Note connectors, not bare leads. bigger.
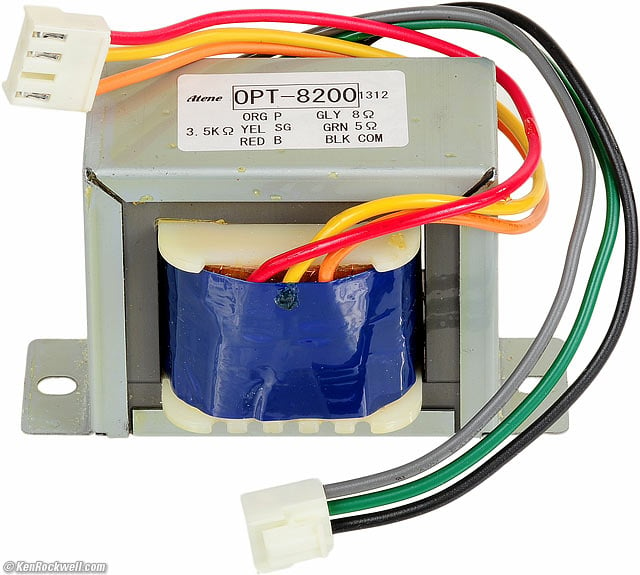
Output transformer. Note connectors, not bare leads.
I measured the output transformers' weight. One measured 897.6g (31.660 oz.) and the other measured 893.8 grams (31.525 oz.). I was tempted to measure their audio performance, but didn't. Since they aren't soldered in, it would be easy to do this in the future.
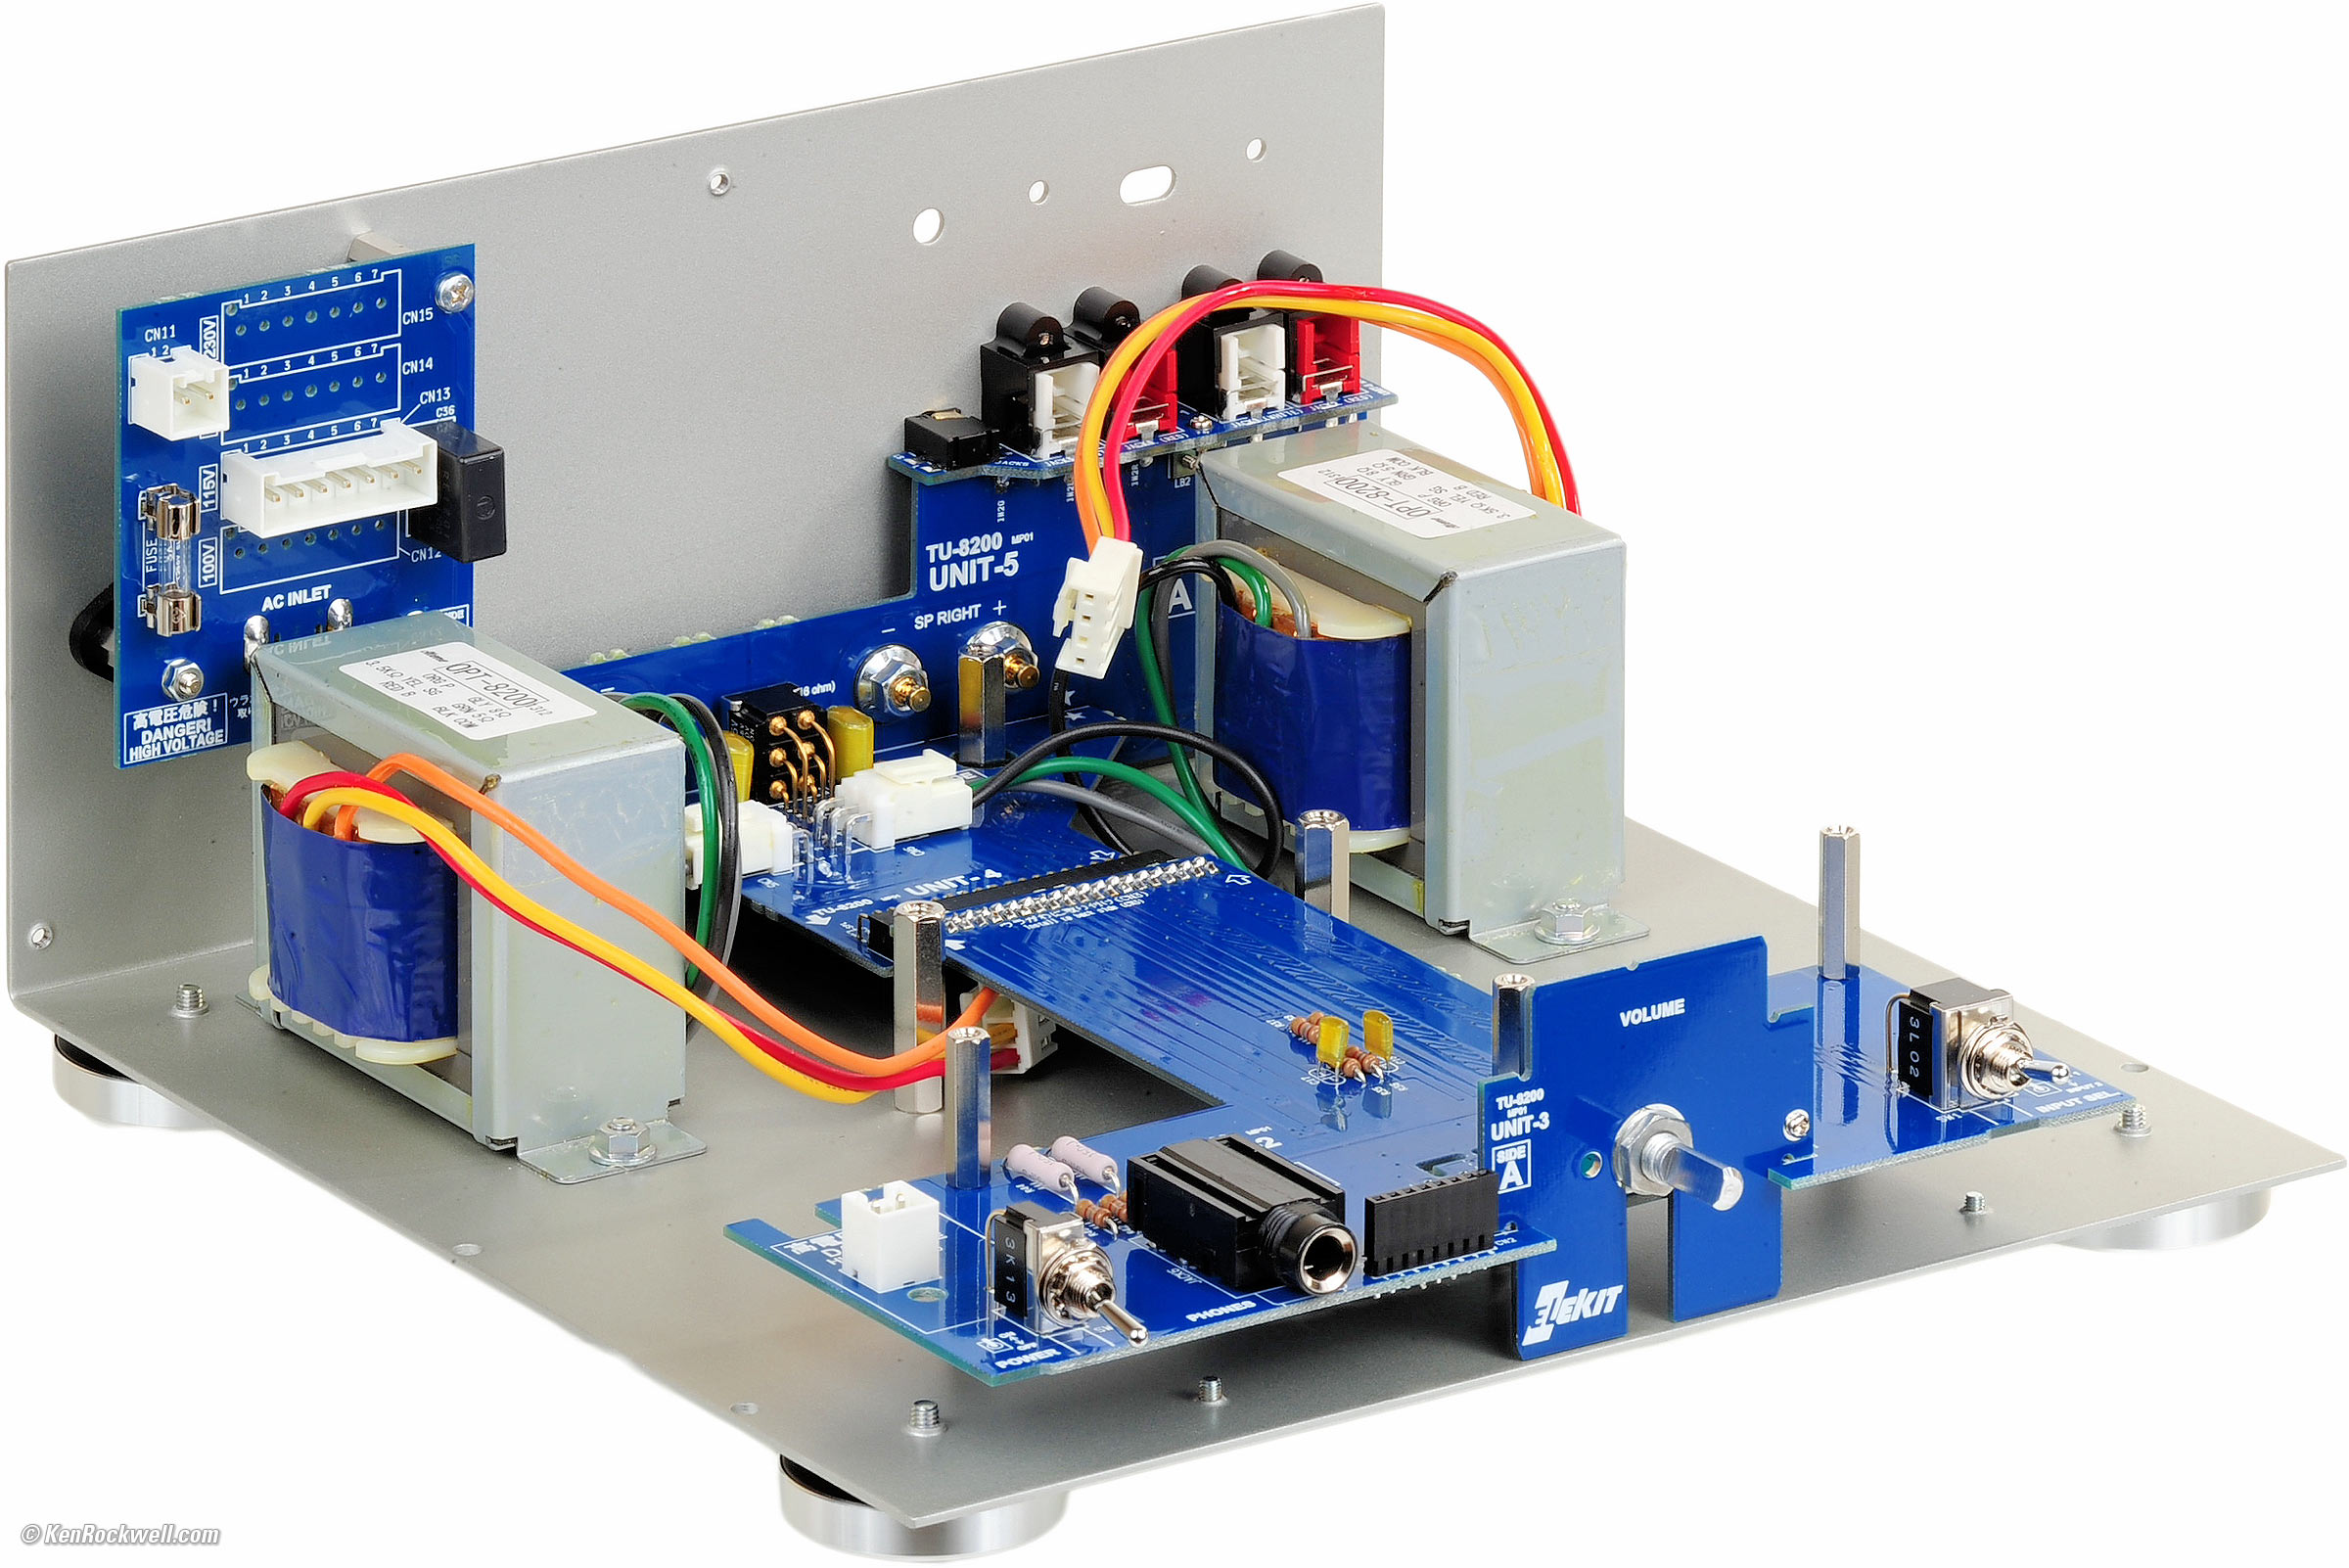
Chassis, sans main board, tubes and covers. Note white connector in one of four voltage-selector spots at top rear left for voltage selection. bigger.
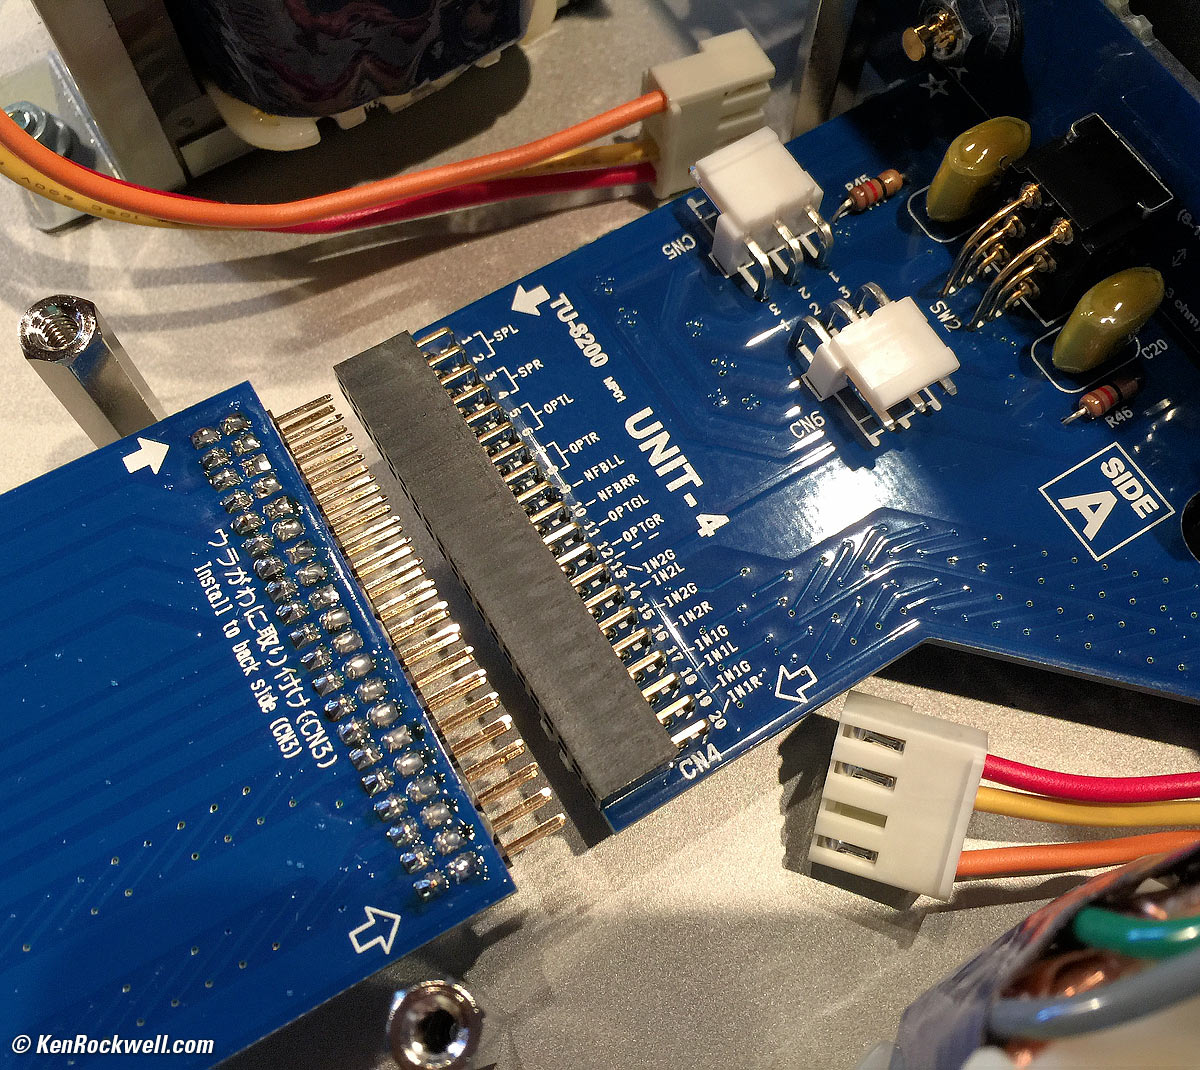
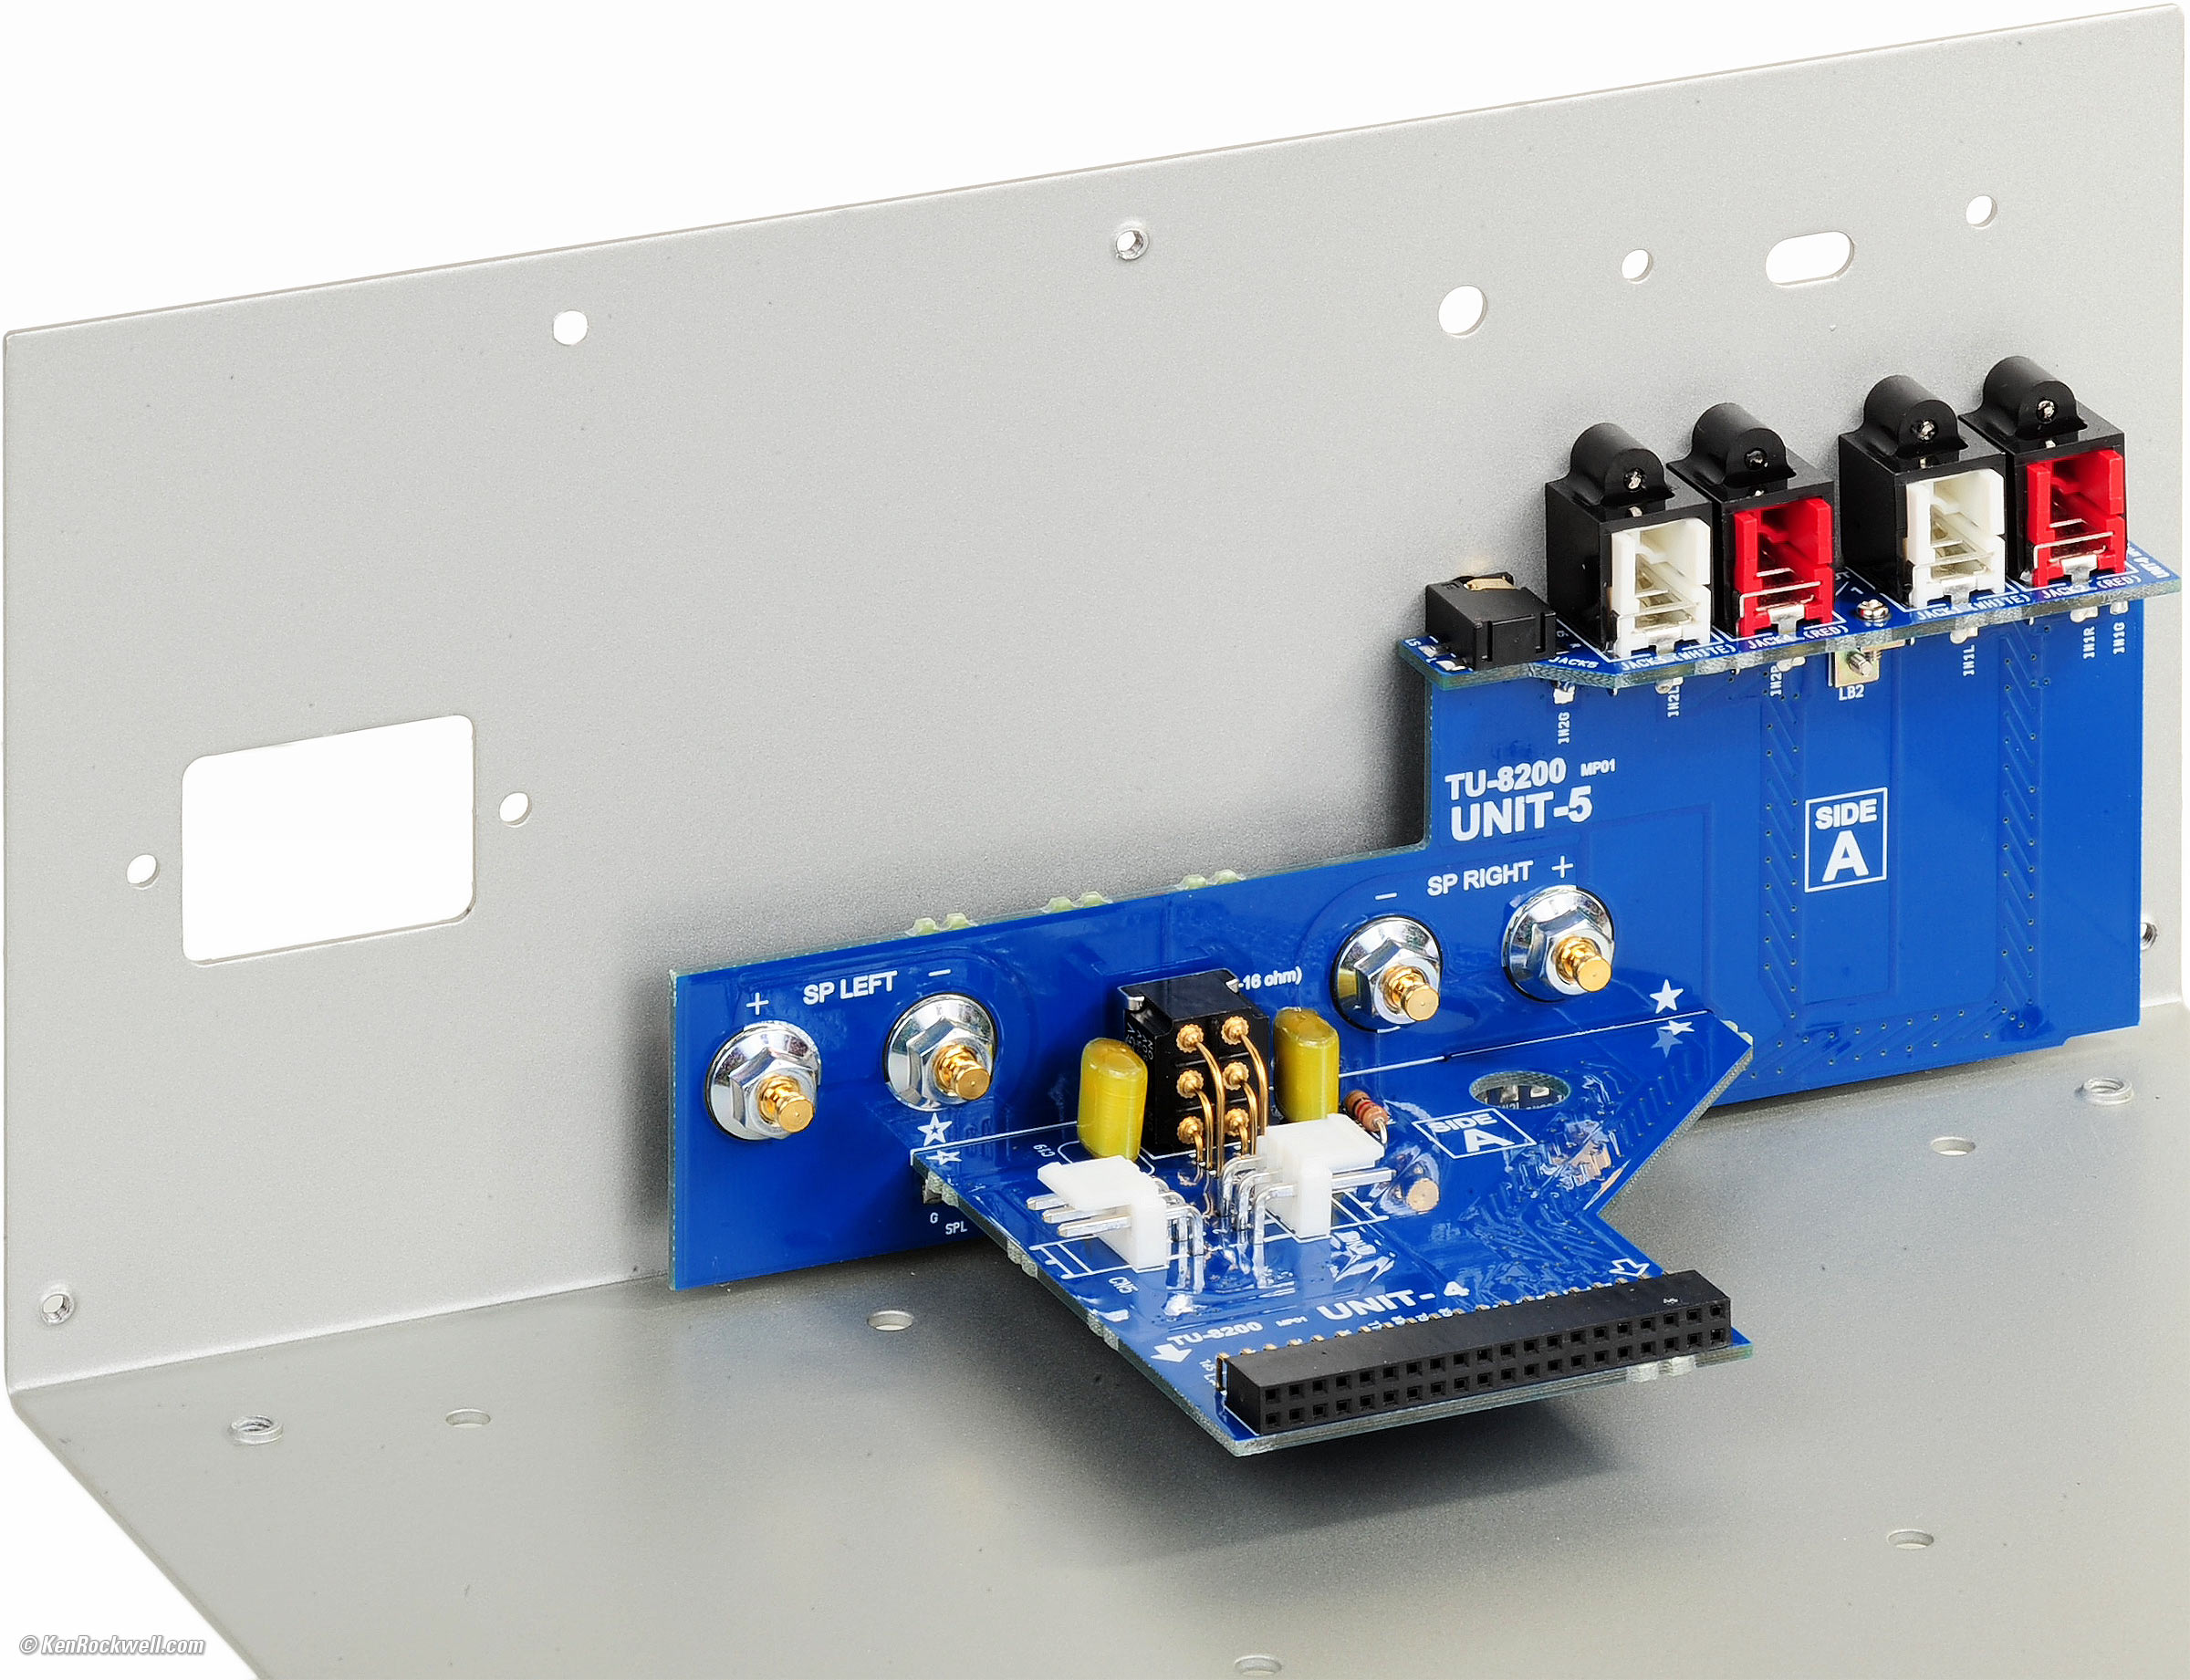
Joining Unit-2 to Unit-4. Be sure every pin is unbent so it doesn't break off when you mate them. bigger.
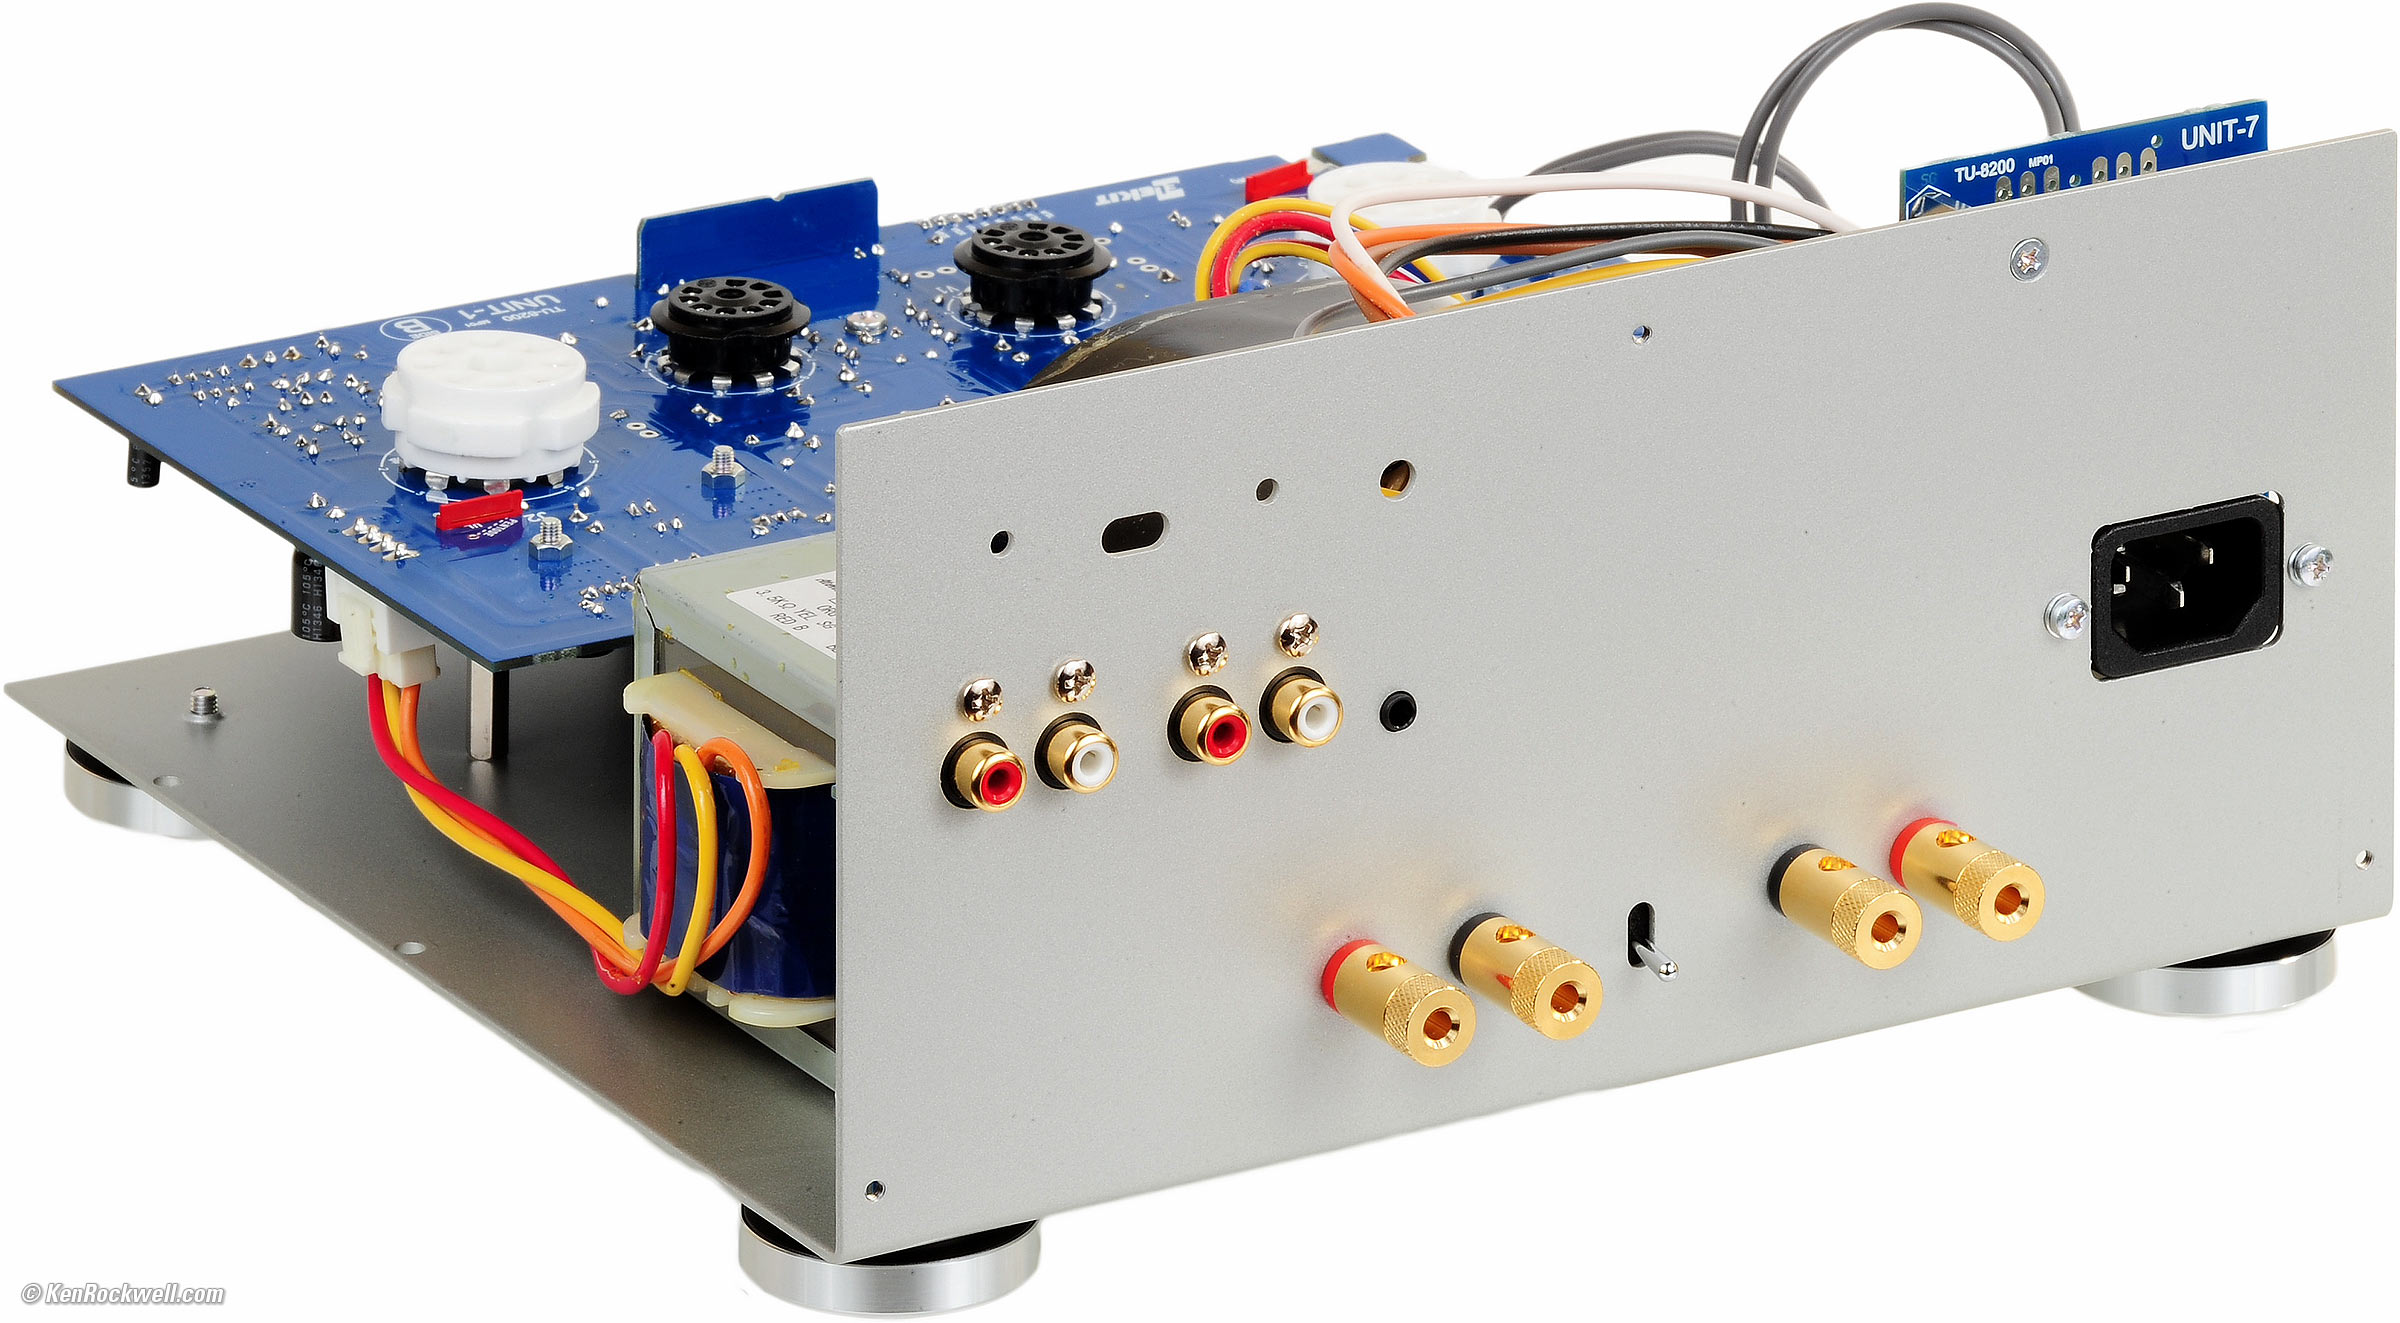
Completed chassis rear view, minus stickers, tubes and covers. bigger.
Completed chassis, minus tubes and covers. bigger.
Completed chassis, minus tubes and covers. bigger.
Top of completed case with stickers, minus tubes. bigger.
Lo and behold, I had the entire amplifier complete before church Sunday, after a total working time of 6 hours and 49 minutes, including photography:
Completed amplifier. bigger.
I don't know if most people would have completed it in under 7 working hours from box opening to finished amplifier, but I've done plenty of this before.
My kit worked the first time I turned it on. Bravo!
The only leftovers were some spare hardware and unused stickers. There are no extra electronic components.
I ran it through its tests and lab measurements on Sunday afternoon, and it works and sounds great.
Measurements top
Intro Specifications Assembly Measurements
Performance Usage Recommendations More
All measurements are in Ultra Linear mode.
Unless otherwise specified, all measurements are RMS at 1 kc at the 8Ω setting measured into an 8Ω load.
These measurements are made with an exotic Rohde & Schwarz UPL laboratory audio analyzer. The traces from the Rohde & Schwarz UPL are color coded for the Left Channel and for the Right Channel. When they don't lie on top of each other, it's due to channel imbalance. When they do lie on top of each other, the trace turns blue.
Input Level Gain Channel Tracking
Frequency Response Damping Factor
4Ω Loads 8Ω loads at 4Ω setting
Input Level measurements top
At maximum gain (volume):
8 Ω load at 8 Ω setting: 71 mV RMS for 1 W at 0.7% THD.
8 Ω load at 4Ω setting: 81.5 mV for 1 W at 0.3% THD.
4 Ω load at 4Ω setting: 68.1 mV for 1 W at 1% THD.
Gain measurements top
8 Ω load at 8 Ω setting
31.96 dB left, 32.06 dB right, at VOLUME MAX.
27.8 dB at 3 o'clock.
16 dB with volume at 12 o'clock.
0 dB with volume at 9 o'clock.
-84 dB at minimum.
8 Ω load at 4Ω setting
30.750/30.854 dB at VOLUME MAX.
4 Ω load at 4Ω setting
29.274/29.447 dB at VOLUME MAX.
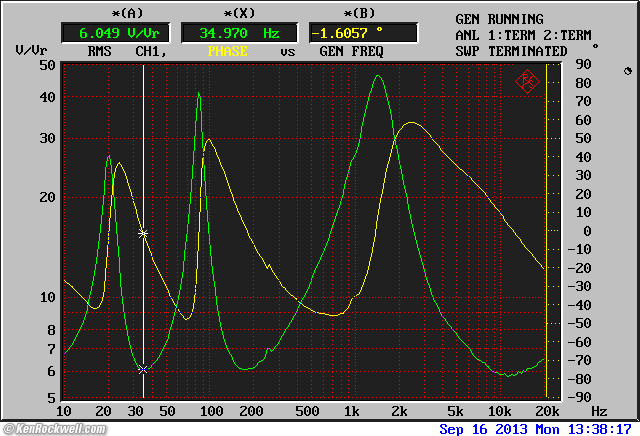
Channel Tracking measurements top
Channel tracking is excellent. The stereo image stays put regardless of the position of the volume control.
![]()
Elekit TU-8200 Channel Tracking (up means more gain on the left).
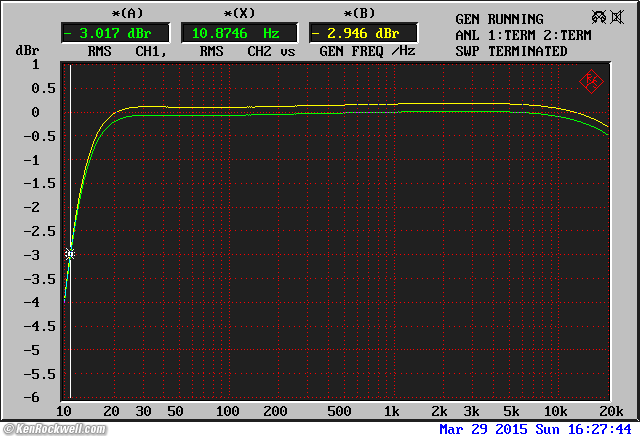
Frequency Response measurements top
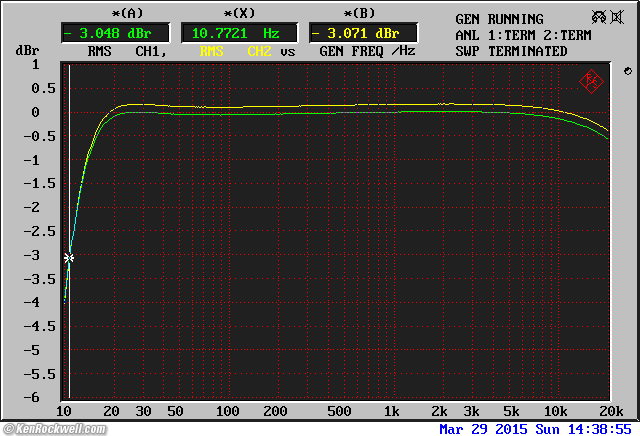
Frequency response at 100 mW into 8Ω.
Beautiful, it's only down a half a decibel at 16 cycles and at 20 kilocycles. This is better than the rated response of the McIntosh MC275, which is only 20 to 20,000 cycles at the same +0, -0.5 dB.
It's better than poor solid state designs like the Musical Fidelity M1PWR!
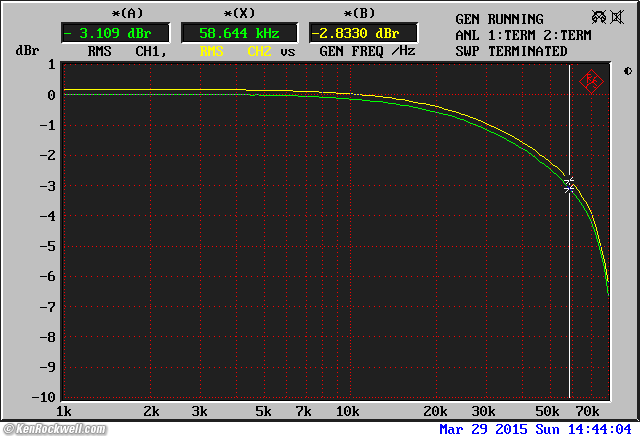
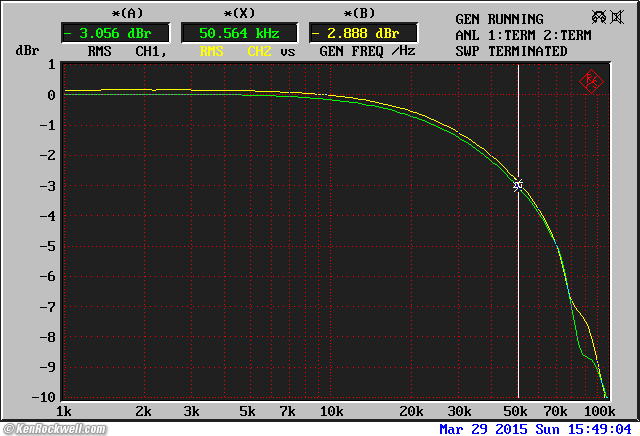
Ultrasonic frequency response at 100 mW into 8Ω.
Down 3dB at 58 kilocycles, which is perfect.
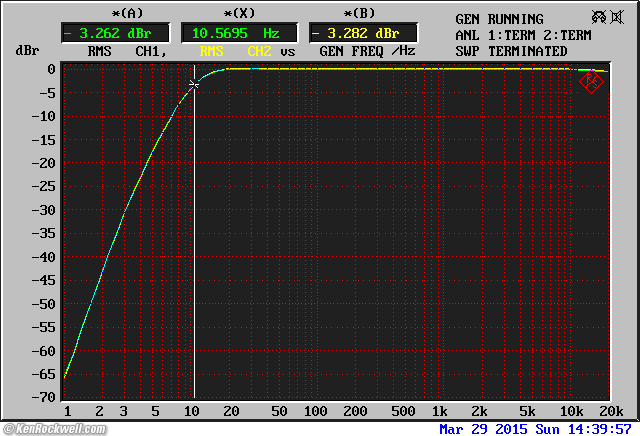
Infrasonic frequency response at 100 mW into 8Ω.
Down 3dB at 10.5 cycles and drops at about 24 dB/octave, which is perfect. We don't want infrasonic response in transformer-coupled tube power amps (which is 99% of them) because it saturates the output transformers.
Damping Factor measurements top
The output source impedance is relatively high, higher than bigger tube amps if you compare it to a McIntosh MC275, for instance.
At 1 kilocycle, the output source impedance is 2.93 Ω at the 8 Ω setting, which is a Damping Factor of 2.7.
At 1 kilocycle, the output source impedance is 1.88 Ω at the 4 Ω setting, which is a Damping Factor of 2.1 into 4Ω, 2.7 into 5Ω or 4.3 into 8Ω.
The damping factor at 50 cycles is essentially the same.
DC output source resistance is 0.52 Ω at the 8Ω setting.
DC output source resistance is 0.46 Ω at the 4 Ω setting.
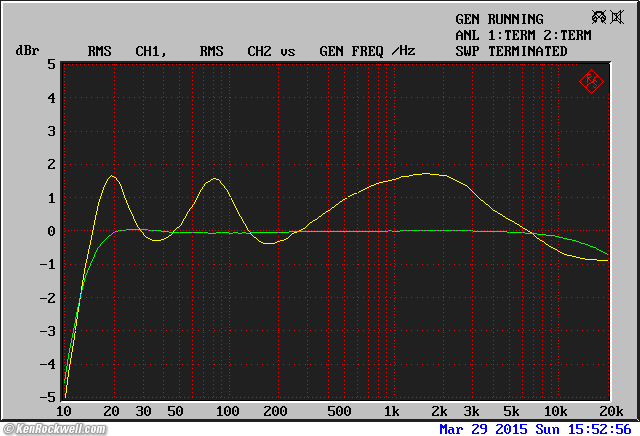
As with most tube amps, actual frequency response will vary when you connect a real loudspeaker instead of the purely resistive laboratory load I use in other measurements. As seen here with a real 8Ω loudspeaker driven from the 8Ω tap, response varies by ±1.5 dB:
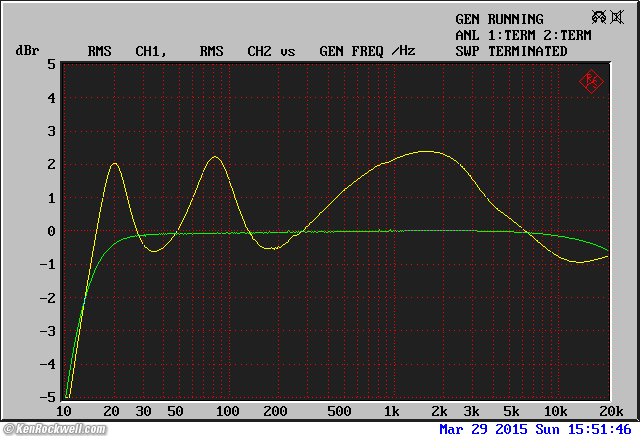
Frequency response driving an 8Ω resistor (green trace) and driving a real B&W CDM2 bookshelf loudspeaker (yellow trace), whose impedance varies between 6 and 45 Ω, a typical loudspeaker load.
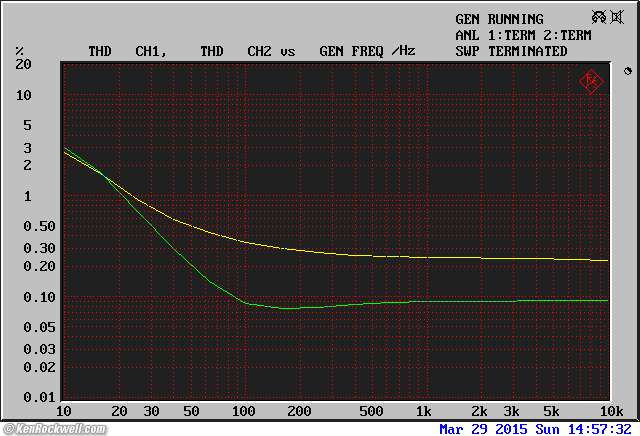
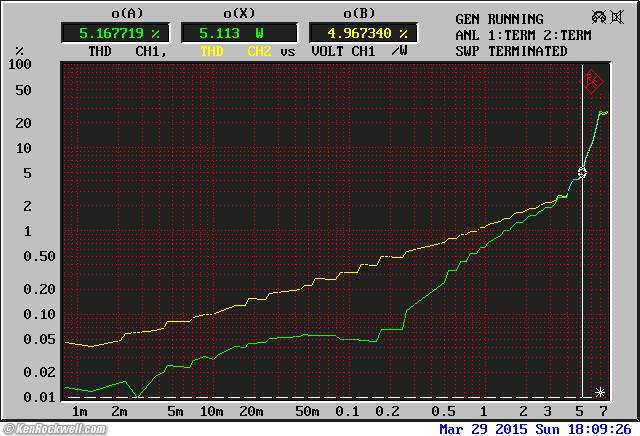
Distortion measurements top
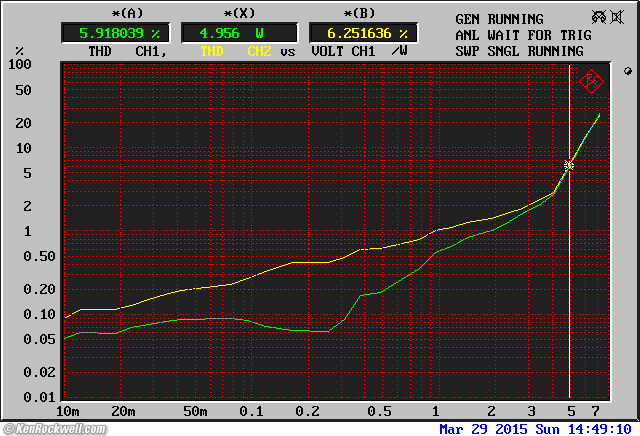
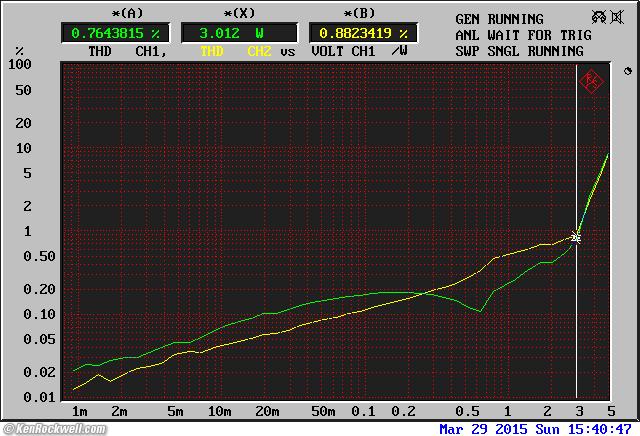
THD versus power.
While rated 8 WPC and delivering only a few watts at a few percent THD with sine waves, I see 30 W RMS come up at the onset of audible distortion with music.
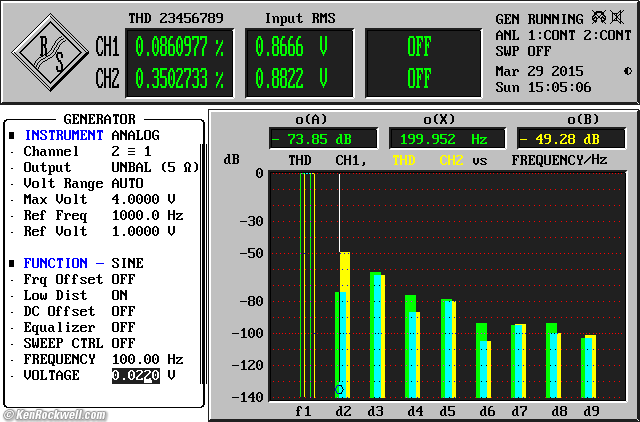
Harmonic distortion versus frequency at 1 mW output.
Harmonic distortion versus frequency at 10 mW output.
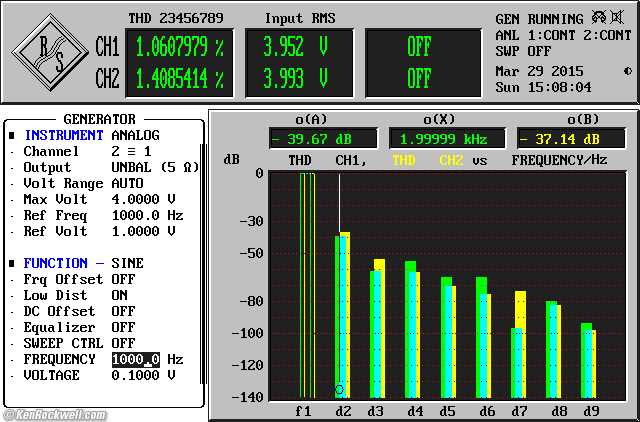
Harmonic distortion versus frequency at 100 mW output.

Harmonic distortion versus frequency at 1 W output.
This is more distortion than a much more powerful high-end tube amp like a McIntosh might have, but this distortion is mostly second-order at all levels, as we hope for in a tube amp. THerefore its distirtion is actually the euphonic distortion that makes tubes sound as good as they do.
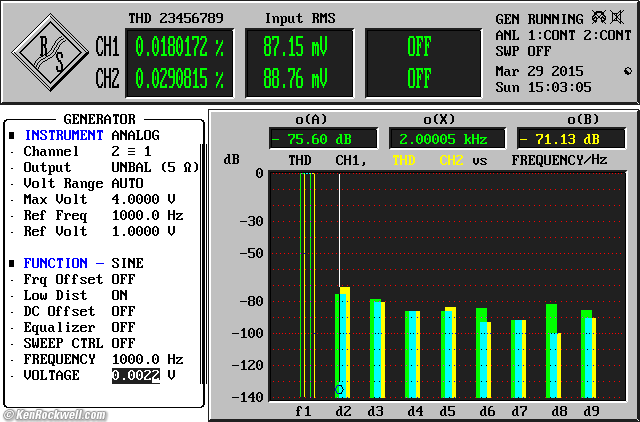
Harmonic distortion components at 1 mW.
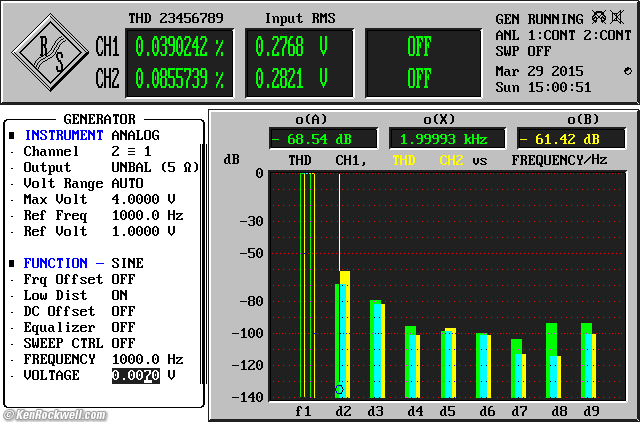
Harmonic distortion components at 10 mW.
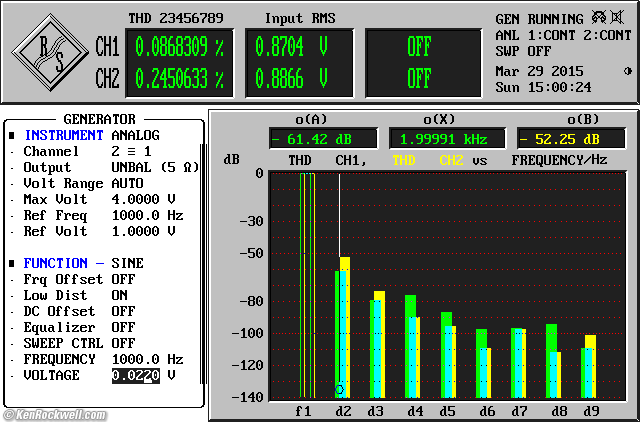
Harmonic distortion components at 100 mW.
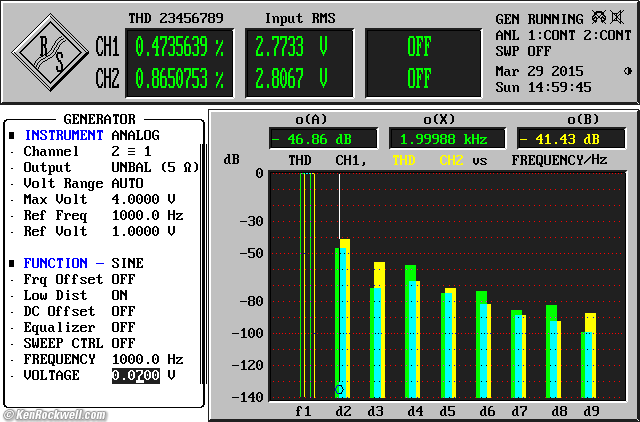
Harmonic distortion components at 1 W.
Harmonic distortion components at 2 W.
Harmonic distortion components at 100 cycles at 100 mW.

Harmonic distortion components at 100 cycles at 1 W.
19 + 20 kilocycle difference-frequency distortion at 100 mW.
19 + 20 kilocycle difference-frequency distortion at 1 W.
Noise measurements top
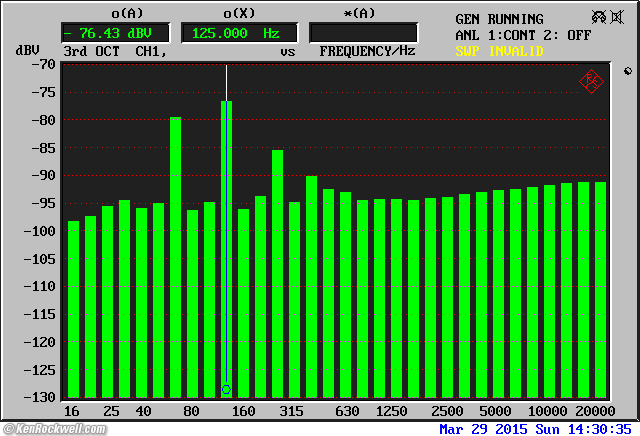
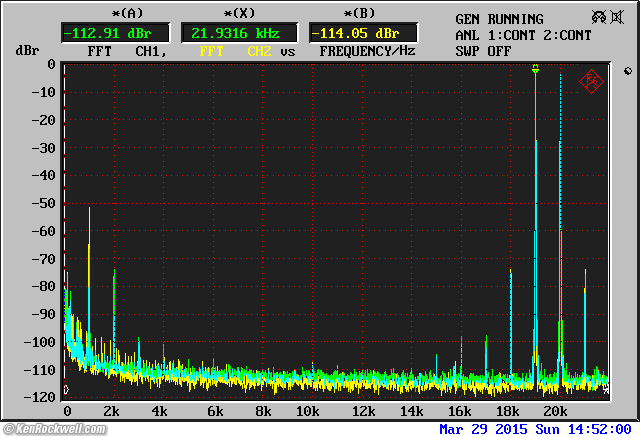
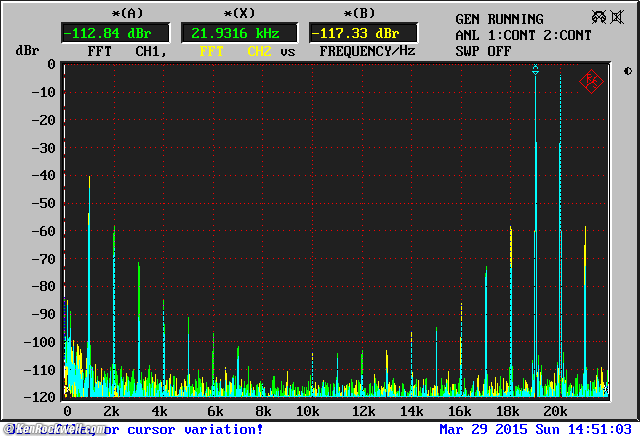
Output noise spectrum.
A Weighted |
Unweighted 22kc BW |
|
MAX |
-82 dBV A |
-76 dBV |
12 o'clock |
-81 dBV A |
-76 dBV |
MIN |
-83 dBV A |
-77 dBV |
This is much quieter than the solid state Musical Fidelity M1PWR, ha!
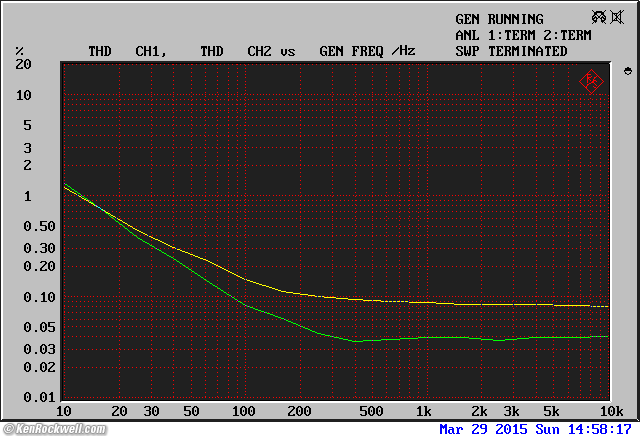
4Ω loads measurements top
I didn't expect to see much difference driving a 4 Ω load at the 4 Ω setting, and I didn't. The 4 Ω setting is actually a 5 Ω tap labeled "4 ~ 6.3 Ω," so we see the results of a load slightly lower impedance than the target tap. No big deal.
Frequency response, 4Ω load at 4Ω setting.
THD versus output power, 4 Ω load at 4 Ω setting.
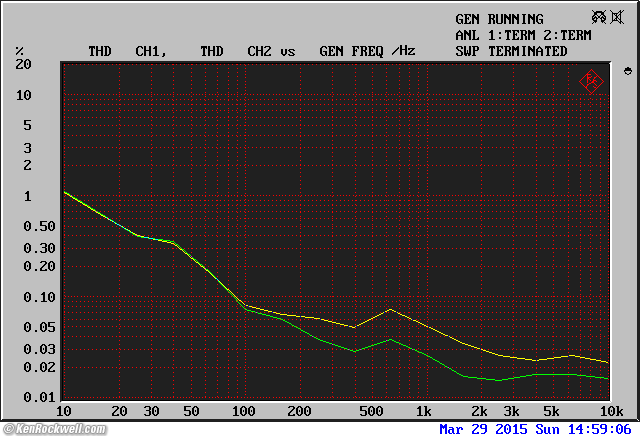
8Ω loads at 4Ω setting measurements top
AHA!!! This is the ticket: it delivers 95% as much power from the 4 Ω tap into 8 Ω, while the distortion is lower at all power levels except the very maximum.
The tip is to run this amplifier at the 4 Ω setting all the time, unless you've got 16 Ω speakers like Quad ESLs.
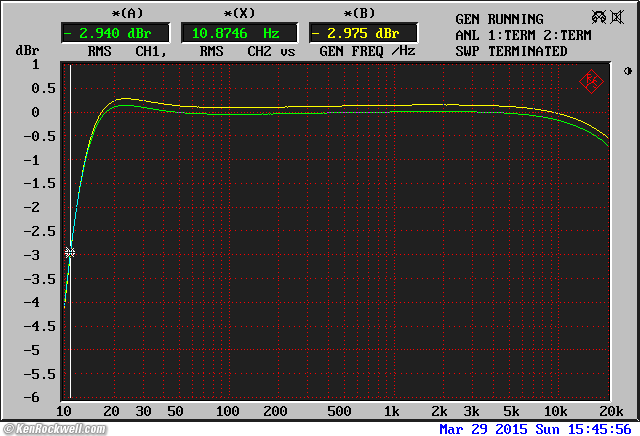
Frequency response, 8Ω load at 4Ω setting.
A tenth of a decibel boost at 23 cycles, which is a good thing.
Ultrasonic frequency response, 8Ω load at 4Ω setting.
The -3 dB point drops from 58 kilocycles to 50 kilocycles, swell. Personally I prefer to limit my system bandwidth to not more than 40 kilocycles.
THD vs. power, 8Ω load at 4Ω setting.
And here's the kicker: distortion is lower into an 8Ω load with the 4Ω tap at all levels, even near maximum output at 3 watts.
Set to 4Ω: Frequency response driving an 8Ω resistor (green trace) and driving a real B&W CDM2 bookshelf loudspeaker (yellow trace), whose impedance varies between 6 and 45 Ω, a typical loudspeaker load.
And here's the other kicker: the output source impedance is obviously lower at the 4Ω setting, so frequency response driving a real 8Ω loudspeakers is flatter than at the 8Ω setting.
At the 4Ω setting, the response is now flat to ±1 dB, not ±1.5 dB as it is at the 8Ω setting with this real CDM2 loudspeaker.
Actual Power Consumption measurements top
My Elekit TU-8200 draws 64 watts regardless of output level.
It draws only 55 watts at full power with continuous sine waves into a test load, but you'd never do that to your speakers.
It draws only 20 W for the first 20 seconds as it's warming up, then 65 watts (0.71A at 117 VAC) after it's warmed up in 30 seconds.
Power consumption will vary with line voltage; only some of the voltages are regulated.
The case barely gets warm since the tubes are far enough away.
Performance top
Intro Specifications Assembly Measurements
Performance Usage Recommendations More
Sound
As covered in the Introduction, the TU-8200 is fluid and mellifluous. It's magnificent for choral, piano, orchestral and vocal works, and also super-smooth for pop music. It makes great music sound even better; that's the whole point of the euphonic distortions added by tube amplifiers.
The sound is smooth, detailed and refined just like the original performance in the concert hall, it doesn't sound like a recording.
The stereo image is very well defined and everything is razor-sharp in its placement across the stage. The center image is tight, and the soundstage is deep.
It sounds great reproducing any kind of music, and has plenty of power as I used it with real speakers at close distances.
It sounds fantastic with my B&W Matrix 805 on my desk. It sounds just as good with my B&W 802 Series III in my medium room, again at close range with near-field EQ. I can listen for hours and not want to stop; with my 802s I was transported someplace so far away by my music that I didn't even know where I was for a few hours. It was thoroughly hallucinogenic; it's good enough to send me into a trancelike state for hours.
It sounds swell full range, although I usually biamplify with a pair of stereo subwoofers. This reduces the work on this 8 WPC amp and lets the subwoofers do much of the heavy lifting, since I use an active crossover to cut the bass sent to this amp and main speakers.
It's silent; there is no audible mechanical or electrical noise or hum, even used on my desk. There are some microphonics and some "singing," but these aren't audible by themselves.
The channels track perfectly; the stereo image never shifts at different volume settings.
It's much more transparent and cleaner then the TubeCube | 7, while the TubeCube is fuzzier and more tubey. The TU-8200 is mellifluous and liquid, too, but clearer.
With Headphones
Plug in headphones, and the speakers cut off.
It sounds great with 300Ω Sennheiser HD-650. It's smooth, clean and has loads of gain and output.
Low impedance headphones are too sensitive. My beyerdynamic T51i are so sensitive that they will hear some hum and noise, but the sound it still glorious. The T51i are best plugged directly into your iPhone, which has one of the best output amplifiers around for low-impedance headphones.
You will hear microphonics as you plug in your headphones. The sound of tubes clanking around is actually the microphonic pickup reproduced through your headphones as you plug them in! Tap the amp and you'll hear it through your headphones; this is normal.
Feel
This is a solid little amplifier, with well made corners that look sharp, but feel soft. This Japanese product has quality metalwork, too.
The big, solid volume control glides as smoothly as silk. This feels like the premium product it is.
The volume control feels and the channels track much, much better than the one in my Benchmark DAC1 HDR, for instance.
Usage top
Intro Specifications Assembly Measurements
Performance Usage Recommendations More
Power
Use any standard IEC or HP power cord.
There is a unique power cord included with a green ground wire at the plug instead of a ground pin. This "cheater" cord lets you lift the ground to prevent ground loops that could cause hum or oscillation. I haven't tried it.
Feet
The feet are nice, big rubber feet that you can put on anything.
Connections
Use standard 3/4" spaced dual banana MDP plugs for the output.
Always use insulated plugs, never metal ones that can be accidentally shorted.
NEVER run the amplifier without speakers or headphones connected. Running a tube amp with nothing connected to it is the best way to destroy it; tube amps do not like being run into open circuits.
If you insert a 3.5mm plug, it overrides the RCA jacks for INPUT 2.
Impedance Selector
It turns out that even into an 8Ω resistor, the 4 Ω setting gives about the same power output as the 8Ω setting, but with much less distortion. It also give better damping and flatter real-world response with real speakers.
Therefore I run this amplifier at the 4Ω setting all the time, unless I'm running 16 Ω speakers like Quad ESLs.
Volume Control
It has so much gain that you may amplify any hum or noise in your preamplifier or wiring. I run my TU-8200 from a preamplifier, and set the TU-8200 volume control straight up at the 12 o'clock position.
You can run it directly from a CD, DVD, SACD, iPhone or any line-level source as well. In these cases, set the level on the source device at maximum and control the volume with the TU-8200's control.
Warm Up
Let the amp warm up for about a minute before you start beating on it.
When turned on, the music starts after about 25 seconds, which is the same as other tube amps.
After a few months of use, it now makes music 15 seconds after turn-on. As always, give it a few minutes if you really want full output.
Tubes hurt
While the amp case gets only a little warm, all vacuum tubes get hot enough to cook on.
I shouldn't have to tell you, but if you're new to tubes, NEVER touch a tube that's been on recently; you'll burn your fingers.
Operating Mode
I left it in Ultra Linear, which gives the benefits of each of the other modes.
To select Pentode (more distortion) or Triode (less power) mode, you have to disassemble the amplifier case and move two jumpers. I didn't try either of these.
Biamplification
Biamplification greatly lowers the power needed, especially with a high crossover frequency like 150 cycles.
I use an active crossover so that only the upper frequencies are passed to this amplifier and my main speakers. The crossover feeds the low frequencies to my stereo subwoofers, excusing this baby amplifier from needing to provide that power.
This is a classic win-win situation, and why all pro systems are multi-amplified: by excusing this amp from having to power the lows, it can work its magic on everything else with none of the strain of having to power the bass as well.
Monoblock operation (for engineers ONLY)
There is no MONO mode, but here's how I'd do it.
DO NOT try this unless you are an electrical engineer skilled in analog circuit design.
I haven't tried this, so good luck. This should let you get two amps for only $1,400 and get 16 watts of pure class A tube power per channel.
Completely unlike solid-state stereo amps that are run in bridge mode for mono, tube amp outputs are connected in parallel for mono, taking advantage of their finite output impedances to keep them from blowing up.
For each channel:
1.) Use an RCA Y-cord to feed both channels the same input.
2.) Set the speaker impedance switch to 8 ~ 16 Ω.
3.) Use two more MDP plugs connected together with a short length of zip cord to short both outputs together (connect them in parallel).
4.) The outputs paralleled together will now drive a 4 ~ 8 Ω load to about twice the power as one channel would.
5.) If set to 4 ~ 6.3 Ω, the outputs in parallel should be happy driving a 2 ~ 3.2 Ω load. Seeing how the 4 Ω setting is better for driving 8Ω speakers than the 8Ω setting, I haven't experimented here to see if it's also better for 8 Ω loads in mono mode.
6.) Repeat for the other amplifier to drive the other channel.
Service
The main board screws to the chassis via one screw on the board behind volume control (hole marked SG in gray, between two black driver tube sockets), and two more hidden screws.
The hidden screws are inside the two white porcelain octal sockets. You only can see them with the power tubes removed.
In other words, if you don't pull out the power tubes, you will never be able to remove the main board from the chassis!
Recommendations top
Intro Specifications Assembly Measurements
Performance Usage Recommendations More
The Elekit TU-8200 is fun to build, and costs much less than similar assembled amplifiers from tweak suppliers. It's much, much better made than junk imported from China; this is a premium product.
If you're reasoable with your power needs and playback levels, you can save yourself from having to pay the big bucks for a higher-powered amplifier from McIntosh and get the same sound. As I was writing this review I got a McIntosh MC240 for comparison, which has more hum and otherwise sounds about the same at low levels - but costs three or four times as much, used! This Elekit uses DC for the low-level heaters and hads no hum, while the McIntosh uses AC for all heaters and has a little hum.
THis is a superior amplifier for desktop use. It has loads of power for nearfeild monitorring, and no audible noise or hum, and the volume control is a dream to touch.
It's stable and works and sounds great. If you want magical sound, tubes are the way to go and this amplifier delivers. Most top albums are recorded with microphones that use tube pre-preamps inside their cases and then use outboard tube preamps just before being fed to an ADC to be recorded digitally for the same reason: tubes just sound better when it comes to making music.
This is a practical purchase since it uses easy to find tubes, and automatically optimizes itself for them. You won't have to waste your music time fiddling with bias and tube matching as you do on most other amps. The only other amp of which I know that shares self-biasing and no need for tube matching is the McIntosh.
I can't think of any other way to get sound this good for this little.
Enjoy!
Ken.
More Information top
Intro Specifications Assembly Measurements
Performance Usage Recommendations More
See the Elekit TU-8200 Assembly Manual for kit assembly instructions, specifications, the schematic diagram and usage and connection instructions.
© Ken Rockwell. All rights reserved. Tous droits réservés. Alle Rechte vorbehalten. Ken Rockwell® is a registered trademark.
Help Me Help You top
I support my growing family through this website, as crazy as it might seem.
The biggest help is when you use any of these links when you get anything. It costs you nothing, and is this site's, and thus my family's, biggest source of support. These places always have the best prices and service, which is why I've used them since before this website existed. I recommend them all personally.
If you find this page as helpful as a book you might have had to buy or a workshop you may have had to take, feel free to help me continue helping everyone.
If you've gotten your gear through one of my links or helped otherwise, you're family. It's great people like you who allow me to keep adding to this site full-time. Thanks!
If you haven't helped yet, please do, and consider helping me with a gift of $5.00.
As this page is copyrighted and formally registered, it is unlawful to make copies, especially in the form of printouts for personal use. If you wish to make a printout for personal use, you are granted one-time permission only if you PayPal me $5.00 per printout or part thereof. Thank you!
Thanks for reading!
Ken.